


Overview
Source:
Alexandra Duncan, GTA, Praxis Clinical, New Haven, CT
Tiffany Cook, GTA, Praxis Clinical, New Haven, CT
Jaideep S. Talwalkar, MD, Internal Medicine and Pediatrics, Yale School of Medicine, New Haven, CT
Providing comfortable speculum placement is an important skill for providers to develop, since the speculum is a necessary tool in many gynecological procedures. Patients and providers are often anxious about the speculum exam, but it is entirely possible to place a speculum without patient discomfort. It's important for the clinician to be aware of the role language plays in creating a comfortable environment; for instance, a provider should refer to the speculum "bills" rather than "blades" to avoid upsetting the patient.
There are two types of speculums: metal and plastic (Figure 1). This demonstration utilizes plastic, as plastic speculums are most commonly used in clinics for routine testing. When using a metal speculum, it's recommended to use a Graves speculum if the patient has given birth vaginally, and a Pederson speculum if the patient has not. Pederson and Graves speculums are different shapes, and both come in many different sizes (medium is used most often). Prior to placing a metal speculum, it is helpful to perform a digital cervical exam to assess for the appropriate speculum size. The depth and direction of the cervix is estimated by placing one finger into the vagina. If the patient's cervix can be located while the patient is seated, it is likely that the patient has a shallow vagina, and therefore should be most comfortable with a short metal speculum.
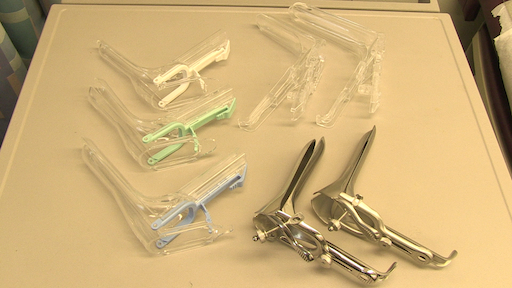
Figure 1. A photograph of commercially available speculums in different sizes.
Plastic speculums are all shaped like Pederson metal speculums and come in different sizes. To assess the appropriate size for a plastic speculum, the examiner places two fingers in the patient's vagina, palm down, and tries to separate the fingers: if there is no space between the fingers, a small plastic speculum should be used; if there is space between the fingers, a medium one should be used. The exam should never be performed with a large speculum (as it is significantly longer) without first determining the length of the vaginal canal.
The speculum is used to perform the Papanicolaou test as part of cervical cancer screening examinations. Cervical cancer was once the leading cause of cancer deaths for women in the United States, but in recent decades the number of cases and deaths has declined significantly1. This change is credited to the discovery made by Georgios Papanicolaou in 1928 that cervical cancer could be diagnosed by vaginal and cervical smears. The Pap test, as it is now called, detects abnormal cells in the cervix, both cancerous and pre-cancerous. Current guidelines for recommended screening intervals can be found through the U.S. Preventive Services Task Force (USPSTF) website2.
The test can be performed using either 1) a conventional glass slide and fixative with a spatula and endocervical brush (the traditional "Pap smear") or 2) the more commonly utilized liquid-based cytology with a cervical broom or a spatula and endocervical brush (Figure 2). No matter what tools are used, the samples are collected from just inside the external os and the squamocolumnar junction, or transition zone around the os (Figure 3). This video demonstrates the spatula and endocervical brush with liquid-based cytology, as the liquid preparation is a more effective technique for the detection of cervical lesions, and the spatula and endocervical brush improve specimen collection.

Figure 2. Pap smear tools. Shown in sequence are: a liquid cytology canister, cervical broom, spatula, and endocervical brush.
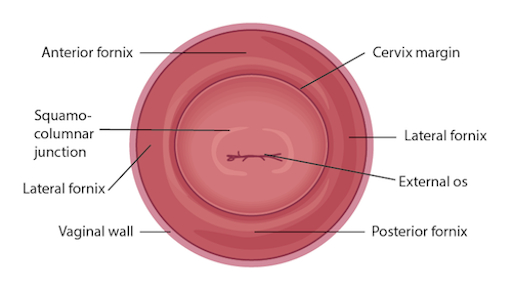
Figure 3. Diagram of the cervix withrelevant structures labeled.
Procedure
The speculum exam begins immediately after the end of the external genitalia exam; therefore, the patient already has provided a history and is in the modified lithotomy position. Make sure the patient is seated at the end of the table, as the speculum cannot be fully inserted any other way.
1. Preparation
- Lay out the supplies for the Pap test.
- Label the liquid cytology canister with the patient's information.
- Unscrew the lid of the canister until it is resting on top and can be lifted off.
- Place the speculum in your non-dominant hand and position your index finger above the bills, your middle finger below the bills, and your thumb on the back of the speculum (Figure 4).
- Use your dominant hand to spread the water-based lubricant (or warm water, otherwise) on the outside of the bills.
- Introduce the speculum and let the patient know what to expect: "This is a speculum. These are the bills, which I will be placing into your vagina to view your cervix and take some samples. This is the handle, which will not be inserted."

Figure 4. How to hold a plastic speculum.
2. Insertion
- As always, introduce your touch to the patient before beginning the exam.
- Let the patient know you are about to place the back of your hand on the patient's thigh and will then begin the exam.
- Place the back of your hand on the inside of the patient's thigh, over the drape, then begin to examine: this prepares the patient and starts with non-invasive contact, which may help put the patient at ease.
- Using the pads of the index and middle finger of your dominant hand, separate the labia minora just above the perineum to get a clear view of the vaginal introitus.
- Guide the patient through a relaxation technique: "I'm going to teach you how to make this more comfortable for yourself. Please take a deep breath in, and as you exhale, bear down as if you are making a bowel movement. (If the patient doesn't understand this, ask the patient to push against your fingers.)"
- As the patient bears down, the vaginal introitus opens. Let the patient know, "You'll feel me inserting the speculum."
- Smoothly insert the speculum about halfway into the vagina at an oblique angle (roughly 45°), angling the bills below where the cervix is expected to be (based on the digital exam) while maintaining posterior pressure.
- Use the first two fingers of your dominant hand to clear the labia on one side, so the labia are not tugged along with the speculum.
- Use your dominant hand to clear the labia on the other side.
- Bring your non-dominant hand to the bottom handle of the speculum, rotate the speculum flat, and insert fully, until the handle is flush against the patient's pelvis and perpendicular to the floor.
- Place one finger of your dominant hand inside the bills of the speculum, and use the finger to apply strong posterior pressure as your non-dominant hand pulls down on the handle of the speculum at the same time. Apply enough posterior pressure so space in the vagina can be seen above the speculum.
- Place the thumb of your non-dominant hand on the thumb lever, and smoothly depress.
- Do not continue to depress once resistance is met, or you may open the bills too far and cause the patient discomfort.
- Hold the speculum steady and check to see if the cervix has been located.
3. Pap test
- If there is enough discharge on the face of the cervix to obscure the os and interfere with specimen collection, use a large cotton-tipped swab to gently clear excess cervical mucous.
- Use your dominant hand to pick up the spatula (or have the chaperone hand it to you).
- Insert the spatula into the vagina, being careful not to let it touch the walls, until the long end rests in the os and the depression and short end are pressed against the squamocolumnar junction.
- Rotate 360°, maintaining consistent pressure and contact with the exocervix.
- Remove the spatula, being careful not to touch the walls of the vagina.
- Place the spatula into the open canister and thoroughly rinse by swirling vigorously in the liquid (different brands of liquid-based cytology recommend swirling for different lengths of time; be familiar with the manufacturer's recommendation before beginning).
- Discard the spatula, or place it back on the tray.
- Use your dominant hand to pick up the endocervical brush.
- Insert the endocervical brush into the vagina, being careful not to let it touch the walls, and gently insert it into the os until only the bottom bristles are exposed.
- Slowly rotate 180° in one direction. Do not over-rotate.
- If using a cervical broom, rather than an endocervical brush and spatula, insert the broom until the center bristles are in the os and the shorter bristles rest on the squamocolumnar junction, then rotate five full times in one direction before removing.
- Remove the brush, being careful not to touch the walls of the vagina.
- Place the endocervical brush into the open canister and thoroughly rinse by swirling vigorously and pressing it repeatedly against the sides of the canister to release material.
- Discard the endocervical brush.
- Replace and tighten the lid of the cytology canister.
4. Removing the speculum
- Place your non-dominant thumb on the thumb lever and maintain pressure while releasing the locking mechanism.
- Continue to hold the thumb lever down, and remove the speculum to about an inch out to allow the cervix to clear the tip of the bills.
- Completely remove your thumb from the lever and place it on the handle of the speculum.
- Rotate the speculum 45° while smoothly removing it the rest of the way out, allowing the vaginal walls to close the bills.
- Place your dominant hand underneath the speculum to catch any discharge.
- Discard the plastic speculum, if disposable.
The speculum exam is used in a wide variety of gynecological procedures and can provide a wealth of diagnostic information. The speculum is a bivalve instrument, which is utilized for separating the walls of the vaginal canal. This not only allows for visual inspection of the cervix, but also provides an access to this region for specimen collection during diagnostic procedures such as the Papanicolau, or Pap test, which is performed to check for any precancerous changes. This video will illustrate the proper technique of using the speculum for cervical inspection, and the appropriate method for collection of samples for the Pap test.
Let's begin with the review of the steps involved in prepping for the speculum exam and the Pap test, followed by a discussion of what a physician should look for while inspecting the cervix through the speculum. There are different types of commercially available specula. Some are made up of disposable plastic, while the metal ones are reusable. In this demonstration, we will use a plastic speculum.
Before starting the exam, it is essential to familiarize yourself with the instrument to be used and understand how it functions. After that you shall begin with the exam. Remember, this procedure usually comes after the external pelvic inspection, so at this point the patient history has been obtained, and they are already in the modified lithotomy position.
Make sure that the patient is seated at the end of the table to allow compete insertion of the speculum. Also lay out the supplies for the Pap test, including a cytology canister; lubricant squeezed onto a clean tray with a liner, and a spatula and endocervical brush OR just a cervical broom to collect the cell sample.Label the liquid cytology canister with the patient's information. Then unscrew the lid of the canister until it is resting on top such that it can be easily lifted off.
It is essential to understand how to hold a speculum. In case you're using a plastic speculum, place it in your non-dominant hand and position your index finger above the bills, your middle finger below the bills, and your thumb on the back of the speculum, avoiding the thumb lever as that would open the speculum. Using your dominant hand spread the water-based lubricant on the outside of the bills. Show the speculum to the patient without pointing it directly at them, and let them know what to expect during the exam, "Dialogue".
Start by letting the patient know that you will first place the back of your hand on their thigh. This is done to prepare the patient for the exam by establishing a non-invasive contact first. Now separate the labia minora with the dominant index and middle finger pads to get a clear view of the vaginal introitus. Next, explain the relaxation technique to the patient, "Dialogue". The vaginal introitus should open up as the patient bears down. Let the patient know that you are about to insert the speculum, "Dialogue" and place it halfway into the vaginal canal, keeping the bills at about 45° angle. Next, bring your non-dominant hand to the bottom handle and rotate the speculum flat, while simultaneously clearing the labia on both sides. Then angle the tip of the bills toward the floor and insert fully, such that the tip ends up below the cervix. Stop when the speculum is flushed against the patient's pelvis.
Next place one of the dominant fingers inside the bills and apply strong posterior pressure while pulling down on the handle with the other hand until it is perpendicular to the floor. Make sure you apply enough pressure to see the space above the speculum. Now, while maintaining posterior pressure with the finger inside the speculum, you can smoothly depress the thumb lever to open the bills. Stop once resistance is met. Then engage the lock by pushing the thumb lever up one or two clicks and remove the finger from inside the speculum. Hold the speculum steady and, using a light source, check if the cervix is visible. Note the tone, color, and position of the cervix and observe for discharge, lesions, polyps, ulcerations, and masses.
You can visually inspect the lower intravaginal part of the cervix. This includes the exocervix, which is normally 2-3 cm in diameter, pink in color, and has a smooth surface; the external os, which is the opening of the endocervix into the vagina; and the four fornices, which are the recesses between the cervix margin and the vaginal wall.
After the visual inspection of the cervix, proceed to collecting samples for the Pap test. With the speculum still in place, insert the spatula into the vagina, being careful not to touch the walls. Position the spatula with its long end in the os, and the short end pressed against the junction. Now rotate it 360°, while maintaining consistent pressure and contact with the exocervix. Carefully remove the spatula avoiding the vaginal walls. Place the spatula into the open cytology canister and thoroughly rinse it by vigorous swirling in the liquid following the manufacturer's instructions. Next, insert the endocervical brush into the vagina avoiding contact with the walls. Push the brush into the os until only the bottom bristles are exposed and then slowly rotate it 180° in one direction. Do not over rotate. Carefully remove the brush avoiding the walls, and place it into the cytology canister. Thoroughly rinse the brush by vigorous swirling and press it repeatedly against the sides of the canister to release material. Instead of using both spatula and brush, one can use just the endocervical broom, which has different sizes of bristles forming a triangular pattern. If using this, then you would insert it so the longer bristles rest in the os and the shorter rest on the transition zone and rotate it about five to ten times, depending on manufacturer's instructions. The release of the sample is same as for that for the endocervical brush.
After sample collection is complete, release the locking mechanism by pressing down on the thumb lever, and while holding the lever down and bills open, remove the speculum about two to three inches out, to ensure that the cervix is cleared off the tip of the bills. Remove your thumb from the lever and place it on the handle. Finally, rotate the speculum by 45° while smoothly removing it all the way out. Have your hand underneath the speculum to catch any possible discharge, and discard the speculum, if disposable. At the end, replace the canister lid. Now the sample is ready for subsequent cytological analysis.
"Examiner explaining different types of specula-the similarities and differences"
You've just watched JoVE's illustration of the speculum exam and the Pap test. You should now understand how to use the vaginal speculum and how to collect cervical cell sample for diagnostic evaluation. As always, thanks for watching!
Subscription Required. Please recommend JoVE to your librarian.
Applications and Summary
This video reviewed the techniques for performing a comfortable speculum exam and collecting the samples for a Pap test. Before the exam is started, the examiner should ensure all supplies are prepared and let the patient know what to expect. Being able to perform a comfortable speculum exam is an important skill for any practitioner, as it is used in a wide variety of gynecological procedures and can provide a wealth of information. When the speculum is inserted, it is possible to observe the cervix and vaginal walls for a variety of signs including tone, color, discharge, lesions, polyps, ulcerations, and more-all of which may be clinically significant and can help with the process of diagnosis. A well-inserted speculum also allows easy access to the cervical os, at which point samples may be taken for the Pap test (as well as for other screenings, like chlamydia and gonorrhea). It's necessary to use a speculum to access the cervix for many other procedures, including inserting or removing an intrauterine device (IUD), a loop electrosurgical excision procedure (LEEP), and more.
Many patients may feel anxiety about the speculum and experience it as the most invasive part of the gynecological exam. The provider can offer the patient general support and empathy, along with specific tools to make the exam more comfortable for themselves. Asking the patient to take a deep breath and then bear down as if having a bowel movement before insertion can open the vaginal introitus and greatly aid comfort. The examiner may offer a particularly anxious patient the opportunity to insert the speculum themselves by placing it upside-down with the handle pointing toward the ceiling as the provider talks them through opening it3. It is often easier to get a clear view of the cervix with an upside-down insertion, but it is not a technique practitioners should employ, because it places the examiner's hand directly against the patient's clitoris.
There are many things the practitioner can do to ensure the exam is comfortable. The speculum should be inserted at an oblique angle to avoid putting too much direct pressure on the urethra. When the speculum is inserted fully, the bills should be angled below where the cervix was located during the digital exam. The practitioner can then apply enough posterior pressure to the speculum, so there is space visible in the vagina over the bills; this allows the bills to be opened without putting pressure on the delicate anterior structures. The most important thing is to never insert or remove a speculum while the bills are open. This is very painful and risks injuring the patient. The examiner should not touch the thumb lever until the speculum is positioned fully and ready to be opened. The lock on the speculum should be released fully before removal, and any pressure maintained manually. Once the cervix is free, the thumb lever should be completely released and the speculum smoothly removed the rest of the way, allowing the vaginal walls to close the bills on the way out.
Subscription Required. Please recommend JoVE to your librarian.
References
- Cervical Cancer Statistics. U.S. Preventive Services Task Force. Centers for Disease Control and Prevention (2014).
- Cervical Cancer: Screening. Recommendation Summary. U.S. Preventive Services Task Force (2012).
- Wright, D., Fenwick, J., Stephenson, P., Monterosso, L. Speculum 'self-insertion': a pilot study. Journal of Clinical Nursing. 14(9): 1098-1111 (2005).