


Overview
Source: Richard Glickman-Simon, MD, Assistant Professor, Department of Public Health and Community Medicine, Tufts University School of Medicine, MA
This video describes the examination of the ear, beginning with a review of its surface and interior anatomy (Figure 1). The cartilaginous auricle consists of the helix, antihelix, earlobe, and tragus. The mastoid process is positioned just behind the earlobe. The slightly curving auditory canal ends at the tympanic membrane, which transmits sound waves collected by the external ear to the air-filled middle ear. The Eustachian tube connects to the middle ear with the nasopharynx. Vibrations of the tympanic membrane transmit to the three connected ossicles of the middle ear (the malleus, incus, and stapes). The vibrations are transformed into electrical signals in the inner ear, and then carried to the brain by the cochlear nerve. Hearing, therefore, comprises a conductive phase that involves the external and middle ear, and a sensorineural phase that involves the inner ear and cochlear nerve.
The auditory canal and the tympanic membrane are examined with the otoscope, a handheld instrument with a light source, a magnifier, and a disposable cone-shaped speculum. It is important to be familiar with the tympanic membrane landmarks (Figure 2). Only two of the three ossicles - the malleus and incus - can normally be seen; the malleus is near the center, and the uncus is just posterior. A cone of light can be seen emanating downward and anteriorly from the umbo, or point of contact between the membrane and the tip of the malleus. The short process roughly demarcates the boundary between the two regions of the tympanic membrane: the pars flaccida, lying superior and posterior, and the far larger pars tensa, lying anterior and inferior. Normally, the tympanic membrane is pink-gray in color and readily reflects the light of the otoscope.
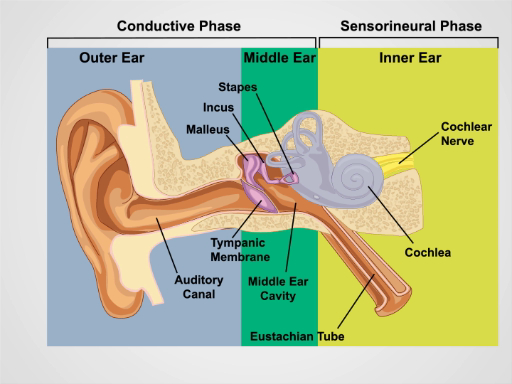
Figure 1. Anatomy of the Ear. A schematic drawing of the human ear in frontal section with outer, middle, and inner ear structures labeled.
Procedure
1. Ear Exam and Hearing
- Inspect the auricles and the surrounding tissue for skin changes, nodules, and deformities.
- Grasp the helix superiorly between the thumb and forefinger one at a time and gently pull up and backward to check for discomfort anywhere in the external ear.
- Palpate the tragus and mastoid process for tenderness.
- Perform the whispered voice test for auditory acuity.
- Make certain that the room is quiet.
- Stand 2 ft behind the seated patient so your face is not visible.
- Gently press and rub a finger against the tragus of the non-test ear, so it can detect no other sounds.
- Exhale completely and whisper a combination of 3 numbers and letters.
- Ask the patient to repeat them back before duplicating the process with a different combination for the opposite ear. Correctly reporting all 3 numbers and letters constitutes a normal test. If the patient makes any mistakes, repeat the test on that side. The test is still considered normal if the patient correctly reports at least 3 out of the 6 numbers and letters per side.
- If the patient fails the whispered voice test, conduct a tuning fork test to help determine whether the hearing loss is conductive or neurosensory.
- Set a 256- or 512-Hz tuning fork vibrating by tapping it sharply against your knuckles or palm.
- Check for lateralization (Weber test): Firmly place the non-vibrating base of the turning fork midline on the patient's head. Normally, the vibration is heard centrally or in both ears equally. In unilateral neurosensory hearing loss, sound is localized to the good ear, whereas in unilateral conductive hearing loss, sound is localized to the impaired ear.
- Compare bone vs. air conduction (Rinne test): Place the base of the vibrating tuning fork on the mastoid process. At the moment the patient can no longer hear the vibration sound, quickly transfer the vibrating end of the tuning fork close to the external canal. Since air conduction exceeds bone conduction, sound is normally still detectable. In conductive hearing loss, however, bone conduction equals or exceeds air conduction, so the patient may report hearing no further sound once the tuning fork is moved. In neurosensory hearing loss, the opposite is true: the patient may report hearing sound after the transfer. Repeat the test on the opposite side. To avoid false positive results, it is best to avoid the Weber and Rinne tests in patients who pass the whispered voice test.
2. Otoscopic Exam
- Turn on the otoscope and select the brightest setting.
- Attach the largest ear speculum that comfortably fits the patient's auditory canal.
- When examining the patient's right ear, hold the otoscope in your right hand, as if holding a pencil.
- Stabilize the otoscope by resting your fourth and fifth fingers on the patient's cheek, so the otoscope follows any unexpected movements.
- Using your left hand, pull the auricle slightly up and back to help straighten the auditory canal, and establish a clear line of sight to the tympanic membrane.
- As this is done, gently insert the speculum into the canal, directing it slightly forward and down.
- Ask the patient to report any discomfort. Take care not to insert the speculum too deeply, as this may reach the bony canal and cause severe pain.
- If cerumen obstructs the view, do not attempt to remove it with a swab or sharp instrument. Instead, irrigate the canal with warm water using a plastic syringe, which is generally a safer and more effective approach.
- Resist the urge to direct immediate attention to the tympanic membrane, and examine the canal first, noting any redness, discharge, swelling, or masses.
- Gently readjust the angle of the speculum as necessary to view the entire tympanic membrane.
- Orient yourself by first identifying the cone of light as it spreads anteriorly and inferiorly from umbo near the center.
- At the origin of the cone of light, look for the handle of the malleus and the short process above. From there, identify the superior pars flaccida and the much larger inferior pars tensa. The incus may or may not be visible just posterior to the handle of the malleus. The stapes and the opening to the Eustachian tube are not visible.
- Check for membrane redness, retraction, bulging, perfusion, or opacity; dull or absent cone of light; and serous or purulent middle ear effusions. If any abnormalities are seen, consider using a pneumatic otoscope equipped with an insufflator to assess membrane mobility.
Ear infections are common occurrences-especially in children-and a proper ear exam is essential to accurately diagnose such conditions.
A comprehensive ear exam includes inspection and palpation of the external ear, hearing test to assess auditory acuity, and the otoscopic exam to inspect the external and middle ear-including the tympanic membrane. Every physician should be well versed with the steps this exam and it is important to understand proper positioning to avoid any potential discomfort to the patient. This video will first illustrate the anatomy of the ear followed by sequential steps of a complete ear examination.
Let's briefly review the surface and interior anatomy of the ear. The outer ear is made up of the cartilaginous auricle, which consists of the helix, antihelix, lobule and tragus. The outer ear is connected to the middle ear via a slightly curving auditory canal that ends at the tympanic membrane. This membrane is responsible for transmitting sound waves collected by the outer ear to the air-filled tympanic cavity in the middle ear. The tympanic cavity is connected to the nasopharynx via an auditory tube known as the Eustachian tube. Vibrations of the tympanic membrane set the three connected ossicles of the middle ear-malleus, incus, and stapes-in motion, which is transformed into electrical signals by the cochlea in the inner ear and then carried to the brain by the cochlear nerve. Therefore, the act of hearing comprises of the conductive phase-involving the outer and middle ear, and the sensorineural phase-involving the inner ear and the cochlear nerve.
Now that we've briefly reviewed the anatomy of the ear, let's go through the steps of the ear exam starting with the external ear inspection and palpation followed by the hearing test.
Before every exam, sanitize your hands by applying topical disinfectant solution. Start with inspection of the auricles and the surrounding tissue looking for skin changes, nodules, and deformities. Next, grasp the helix superiorly between the thumb and forefinger and gently pull up and backward to check for discomfort anywhere in the external ear. Then, palpate the tragus and the mastoid process for tenderness.
Following inspection and palpation, one should perform the auditory acuity tests. First in the sequence is the whispered voice test. For this, ensure that the room is quite. Stand about two feet behind the patient and gently press and rub a finger against the tragus of the non-test ear, so that it can detect no other sounds. Now, whisper a combination of 3 numbers and letters "1A 2B 3C" ask the patient to repeat them back "1A 2B 3C". Then, duplicate the process with a different combination for the opposite ear. Correctly reporting all 3 numbers and letters constitutes a normal test. If the patient makes any mistakes, repeat the test on that side. The test is still considered normal if the patient correctly reports at least 3 out of the 6 numbers and letters per side.
If the patient fails the whispered voice test, then conduct the Weber and the Rinne test. To begin, tap a 256 or 512 Hz tuning fork sharply against your palm. For the Weber test, firmly place the non-vibrating base of the fork midline on the patient's head and ask, "On which side do you hear the vibration?"…"Both". If the answer is both, it means no lateralization. In unilateral neurosensory hearing loss, sound is localized to the good ear, whereas in unilateral conductive hearing loss, sound is localized to the impaired ear.
For the Rinne test, place the base of the vibrating tuning fork on the mastoid process. Normally, the patient would report the presence of sound and this is due to bone conduction. Ask the patient to let you know when they can no longer hear the vibration sound "Please tell me when you can no longer hear the vibration" and at that moment quickly transfer the vibrating end of the tuning fork close to the external canal. Since air conduction exceeds bone conduction, sound is normally still detectable. In conductive hearing loss, the patient may report presence of sound initially but indicate absence of sound once the tuning fork is moved. This confirms that bone conduction equals or exceeds air conduction. In neurosensory hearing loss, the patient may report no sound initially, but indicate presence of sound after the transfer.
After inspection, palpation, and hearing tests, proceed to perform a complete otoscopic exam. The otoscopic exam utilizes specialized equipment called the otoscope. This is a handheld instrument with a light source, a magnifier and a disposable cone-shaped speculum, which is available in different sizes. To begin with the exam, turn on the otoscope and select the brightest setting. Then attach the largest ear speculum that comfortably fits the patient's auditory canal. The smaller specula are usually reserved for small children.
When examining the patient's right ear, hold the otoscope in your right hand, as if holding a pencil. Stabilize the otoscope by resting your fourth and fifth fingers on the patient's cheek, so the otoscope follows any unexpected head movements. Using your left hand, pull the auricle slightly up and back to help straighten the auditory canal and establish a clear line of sight to the tympanic membrane. As this is done, gently insert the speculum into the canal, directing it slightly forward and down. Ask the patient to report any discomfort. Take care not to insert the speculum too deeply, as this may reach the bony canal and cause severe pain. If cerumen obstructs the view, do not attempt to remove it with a swab or any sharp instrument. Instead, irrigate the canal with warm water using a plastic syringe, which is generally a safer and more effective approach. Resist the urge to direct immediate attention to the tympanic membrane, and examine the canal first, noting any redness, discharge, swelling, or masses.
Gently readjust the angle of the speculum as necessary to view the entire tympanic membrane. It is important to be familiar with the membrane landmarks. Usually, two of the three ossicles-the malleus and incus-can normally be seen. The malleus is near the center and the incus is just posterior. At times, the incus may not be visible. A cone of light can be seen emanating downward and anteriorly from the umbo, which is the point of contact between the membrane and the tip of the malleus. The short process of the malleus roughly demarcates the boundary between the two regions of the tympanic membrane: the pars flaccida, lying superior and posterior, and the far larger pars tensa, lying anterior and inferior. Normally, the tympanic membrane is pink-gray in color and readily reflects the light of the otoscope. Check for membrane redness, retraction, bulging, perfusion, and opacity, and inspect for serous or purulent middle ear effusions.
You've just watched JoVE's video on the ear examination. In this presentation, we reviewed the surface and the interior anatomy of the ear. We also demonstrated the steps to be performed for ear inspection, palpation, hearing tests and otoscopic assessment. As always, thanks for watching!
Subscription Required. Please recommend JoVE to your librarian.
Applications and Summary
Proper evaluation of the ear requires a hearing check and otoscopic exam. Conductive hearing loss results from disorders of the external and middle ear. Cerumen impaction, otitis externa, trauma, foreign bodies, and (less commonly) exostoses can lead to hearing loss by obstructing the auditory canal. Middle ear causes of hearing loss include otitis media, Eustachian tube dysfunction, barotrauma, and otosclerosis. Neurosensory hearing loss is due to disorders of the inner ear. Presbycusis and noise trauma are most common; hereditary and congenital conditions, Meniere's disease, ototoxicity, infection, autoimmunity, and acoustic neuroma are less common. Besides hearing loss, patients with ear pathology may present with pain, tinnitus, vertigo, and/or hyperacusis.
The otoscope can only be used to examine the external and middle ear. To properly visualize the external canal and tympanic membrane, it may be necessary to irrigate out any obstructing cerumen. A clinician should take care not to ignore the external canal in their eagerness to inspect the membrane. During the examination of the external ear canal, the examiner should look for the inflammation of otitis externa, foreign bodies, trauma, bony exostoses and osteomata, and squamous cell carcinomas. Inspection of the tympanic membrane may provide insight into pathological processes in the middle ear and, indirectly, the Eustachian tube. Abnormally increased or decreased pressure within the middle ear can distort the contours of the tympanic membrane, causing it to bulge or retract, respectively. Blockage of the Eustachian tube is a common reason for membrane retraction. Diminished mobility with ear insufflation suggests abnormal pressures. Middle ear disorders that are readily diagnosable with the otoscope include serous effusion, acute otitis media with purulent effusion, perforation of the tympanic membrane, tympanosclerosis, and cholesteatoma.
Subscription Required. Please recommend JoVE to your librarian.