


Overview
Source:
Alexandra Duncan, GTA, Praxis Clinical, New Haven, CT
Tiffany Cook, GTA, Praxis Clinical, New Haven, CT
Jaideep S. Talwalkar, MD, Internal Medicine and Pediatrics, Yale School of Medicine, New Haven, CT
The pelvic exam can feel invasive to patients, so it is important to do everything possible to make patients feel comfortable and empowered, rather than vulnerable. Clinicians should be aware of how they are communicating, both verbally and nonverbally, and should give their patients control whenever possible. There are many ways to do this, from how the exam table is positioned to how the patient is engaged throughout the exam. As many as 1 in 5 patients may have experienced sexual trauma; therefore, it is important to avoid triggering those patients, but it's not always possible to know who they are. The exam in this video demonstrates neutral language and techniques that can be employed with all patients to create the best experience possible.
It's important to keep the patient covered wherever possible and to minimize extraneous contact. A clinician should be careful to tuck fingers that aren't being used to examine the patient to avoid accidental contact with the clitoris or anus.
Before performing the pelvic examination, examiners should find out how knowledgeable the patients are about the exam and their own bodies, and establish the expectation that the patients can communicate questions or concerns throughout the exam. While it is always important to avoid extremely clinical language, certain colloquial words can cross the line from caring to overly intimate during this exam. It is helpful to avoid the words "touch" and "feel," which can feel sexualized in this context; instead, the words "assess," "check," "inspect," or "examine" should be used. The words "bed" and "sheet" should be avoided, and "table" and "drape" should be used instead. Also, a clinician should use the word "footrests" rather than "stirrups" to avoid connoting horses. It's a good idea to avoid telling patients to "relax," because it's a hard order for a patient to follow when anxious. Asking patients to "soften" or "release" specific muscles can be more useful, and having a patient do a Kegel exercise or Valsalva maneuver can serve as a specific relaxation technique.
Best practice dictates avoiding assumptions about patients' gender, as patients with female anatomy may identify as another gender (e.g., transgender or genderqueer). This video depicts the approach to a patient whose history has revealed no specific complaints or risk factors related to gynecological health.
The pelvic exam consists of three parts: the visual and manual exam of the external genitalia, a speculum exam, and a bimanual exam. This video covers the introduction to the pelvic exam and the external genitalia exam. To avoid missing potential findings, the external pelvic exam should be performed in a systematic approach consisting of two main components: a visual inspection of the vulva (Figure 1), and internal palpation and assessment of glands and tone.
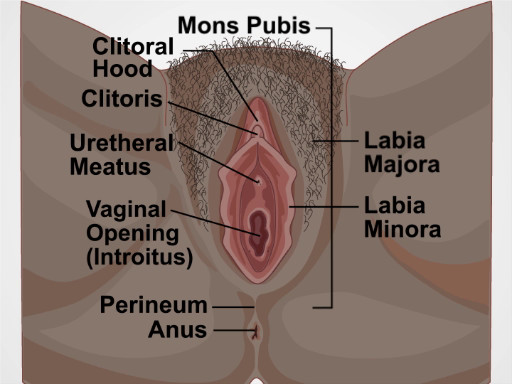
Figure 1. Diagram of the vulva. A diagram showing external genitals with the structures labelled.
Procedure
1. Preparation
- Before beginning the exam, establish an expectation of comfort, and ask the patient to communicate questions and concerns during the visit. For example, say something like, "Have you had an exam like this before? How was that experience for you? I expect this to be a comfortable exam. If there is anything I can do to make this more comfortable for you, please let me know, and I will make any adjustments I can. You can ask me questions at any time."
- Introduce and summarize the exam for the patient, "The pelvic exam has three parts. First, I am going to assess the hair and skin around the outside of your vagina and some of the glands near the vaginal opening. Then, I will place a speculum in your vagina to view your cervix and take some samples. Last, after I have removed the speculum, I will place two fingers in your vagina and use my other hand to press on your abdomen to assess your uterus and ovaries."
- Practicing clinicians often utilize a chaperone for the patient's comfort or their own, or based on institutional policies. Discuss the presence of a chaperone with the patient. Engage the chaperone by requesting the chaperone's assistance throughout the exam.
- Ask the patient to change into a gown (if the patient is not already wearing one), and step out of the room. Specify how the patient should dress: underwear off, gown open in the back (or however is preferred by the examiner).
- Leave the patient with a drape and instruct that it can be placed over the patient's lap when seated on the table.
- Set up the room and instruments: make sure to have nearby a trash can, a working light, a stool near the exam table, swabs, and lubricant.
- Give the patient a hand mirror to follow along with the exam and say, "This allows me to communicate with you during the exam. Please hold it for now, and I will explain how to use it shortly."
- Use the exam to communicate with the patient about potential findings. If the patient is following along with a mirror, this exam can provide an opportunity for education about anatomy. Point out the structures throughout the exam and provide an explanation appropriate to the patient's comfort and knowledge; do not force someone to engage, and try to avoid informing highly knowledgeable patients about basic facts they already know.
- Pull out the footrests (or ask the chaperone to do so) and ask the patient to place each foot in a footrest.
- Raise the back of the exam table to 45-60 degrees, and ask the patient to sit back. The patient should be able to see you now, and this position allows the patient's internal organs to sink into the pelvic basin, which is their natural position, making it much easier to assess.
- Wash your hands and put on gloves.
- Instruct the patient to move so the buttocks are at the end of the exam table. One way to do this is to use the drape as a barrier, place the back of your hand on the end of the exam table, and ask the patient to, "Please slide down until you feel the back of my hand."
- Place the backs of your hands lateral to each of the patient's knees, far apart, and ask them to, "Please extend your knees toward my hands."
- Fold back the drape by grabbing it with both hands in the middle and scrunching it up toward the patient's pubic bone.
- Once the pubic bone is reached, move your hands apart, while still holding the drape, and say, "Please hold this here."
- As the drape is raised, immediately glance at the pubic hair to check for movement, as lice may scatter when light first hits the area.
- Ask the patient to bring the mirror to one of their knees. Place two fingers near (but not touching) the patient's vulva and say, "Please adjust the mirror until you see my fingers. This is where the exam will take place."
2. Visual Exam
- Your fingers are the tools in this exam. Use the first two fingers of your dominant hand in a "peace" sign and keep the other fingers tucked. Use the pads of your fingers, not the tips, when examining. Be careful to avoid contact with the clitoris. Never place your fingers centrally while near the anterior structures, and keep your hand low.
- Visually assess for: abnormal patterns of hair growth, rashes, lesions, masses, discharge, potential signs of domestic violence (scarring, burns, or bruising), signs of female genital mutilation (FGM), hemorrhoids; skin tags, fissures, and other irregularities. Inquire about any findings during the exam by pointing them out to the patient in the mirror and asking, "Is this normal for you? How long has it been like this?"
- Introduce the exam to the patient. Before starting, place the back of your hand on the inside of the patient's thigh, over the drape. This maneuver prepares the patient, as starting with non-invasive contact may help put them at ease and avoid muscle spasm.
- Using the pads of the index and middle fingers on your dominate hand, separate the labia minora and majora on one side to inspect the entirety of the sulcus.
- Repeat on the other side of the vulva.
- Using the same two fingers, separate both of the labia minora to view the vaginal introitus and urethral opening.
- Rotate your wrist up and use the back of the two fingers to retract the clitoral hood to view the clitoral shaft.
- Make a fist with your hand, place the back of your fist on the fleshy part of one buttock, and pull away to view the anus.
3. Internal/Digital Exam
- When assessing glands internally, think about the vulva as if it were a clock face in order to ensure your fingers are placed correctly.
- Point the index finger of your dominant hand, palm down, above the perineum, and insert into the vaginal introitus to just beyond your first knuckle.
- Assess the Bartholin's glands by gently pinching the tissue between your thumb and inserted finger at five and seven o'clock, watching the patient's face for a flinch.
- Apply posterior pressure to rotate the palm up, and check the Skene's glands and the urethra for infection and discharge.
- Use the thumb and middle finger of your dominant hand to separate the labia minora to view the urethral opening.
- Milk the Skene's glands by using the inserted index finger to gently tap upward at eleven and one o'clock.
- If the Skene's glands are infected, discharge into the urethra may be seen. Inspect the urethra and make a gentle beckoning motion at twelve o'clock. Use a swab to get a sample of any discharge elicited.
- Perform a digital cervical exam to assess the depth and direction of the cervix (which helps determine your approach during the speculum exam); release the labia and insert your finger farther to locate the cervix, standing up, if necessary. If you are able to locate it while sitting down, the patient may need a short speculum.
- Sit down and slide your finger halfway out, then rotate the palm down.
- Insert your middle finger by placing it over the top of your index finger, applying posterior pressure as it is being inserted, then place your fingers side by side.
- Assess for cystocele by dropping your wrist and pulling down toward the perineum to make space above your fingers. Ask the patient to bear down as if having a bowel movement (Valsalva maneuver) while assessing for a bulge, a sign of herniation (Figure 2).
- Assess for rectocele by lifting your wrist up to apply anterior pressure toward the bladder until space underneath the fingers can be seen. Ask the patient to bear down as if having a bowel movement (Valsalva maneuver) while assessing for a bulge, a sign of herniation (Figure 2).
- If performing a speculum exam with a plastic speculum, lower your wrist so the fingers are flat and centered, and gently separate them to assess for the plastic speculum size. If you're having a difficult time maneuvering your fingers, start with a small size, but if you can create space in the vagina, start with a medium.
- Assess pubococcygeus (PCG) muscle tone by asking the patient to squeeze around your fingers as if stopping the flow of urine (Kegel exercise).
- Remove your fingers and prepare for the speculum exam.

Figure 2. Pelvic anatomy for normal, cystocele and rectocele conditions.
The pelvic examination is performed for diagnostic, screening and treatment purposes as a part of gynecologic, obstetric and sexual health care. A comprehensive pelvic exam includes assessment of the external genitalia-which will be discussed in this video, followed by examination of the vagina and cervix with a speculum-to be covered in the video titled Pelvic Exam Part II; and a bimanual evaluation of the pelvic organs-reviewed in Part III of this series.
Here, we will first discuss how to introduce this exam to a patient. Subsequently, we will review the steps for external genitalia assessment, which includes inspection as well as digital evaluation.
Before discussing the physical examination steps, let's review how to introduce this exam to a patient, the set-up necessary and a few general considerations. The pelvic exam can feel invasive to patients, so it is important to do everything possible to make them feel comfortable and empowered, rather than vulnerable. Right at the start you must establish an expectation of comfort and ask your patient to communicate their questions and concerns during the visit. If the patient has had a pelvic exam before, you should inquire about that experience. Reassure the patient by saying something like "Dialogue".
Before beginning with the procedure, it is important that you introduce and summarize the exam, "Dialogue". Remember, that while it is always important to avoid extremely clinical language, certain colloquial words can cross the line from being caring to being overly intimate during this exam. It is helpful to avoid the words "touch" and "feel," which can feel sexualized in this context; instead, the words "assess," "check," "inspect," or "examine" should be used. The words "bed" and "sheet" should be avoided, and "table" and "drape" should be used instead. Also, a clinician should use the word "footrests" rather than "stirrups". It's a good idea to avoid telling patients to "relax" because it's a hard order for a patient to follow when they're anxious. Practicing clinicians often utilize a chaperone for their own or the patient's comfort, and based on institutional policies. However, in this video demonstration we will not be using a chaperone. Ask the patient to change into a gown and specify how they should dress-underwear off, and gown open in the back. Also provide the patient with a drape to place over their lap and step out of the room to give them privacy.
Set up all the supplies you will need, before beginning the exam. If you will be using lubricant at any point make sure to squeeze it onto a clean area before beginning, as you cannot touch the packets or bottle once you are wearing gloves. Make sure to have a trashcan, a working light, and a stool near the exam table.Give the patient a hand mirror so they can follow along with the exam and say, "Dialogue". Pull out the footrests and ask the patient to place their feet over them. Raise the back of the exam table to 45-60° and ask the patient to sit back. This modified lithotomy position allows the patient to see the examiner and facilitates the examination, as the patient's internal organs sink into the pelvic basin making them much easier to assess.
After the patient is comfortable, wash your hands thoroughly. Sit down on the stool near end of the exam table, and put on gloves. Then, place the back of your hand on the end of the table over the drape and ask the patient to slide down until they can feel the back of your hand. Next, ask them to extend their knees sideways. Now, using both your hands, fold the drape up toward the patient's pubic bone. Then, request the patient to hold it in place using their free hand. Next, ask the patient to bring the mirror next to one of their knee. Place two fingers near, but not touching, the patient's vulva and say, "Dialogue". To put the patient at ease and avoid muscle spasm, establish a non-invasive contact first, "Dialogue".
The structures evaluated during visual inspection include: mons pubis, which overlies the pubic symphysis, the labia majora that appear as rounded folds and are composed of adipose tissue, and more internally, the labia minora, the clitoris and the clitoral hood. Between the labia minora, there are two opening: the uretheral meatus and the vaginal opening, known as the introitus. The term perineum describes the tissue between the introitus and the anus. During the exam visually assess for the following: the pattern of hair growth, rashes, lesions, moles, masses, and discharge. Also look for potential signs of domestic violence such as scarring, burns, or bruising; signs of female genital mutilation; hemorrhoids; skin tags; fissures; and other irregularities.
To view these structures, position the index and middle fingers of dominant hand in a "peace" sign and keep the other fingers tucked. With the pads of your index and middle fingers, separate the labia minora and majora on one side to inspect the entirety of the sulcus. Keep your hand low and take care to avoid accidental extraneous contact with the clitoris by keeping fingers that aren't being used tucked in. Using the same two fingers, separate the labia minora to view the vaginal introitus and urethral opening. Then, rotate your wrist up and use the back of the two fingers to retract the clitoral hood and view the clitoral shaft. Lastly, make a fist, and using the back of your fist pull away one buttock to view the anus. If you notice a mole or freckle, point it out to the patient and let them know they should regularly check it for changes, just as they would with moles elsewhere on their body.
The next part of the exam is the digital assessment of the vestibular glands, the vagina and the cervix. To start, first lubricate the turn your dominant index finger. Let the patient know you will be placing a finger in their vagina. In palm down position, place the lubricated finger into the vaginal introitus to just beyond your first knuckle. Then gently pinch the tissue between your thumb and the inserted finger at five and seven o'clock positions to assess the Bartholin's glands located posteriorly. Watch the patient's face for signs of discomfort and note if you feel any palpable masses.
Next, apply posterior pressure and rotating your palm up. Then using the thumb and middle finger separate the labia minora to visually inspect the urethral meatus and the openings of the paraurethral or Skene glands-located bilaterally next to the urethral meatus. Note the signs of inflammation and presence of discharge. Express the Skene's glands by tapping gently upward with your index finger at one and eleven o'clock positions. If the glands are infected they discharge into the urethra, so finish by making a gentle beckoning motion at twelve o'clock to check if the glands release any discharge, which is absent in this case.
Then, release the labia and insert your finger farther to locate the cervix; assess its depth and direction. This will help you choose the correct speculum size and also help you decide where to angle the speculum during the other part of the exam.If you can easily locate the cervix while sitting down, the patient may need a short speculum. If you cannot easily locate the cervix, then you might have to stand up and the use a medium or a longer speculum.
Next, perform digital vaginal assessment. Slide your index finger halfway out and then rotate to palm down position. Subsequently, insert your middle finger by placing it over the top of your index finger and then place them side-by-side.Now, drop your wrist and pull down toward the perineum to make space above your fingers. Next, ask the patient to perform the Valsalva maneuver by bearing down as if having a bowel movement and assess cystocele, which refers to anterior bladder prolapse. Following that, lift your wrist up to apply anterior pressure toward the bladder until space underneath the fingers can be seen. Again, ask the patient to bear down while assessing for rectocele denoted by rectal herniation into the back wall of the vagina.
Next, lower your wrist so the fingers are flat and centered and gently separate them. This will also help in choosing the right speculum for the following part of this exam. If you're having difficulty in separating your fingers, the exam should be performed with a small size speculum.Finally, assess the tone of the pubococcygeal muscle by asking the patient to squeeze around your fingers as if they are stopping the flow of urine. This maneuver is called the Kegel's exercise. A firm squeeze represents a healthy and toned pelvic floor. Remove your fingers and discard the gloves. This completes the first part of the pelvic exam.
You've just watched JoVE's video on the approach to the pelvic examination and assessment of the external genitalia. In this video, we reviewed how to introduce the pelvic exam to a patient, demonstrated the inspection of the external genitalia, and showed the steps to be performed during the digital assessment of the cervix and vagina. As always, thanks for watching!
Subscription Required. Please recommend JoVE to your librarian.
Applications and Summary
This video reviewed the introduction and setup for the pelvic exam, and how to visually inspect and examine the complete female external genitalia. Before performing the pelvic exam, examiners should find out how knowledgeable the patients are about the exam and their own bodies, and establish the expectation that the patients can communicate questions or concerns throughout the exam. The exam table should be positioned so the patient can see what is happening and can communicate with the examiner, and the patient should remain covered as much as possible to minimize feelings of vulnerability. The examiner can give the patient a hand mirror and instruct how to position it to follow along with the exam, and educate the patient about their structures throughout the exam (when appropriate).
The examiner should first provide an overview of the exam, and explain every step as the exam progresses, letting the patient know before the examiner makes contact with the patient's genitalia. First, the external genitalia is examined, including the glands and muscle tone of the vagina. The examiner should take note of any potential findings (including taking swabs of any unusual discharge elicited). Any markings or potential signs of domestic or intimate partner violence should be documented, though examiners should remember that some of their patients may engage in rough sex, and bruising may not be indicative of violence.
Beyond asking clarifying questions, the examiner should not discuss concerns or follow-up testing while the exam is ongoing. Following the components covered in this video, the pelvic examination is typically followed by two additional components, the speculum and bimanual exams. After the speculum and bimanual exams, the examiner should step out to allow the patient to get dressed. The examiner can then reenter the room to discuss concerns and next steps, as having those conversations while the patient is unclothed and vulnerable heightens anxiety.
When an exam has normal findings, the examiner should always tell the patient that "everything appears healthy and normal." This simple statement relieves anxiety and empowers patients to equate their body structures as normal.
Subscription Required. Please recommend JoVE to your librarian.
References
- Black M.C., Basile K.C., Breiding M.J., Smith S.G., Walters M.L., Merrick M.T., Chen J., Stevens M.R. The National Intimate Partner and Sexual Violence Survey (NISVS): 2010 Summary Report. Atlanta, GA: National Center for Injury Prevention and Control, Centers for Disease Control and Prevention (2011).