

Summary
This work describes basic procedures of noninvasive small animal MRI and MRS in vivo.
Abstract
Small animal Magnetic Resonance (MR) research has emerged as an important element of modern biomedical research due to its non-invasive nature and the richness of biological information it provides. MR does not require any ionizing radiation and can noninvasively provide higher resolution and better signal-to-noise ratio in comparison to other tomographic or spectroscopic modalities. In this protocol, we will focus on small animal MR imaging and MR spectroscopy (MRI/MRS) to noninvasively acquire relaxation weighted 1H images of mouse and to obtain 31P spectra of mouse muscle. This work does not attempt to cover every aspect of small animal MRI/MRS but rather introduces basic procedures of mouse MRI/MRS experiments. The main goal of this work is to inform researchers of the basic procedures for in vivo MR experiments on small animals. The goal is to provide a better understanding of basic experimental procedures to allow researchers new to the MR field to better plan for non-MR components of their studies so that both MR and non-MR procedures are seamlessly integrated.Protocol
Part 1: Magnet Safety
Both MRI and MRS use a strong magnetic field that requires extreme caution. For example, the 4.7 T instrument that we used for the present work has a magnetic field approximately 90,000 times the earth magnetic field. The high magnetic field is always on even when the MR scanner is not being used. Any metallic object that comes into contact with such a high magnetic field will be strongly and rapidly attracted by the magnet. It is extremely dangerous if an experimental subject or operator is located in the projectile path of a metallic object flying into the magnet. Therefore, personnel who conduct MR experiments should be careful to remove any metallic objects from their clothing before entering the proximity of the instrument and also maintain the surrounding environment free from such objects. More detailed information on magnet safety appears in the literature1 and the following webpage: http://www.imrser.org/ . The presence of metallic material can not only cause the aforementioned safety issue but interfere with experimental results by inducing imaging/spectroscopic artifacts. The metallic material present near or inside the imaging object can alter the magnetic field in the vicinity and so generate artifacts on acquired images or broaden line-width of spectra.
Accordingly, leave wallet, keys, pens, etc. outside the magnet if you handle animals for MR procedures.
Part 2: In Vivo MRI of Mouse in a Horizontal Bore Magnet
Animal Preparation for MRI
- All the animal procedures should be approved by the institutional animal care and use committee (IACUC) prior to executing any types of animal handling.
- We use vaporized isoflurane to anesthetize animals for MRI experiments. Anesthesia of animals can be achieved by other anesthetics such as avertin (2,2,2-tribromoethanol or TBE) and a cocktail of ketamine and xylazine. Dosage information of each anesthetic is found in Table 1.
- Line an induction chamber with plastic backed absorbent pad (blue pad or chuck). Place a mouse (or multiple mice for multi-mouse imaging) in the induction chamber.
- Adjust the flowmeter of the isoflurane vaporizer to 0.8 1.5 L/min. Then adjust the isoflurane vaporizer to 4 % for about 2 3 minutes.
- After reaching the surgical plane of anesthesia (i.e. no toe pinch response), place the mouse on an animal holder with its nose inserted into a nose cone (or mask). A head restrainer can be used for head imaging and a body holder can be used for body imaging.
- Animal holders are used to prevent potential motion: there are several types of commercial holders. Also, a custom designed holder can be fabricated to accommodate any special requirements of an experimental setup. For a custom designed holder, make sure to use only nonmagnetic material.
- During the imaging period, adjust the flowmeter to 0.4 0.8 mL/min and reduce the isoflurane vaporizer to 1.2 1.5 %. The expired gas coming from the mouse nose cone is collected by a pump and removed into an in-house vacuum.
- The eyes of the animal will be kept moist with a sterile eye lubricating ointment. The animal will be kept at 35-37° C during the experiment within a warm water circulation system. Other types of heat source can be used such as heated pads and warm air blown into the radiofrequency (RF) coil.
- An animal monitoring system is in place to monitor body temperature, respiration/cardiac cycle, and synchronize respiration/cardiac gating with image acquisitions.
- A standard sample made of agarose is placed next to the animal to monitor abrupt signal change. This standard agar sample is particularly useful for multi-slice and multi-time point imaging. When an unexpected signal change is detected in a slice from the acquired images, the slice with the unexpected signal change can be eliminated. Also, its signal intensities can be adjusted based on the signal change of the standard sample during post-image analysis.
- After securely placing the animal and monitoring components on the animal holder, position the animal holder at the center of a RF coil.
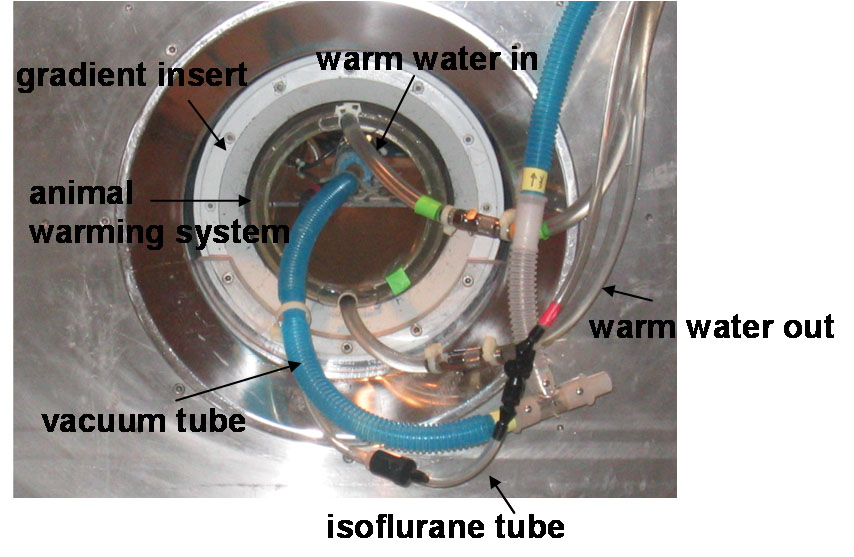
- Move the RF coil to the magnet room and insert the RF coil into the warm water circulation system placed inside the magnet. Figure 2 displays several components of an MRI scanner observed from the front of the magnet bore.
MRI Experiment
- Tune the RF coil to the 1H resonance frequency and match the characteristic impedance of the coil to 50 Ohm using the tuning panel in the MR scanner. This is to achieve optimum conditions of signal reception. Most human MRI scanners do not require a separate process of tune/match except in MRS procedures.
- Conduct a shimming process using a single pulse sequence. An MR signal relies on the environmental magnetic field homogeneity. The shimming process enables the magnetic field in the region of interest to be as homogeneous as possible. Each MR scanner has its own way to perform the shimming process, including automatic fast shimming processes such as fast map and gradient shimming.
- Optimize the RF pulse by maximizing one dimensional image profile. RF pulse powers can be arrayed while keeping the pulse length constant and a long enough TR (recycle delay) that is approximately 3 - 5x the T1 of tissue.
- Acquire scout images along three orthogonal orientations to create axial, coronal and sagittal images. A fast image acquisition sequence (i.e. gradient echo or fast spin echo imaging sequence) can be used to acquire the scout images. The acquired images will be used to plan for actual imaging with determination of imaging planes.
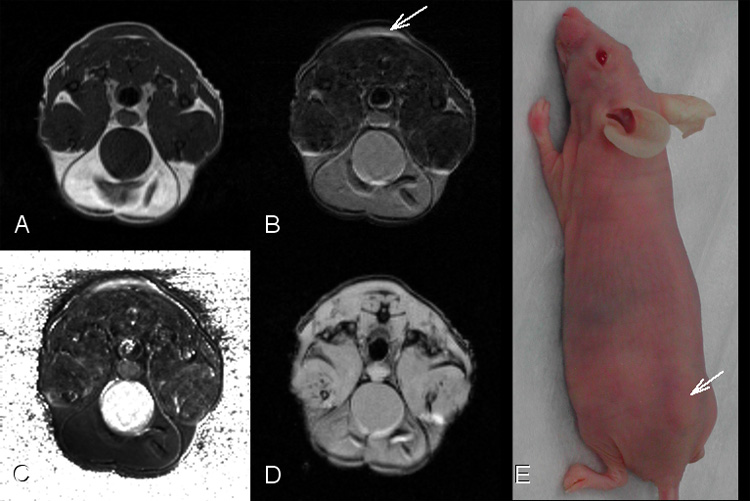
- Change to spin echo sequence. Select proper sequence parameters: TR (recycle delay) should be three to five times the tissue T1 to acquire fully relaxed images such as proton density or T2 weighted images. TE (echo time) is the time duration between the first RF pulse and the center of echo signal. A TE value can be selected depending on image contrast as summarized in Table 2. Figure 2 shows in vivo images acquired with different relaxation effects of T1, T2 and T2* for a nude mouse with a xenograft tumor on its back.
- T2 measurements can be done either using multiecho imaging or single echo imaging with multiple TE values.
- Subsequent to the MRI/MRS in vivo experiment, animals should be monitored throughout the recovery process. After MR imaging, the animals will be taken out of the RF coil and monitored to assure full recovery when returned to the cage. Heat loss is rapid in anesthetized mice. Keep the animals warm by covering them with gauze pads or towels and/or providing a heat source until the animals are recovered from anesthesia.
Image Processing
- Review acquired images on the MR console and transfer selected data to a post-processing computer.
- We typically use ImageJ (http://rsbweb.nih.gov/ij/) for analyzing images. The image analysis includes image scaling/filtering, calculations of T1, T2 and diffusion, tumor volume measurements and segmentation of tumors.
Part 3. In Vivo MRS for Mouse Hindlimb Skeletal Muscle in a Vertical Bore Magnet
Construction of Cuff for Inducing Reversible Ischemia
- Start with a piece of PVC pipe that is approximately 5-7 mm wide with an i.d. of 12-15 mm. Drill a small hole through the wall of this piece and thread.
- Cut a piece of balloon so it is open on both ends (helium quality balloons work best). Insert this piece through the PVC piece and wrap back around and tape ends together on the outside wall of the PVC piece.
- Use shrink wrap to seal the balloon ends around the tube. You should have a cuff with a solid outer wall and an inflatable inner wall.
- Cut out an area of shrink wrap and balloon around the threaded hole, taking care to leave plenty of material between the hole and the edge of the PVC piece. Thread a 1.5 cm piece of non-ferrous metal (i.e. brass) into the hole in the PVC. This allows you to inflate the cuff. Seal the area with 5 minute epoxy.
- Fix this cuff in place next to the RF coil in the MRS probe and connect to an external sphygmomanometer.
Custom Respiration Monitor
- We use a custom made respiration monitor that is made to be compatible with the restricted space and access to the bore of the magnet. Several commercial models are also available.
- Tie a small balloon to the end of stretch resistant tubing fed into the probe.
- Attach the other end of the tubing to a pressure transducer.
- Be sure the line and balloon are free of air bubbles. The bubbles will attenuate the signal from compression of the balloon caused by movement of the mouse body due to respiration.
Mouse Positioning in MRS Probe
- Anesthetize the mouse with 5% Avertin (0.010 ml/g body weight).
- After reaching the surgical plane of anesthesia, position the mouse in the MRS probe by placing the mouse on its back on the mouse support. Place the fluid-filled balloon on the ventral side of the mouse and secure in place with mouse support straps.
- Position mouse and body support in the MRS probe.
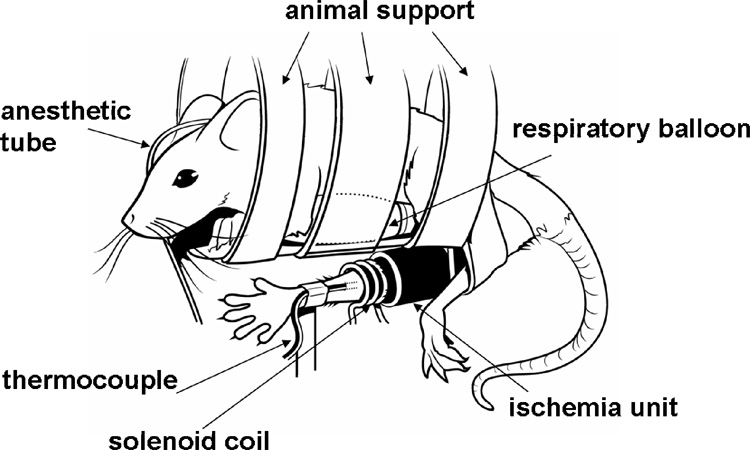
- Pull one hindlimb through the ischemic cuff and MRS coil. The leg should be centered in the coil as much as possible. This arrangement allows the mouse body to be positioned horizontally in a vertical bore magnet (Figure 3).
- Fix leg in place by taping foot to rigid support.
- Place thermocouple subcutaneously in hindlimb outside the region sampled by the coil.
- Moisten the eyes with the eye lubricating ointment to prevent the eyes from drying. Cover mouse eyes and face to prevent rubbing or irritation from the wall of the probe.
- Other monitoring probes can be added depending on the specific needs of the experiment.
Setting up MRS Experiment
- Connect airflow to heating element on the MRS probe.
- Set the variable temperature control unit on VNMR software to maintain leg temperature at 35-37 °C.
- Tune coil frequency and match impedance using the tuning panel in the MRS software for both 1H and 31P resonances.
- Adjust shimming circuits to optimize the homogeneity of the B1 magnetic field in the region of interest using 1H spectroscopy.
- Switch to 31P frequency to determine the RF pulse width to yield maximum signal from one free induction decay (FID) (90° time).
- Collect high signal to noise fully relaxed spectra (FRS) to determine the ratios of inorganic phosphate (Pi) and phosphocreatine (PCr) to ATP under fully relaxed conditions. These spectra are collected using the 90° time with time between FID acquisitions (TR) of approximately 5x the T1 of PCr (20 sec. at 7 T). These will be used for quantification of PCr and Pi levels from MR spectra.
Ischemic Experiment
- A simple ischemic perturbation allows for the determination of resting and maximal mitochondrial ATP production by measuring changes in phosphocreatine during and immediately following ischemia.
- Set-up array to collect multiple spectra using a 45° pulse width (i.e. 0.5 x the 90° time) and a TR of 0.5x the T1 (~1.5 sec.). We typically collect 4 FIDs for every spectra (number of averaging (na) = 4 in VNMR software) for a time resolution of approximately 6 seconds. This time resolution is sufficient to accurately determine resting and maximal mitochondrial ATP production.
- Collect resting spectra for approximately 5 minutes.
- Induce ischemia by inflating the cuff to 270-300 mmHg for 10-12 minutes.
- Release the cuff and collect recovery spectra for 5 minutes.
- Remove the probe from magnet and the mouse from the probe. Allow the mouse to recover from anesthesia under appropriate conditions. Experiments can be repeated on subsequent days. Following the final spectroscopy experiment mouse leg muscles are removed and immediately freeze-clamped in liquid N2 for analysis of ATP concentrations by HPLC.
Data Analysis
- Data is analyzed offline using one of several spectral analysis programs for NMR spectra. Our laboratory typically uses fit to standard 2 and jMRUI (http://www.mrui.uab.es/mrui/mrui_Overview.shtml) for quantifying peak areas.
- Initial PCr breakdown rates during ischemia are a measure of the mitochondrial ATP production under normoxic conditions as described in several papers 3-5. PCr recovery rates can be used to determine the maximal capacity for mitochondrial ATP production based on the approach described previously 4,6.

Figure 1. In vivo MRI setup viewed from the front of the magnet bore. The setup comprises an RF coil, animal warming system (or warm water circulation system) and gradient insert. All these components are inserted into a horizontal magnet. Warm water is heated in a water reservoir outside the magnet room and introduced into the animal warming system through a Tygon tube (green tape). After circulating in the cylinder, water is pulled from the warming system back to the water reservoir to be heated. An isoflurane tube and vacuum tube are used to anesthetize mice during MRI experiments.
Please click here to see a larger version of this figure.

Figure 2. In vivo images for a nude mouse with xenograft tumor (D282 tumor) on its back (arrow) with different relaxation effects: A. T1 weighed image (TR/TE=500/14.2ms). B. T2 weighed image (TR/TE=2s/40ms). Both T1 and T2 weighted images were acquired by spin echo sequence. C. T2 map processed with 4 sets of images acquired by different TE values ranging from 20 to 80 ms. D. T2* weighed image (TR/TE=180/7.39ms, flip angle = 20 degrees) acquired by gradient echo sequence. Field of view of 35 x 35 mm2 is for all MR images.
Please click here to see a larger version of this figure.

Figure 3. Illustration of mouse positioned in horizontal body holder with leg secured in RF coil.
Please click here to see a larger version of this figure.

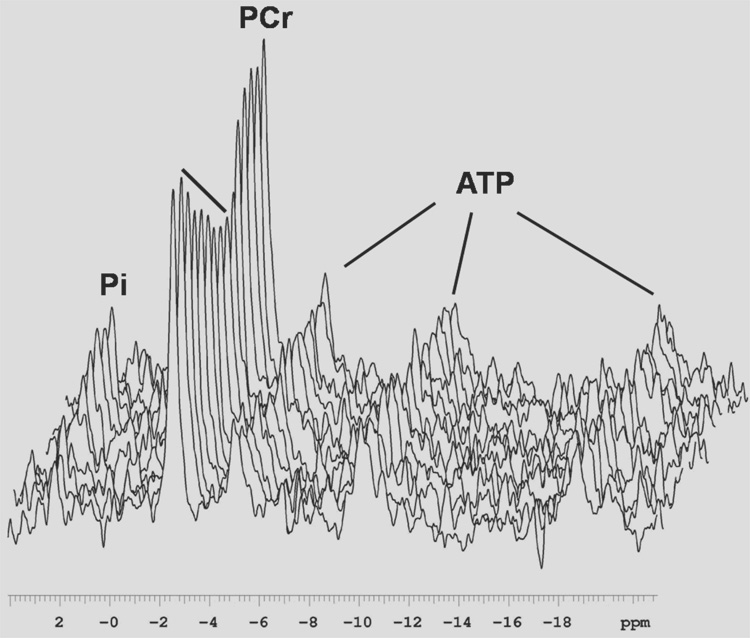
Figure 4. In vivo 31P spectra through one ischemia reperfusion cycle. Data were collected on a 7 T vertical bore magnet and line broadened with a 20 Hz exponential filter. TR=1, na=4, every 20 spectra are plotted.
Please click here to see a larger version of this figure.
Table 1. Dosage of anesthetic for mouse MRI/MRS.
| Animal Species |
Anesthetic Agent |
Dose (mg/kg for injectables) |
Route |
| Mouse | Isoflurane gas | 4.0% for 2-3 min (induction), then 1.2 to 1.5% continuously (maintenance) | Inhaled via nose cone |
| Mouse | Avertin | 5%, 10ml/kg body weight | intraperitoneal (IP) |
| Mouse | Ketamine/Xylazine | 100 mg/kg and 10 mg/kg | IP |
Table 2. Image with relaxation weightings
| Image Weighting | TR (recycle delay) | TE (echo time) |
| T1 | Short (Shorter than T1) | Short (Shorter than T2) |
| T2 | Long (3 ~ 5 times T1) | Long (around T2) |
| PD (proton density) | Long (3 ~ 5 times T1) | Short (shorter than T2) |
T1: spin lattice relaxation (or longitudinal relaxation) time
T2: spin spin relaxation (or transverse relaxation) time
Subscription Required. Please recommend JoVE to your librarian.
Discussion
The pre-acquisition steps of tune/match and shimming are critical to acquire high spatial resolution and a high signal-to-noise ratio (SNR). It is also important to monitor animal conditions with an animal monitoring system to maintain a stable physiological state for animals during signal acquisitions to comply with humane animal handling and to prevent any potential artifactual measurements. The procedures explained in the protocol can be modified to acquire additional information including diffusion, perfusion and flow imaging and localized spectroscopy in vivo. All the animal preparations should be similar unless a procedure requires a supplementary setup. The protocols of MRI and MRS described in this study have been used for several applications including longitudinal MRI studies for the development of nanoprobes to target tumors 7 and MRS studies for mitochondrial ATP production 5,8. MRI and MRS are useful techniques to noninvasively visualize animal anatomic, relaxation change or to nondestructively monitor metabolism. Both techniques can be used as longitudinal monitoring procedures to examine above-mentioned changes over time. For MRS we built a custom RF probe that allows the animal to be maintained in the horizontal position in a vertical bore magnet. Thus, these experiments can be performed on any vertical wide-bore magnet, such as is found in most chemistry departments.
Subscription Required. Please recommend JoVE to your librarian.
Acknowledgments
This study was supported in part by NIH/NIBIB R21EB008166 to DL and NIA AG028455 and NIA AG022385 for DJM. We thank Dr. James Olson at the Fred Hutchinson Cancer Research Center for providing their D282 tumor mice.
Materials
| Name | Company | Catalog Number | Comments |
| Inova 200 MR scanner/4.7 T | Varian Inc., Agilent | Used for mouse MRI | |
| Inova 300 NMR spectrometer/7 T | Varian Inc., Agilent | Used for MRS of mouse skeletal muscle |
References
- Stecco, A., Saponaro, A., Carriero, A. Patient safety issues in magnetic resonance imaging: state of the art. Radiol Med. 112, 491-491 (2007).
- Heineman, F. W., Eng, J., Berkowitz, B. A., Balaban, R. S. NMR spectral analysis of kinetic data using natural lineshapes. Magn Reson Med. 13, 490-490 (1990).
- Amara, C. E. Mitochondrial function in vivo: spectroscopy provides window on cellular energetics. Methods. 46, 312-312 (2008).
- Blei, M. L., Conley, K. E., Kushmerick, M. J. Separate measures of ATP utilization and recovery in human skeletal muscle. J Physiol. 465, 203-203 (1993).
- Marcinek, D. J., Schenkman, K. A., Ciesielski, W. A., Conley, K. E. Mitochondrial coupling in vivo in mouse skeletal muscle. Am J Physiol Cell Physiol. 286, C457-C457 (2004).
- Paganini, A. T., Foley, J. M., Meyer, R. A. Linear dependence of muscle phosphocreatine kinetics on oxidative capacity. Am J Physiol. 272, 501-501 (1997).
- Sun, C. In vivo MRI detection of gliomas by chlorotoxin-conjugated superparamagnetic nanoprobes. Small. 4, 495-495 (2008).
- Marcinek, D. J. Reduced mitochondrial coupling in vivo alters cellular energetics in aged mouse skeletal muscle. J Physiol. 569, 467-467 (2005).
