The video demonstrates a method for generating antibiotic-marked mutants in cyanobacteria. The protocol begins with culturing cyanobacteria, followed by centrifugation and washing steps that preserve surface pili. A plasmid carrying an antibiotic resistance gene flanked by homologous sequences is then introduced. During incubation, the plasmid is internalized via pili and replaces the target gene through homologous recombination. Antibiotic selection and restreaking are used to isolate and purify the mutant strain.
Een abonnement op JoVE is vereist om deze inhoud te bekijken. Log in of start vandaag met uw gratis proefperiode.
Methodenartikel
Generation of Antibiotic-Marked Mutants in Cyanobacteria via Homologous Recombination
678 weergaven
⸱
30 oktober 2025
In dit artikel
Samenvatting
Protocol
- Preparation of Culture Media
- Prepare Blue-Green medium 11 (BG11 medium) according to Castenholz (1988).
- Prepare stock solutions of 100x BG11, trace elements, and iron stock (Table 1).
- Prepare separate solutions of phosphate stock, Sodium carbonate (Na₂CO₃) stock, N-[Tris(hydroxymethyl)methyl]-2-aminoethanesulfonic acid (TES) buffer, and Sodium bicarbonate (NaHCO₃) (Table 1).
- Autoclave the phosphate and Na₂CO₃ stocks. Filter-sterilize TES buffer and NaHCO₃ with 0.2 µm filters.
- Prepare BG11 by combining 976 ml of water, 10 ml of 100x BG11, 1 ml of trace elements, and 1 ml of iron stock, and autoclave the solution. After this solution has cooled to room temperature, add 1 ml of phosphate stock, 1 ml of Na₂CO₃ stock, and 10 ml of NaHCO₃.
- For BG11 solid medium, add 15 g of agar and 700 ml of water to one flask. To the second flask, add 3 g of Sodium thiosulfate (Na₂S₂O₃), 226 ml of water, 10 ml of 100x BG11, 1 ml of trace elements, and 1 ml of iron stock. Autoclave both solutions. After these solutions have cooled to room temperature, combine them and add 1 ml of phosphate stock, 1 ml of Na₂CO₃ stock, 10 ml of TES buffer, and 10 ml of NaHCO₃.
NOTE: Solutions are prepared separately to avoid precipitation of certain salts.
- Prepare Blue-Green medium 11 (BG11 medium) according to Castenholz (1988).
- For selection on sucrose, prepare a 50% (w/v) sucrose solution. Filter sterilize the solution with 0.2 µm filters and add to BG11 (100 ml of 50% sucrose to 900 ml of BG11) to produce BG11/5% sucrose plates.
NOTE: Do not add NaHCO₃ to BG11/5% sucrose agar plates. Add Na₂CO₃ as normal. - For culturing of Synechococcus, add 10 ml of 1 M 4-(2-hydroxyethyl)piperazine-1-ethanesulfonic acid, N-(2-hydroxyethyl)piperazine-N′-(2-ethanesulfonic acid) (HEPES), and 1 ml of vitamin B12 (Table 1) to 1 L of BG11 medium.
NOTE: Transformation of strains cultured in commercially available BG11 media is significantly less efficient than in the BG11 media recipes described here, and therefore, it is not recommended.
Table 1: Solutions used in this study.
| Stock solution recipes | |
| Chemical | Amount (g) |
| 100x BG11 (per L) | |
| NaNO₃ | 149.6 |
| MgSO₄·7H₂O | 7.49 |
| CaCl₂·2H₂O | 3.6 |
| Citric acid | 0.6 |
| Add 1.12 ml 0.25 M Na₂EDTA, pH 8.0 | |
| 0.25 M Na₂EDTA, pH 8.0 (per 100 ml) | |
| Na₂EDTA | 9.3 |
| Trace elements (per 100 ml) | |
| H₃BO₃ | 0.286 |
| MnCl₂·4H₂O | 0.181 |
| ZnSO₄·7H₂O | 0.022 |
| Na₂MoO₄·2H₂O | 0.039 |
| CuSO₄·5H₂O | 0.008 |
| Co(NO₃)₂·6H₂O | 0.005 |
| Iron stock (per 100 ml) | |
| Ferric ammonium citrate | 1.11 |
| Phosphate stock (per 100 ml) | |
| K₂HPO₄ | 3.05 |
| Na2CO3 stock (per 100 ml) | |
| Na₂CO₃ | 2 |
| TES buffer, pH 8.2 (per 100 ml) | |
| TES | 22.9 |
| NaHCO3 stock (per 100 ml) | |
| NaHCO₃ | 8.4 |
| HEPES, pH 8.2 (per 500 ml) | |
| HEPES | 119.15 |
| Vitamin B₁₂ (Per 50 ml) | |
| Cyanocobalamin | 0.02 |
| Luria Bertani media (Per 500 ml) | |
| Luria Bertani broth | 12.5 |
| 1 M MgCl₂ (Per 100 ml) | |
| MgCl₂·6H₂O | 20.33 |
| Solution A (Per 200 ml) | |
| MnCl₂·4H₂O | 0.395 |
| CaCl₂·2H₂O | 1.47 |
| 2-(N-Morpholino)ethanesulfonic acid hydrate, 4-Morpholineethanesulfonic acid (MES) | 0.4265 |
| Solution A + glycerol | |
| 10 ml solution A | |
| 1.5 ml glycerol |
2. Growth of Cyanobacterial Strains
- Culture strains in 100 ml conical flasks with a maximum volume of 50 ml and shake at 120 revolutions per minute (rpm). Seal BG11 plates with Parafilm and puncture three small holes in the side of the plate to allow gas exchange. Incubate all strains at 30 °C under fluorescent bulbs in a photobioreactor at a light intensity between 20-40 µmol photons m-2 sec-1.
- Use the best sterile techniques. Handle all cyanobacterial strains in a laminar flow hood.
NOTE: This is especially important when strains are cultured with media containing sucrose, which can be easily contaminated.
3. Generation of Plasmid Constructs
- Design sets of primers, including the required restriction enzyme sites, using primer design software such as Primer3 (http://frodo.wi.mit.edu/primer3/), to amplify two ~1 kb regions 5’ and 3’ of the gene of interest. Consult the genome sequence of the cyanobacterial species via Cyanobase (http://genome.kazusa.or.jp/cyanobase). See Table 2 for all primers used here. When designing primers, consider the following factors:
- Ensure that amplified regions include 5' and 3' regions of the gene that will be mutated, e.g,. Figure 1.
- Do not mutate intergenic regions to avoid unintended mutation of antisense and non-coding RNAs.
- When choosing flanking regions, do not include the entire open reading frame of adjacent genes, as expression of these genes in Escherichia coli may interfere with cloning.
- Amplify products by Polymerase Chain Reaction (PCR) using high-fidelity DNA polymerase according to the manufacturer's instructions.
NOTE: In our experience, this enzyme produces few errors.- Set up 50 µl PCR reactions containing high-fidelity buffer (HF buffer) and either 0, 1.5, or 3 µl of Dimethyl Sulfoxide (DMSO). Use 100 ng of genomic DNA per reaction. Use a program consisting of an initial denaturation step of 98 °C for 30 sec, 35 rounds of 98 °C for 10 sec, 67 °C for 30 sec, 72 °C for 30 sec, followed by a final extension step of 72 °C for 5 min. This typically gives consistent products.
- Verify PCR products and samples digested with endonuclease enzymes for the correct size via gel electrophoresis. Run 1% (w/v) agarose gels containing 0.02% (v/v) ethidium bromide for 45 min at 100 V.CAUTION: Ethidium bromide is a potential mutagen and should be handled with appropriate protection.
- Purify PCR products using a DNA purification kit according to the manufacturer's instructions. Also, use this kit for purification of plasmid fragments, including pieces cut from agarose gels. Elute purified DNA in 14 µl of water.
- For cloning steps, incubate restriction endonuclease reaction mixtures at 37 °C for >1 hr in a total volume of 30 µl according to the manufacturer's instructions.
- For ligation steps, ligate DNA fragments at room temperature for >1 hr in a total volume of 20 µl, containing 5 µl of purified digested plasmid, 12 µl of purified digested insert, 2 µl of buffer, and 1 µl of ligase.
- Prepare Escherichia coli DH5α transformant cells according to the following method.
- Grow an overnight E. coli culture in 10 ml Luria Bertani (LB) media.
- Inoculate 400 ml LB in a 1 L conical flask containing 6 ml 1 M MgCl2 (Table 1) with 1 ml of the overnight culture.
- Grow the culture at 37 °C at 220 rpm for approximately 4 hr or until OD₆₀₀ₙₘ reaches 0.4-0.6.
- Place cells on ice for 1 hr.
- Centrifuge at 2,800 × g for 10 min to pellet cells at 4 °C.
- Remove supernatant and resuspend in 160 ml solution A (Table 1) and incubate on ice for 20 min.
- Centrifuge at 2,800 × g for 10 min to pellet cells at 4 °C.
- Remove supernatant and resuspend in 4 ml Solution A + glycerol (Table 1).
- Prepare 50 µl aliquots, freeze in liquid N2, store at -80 °C.
- Mix 5 µl of ligation mixture with 50 µl of competent cells and incubate for 1 hr on ice.
- Heat-shock the cells at 42 °C for 90 sec, followed by incubation on ice for 2 min.
- Add 950 µl of LB media (Table 1) and incubate at 37 °C for 1 hr.
- Aliquot 50 and 200 µl on plates with the appropriate antibiotic, either ampicillin (100 µg/ml) and/or kanamycin (30 µg/ml).
CAUTION: Both kanamycin and ampicillin are toxic and should be handled with appropriate protection. - Pick and incubate single colonies in 2 ml LB media inoculated with the appropriate antibiotic.
- Purify all plasmids using a miniprep plasmid purification kit according to the manufacturer's instructions.
- Generate plasmids, in this specific example for knocking out the cpcC1C2 genes, according to the following steps.
- Amplify the 1,012 base pairs (bp) 5' flanking region (left fragment) using primers cpcC1C2leftfor and cpcC1C2leftrev (See step 3.2, Table 2). Remove a small amount of the PCR reaction and confirm whether the correct size product has been amplified via gel electrophoresis (step 3.3). Digest this fragment and pUC19 with XbaI and BamHI (step 3.5).
- Purify both preparations (step 3.4), ligate (step 3.6), transform (step 3.7), and set up four 2 ml LB liquid cultures with ampicillin (100 µg/ml) from separate colonies for plasmid purification via minipreps (step 3.8).
- Check for insertion of the fragment into pUC19 via XbaI/BamHI digestion and gel electrophoresis (step 3.3). Bands of 2,660 bp and 1,012 bp indicate correct introduction of the insert into the plasmid.
- Amplify the 1,016 bp 3' flanking region (right fragment) using primers cpcC1C2rightfor and cpcC1C2rightrev (See step 3.2, Table 2). Remove a small amount of the PCR reaction and confirm whether the correct size product has been amplified via gel electrophoresis (step 3.3). Digest this fragment and pUC19 with SacI and EcoRI (step 3.5).
- Purify both preparations (step 3.4), ligate (step 3.6), transform (step 3.7), and set up four 2 ml LB liquid cultures with ampicillin (100 µg/ml) from separate colonies for plasmid purification via minipreps (step 3.8).
- Check for insertion of the fragment into pUC19 via SacI/EcoRI digestion (step 3.5) and gel electrophoresis (step 3.3). Bands of 2,660 bp and 1,016 bp indicate correct introduction of the insert into the plasmid.NOTE: XbaI/BamHI sites for cloning of the 5' region and SacI/EcoRI for cloning of the 3' region into pUC19 are used wherever possible. If feasible, always include a BamHI site on the reverse primer for the 5' region or the forward primer for the 3' region to ensure that later cloning steps are easier to perform.
- Sequence both inserts to determine if the sequence is correct using primers spanning the insertion site, e.g., M13 forward and M13 reverse (Table 2). The sequence must be correct to ensure no errors are introduced into flanking regions.
- Excise the left fragment from pUC19 via XbaI/BamHI digestion. Digest the pUC19 + right fragment with XbaI/BamHI (step 3.5).
- Purify the 1,012 bp left fragment and 3,676 bp pUC19 + right fragment from an agarose gel (step 3.3) via excision of the DNA using a scalpel blade.
- Purify both preparations (step 3.4), ligate (step 3.6), transform (step 3.7,) and set up four 2 ml LB liquid cultures with ampicillin (100 µg/ml) from separate colonies for plasmid purification via minipreps (step 3.8).
- Check for insertion of the fragment into pUC19 + right fragment via XbaI/BamHI digestion (step 3.5) and gel electrophoresis (step 3.3). Bands of 3,676 bp and 1,012 bp indicate correct insertion of the insert into the plasmid (refer to this as plasmid B).
- Excise the neomycin phosphotransferase/levansucrase gene (npt1/sacB) cassette from pUM24cm19 via BamHI digestion. Digest plasmid B with BamHI (step 3.5).
NOTE: The npt1/sacB cassette does not have to be purified from agarose gels since pUM24cm encodes a protein conferring chloramphenicol resistance. Therefore, if colonies are grown on LB/ampicillin/kanamycin agar plates, the only possible combination that will lead to resistant colonies is the incorporation of the npt1/sacB cassette into plasmid B. - Purify both preparations (step 3.4), ligate (step 3.6), transform (step 3.7), and set up four 2 ml LB liquid cultures with ampicillin (100 µg/ml) and kanamycin (30 µg/ml) from separate colonies for plasmid purification via minipreps (step 3.8).
- Check for insertion of the npt1/sacB cassette into plasmid B via BamHI digestion (step 3.5) and gel electrophoresis (step 3.3). Bands of 4,688 bp and 3,894 bp indicate correct insertion of the insert into the plasmid (refer to this as plasmid A).
Table 2: Primers used in this study. Restriction endonuclease sites are underlined.
| Primer | Sequence |
| cpcC1C2leftfor | GTACTCTAGAGCGGCTAAATGCTACGAC |
| cpcC1C2leftrev | GATCGGATCCGCGGTAATTGTTCCCTTTGA |
| cpcC1C2rightfor | GATCGAGCTCTGCACTGGTCAGTCGTTC |
| cpcC1C2rightrev | GACTGAATTCATCGTTGCTTGAACGGTCTC |
| M13 forward | TGTAAAACGACGGCCAGT |
| M13 reverse | CAGGAAACAGCTATGAC |
| cpcC1C2for | GTTTTCATTGGCATCGGTCT |
| cpcC1C2rev | ATGTCCCAGGAACGACTGAC |
| A1173for | AGCAAACCGTTTTTGTGACC |
| A1173rev | TGCAAGGTGGCGAACTGTAT |
4. Generation of Marked Synechocystis and Synechococcus Mutants
- Set up a fresh culture by inoculating a loop full of cells into 30-50 ml of BG11 medium. Grow the culture for 2-3 days to an optical density at 750 nanometers, or OD₇₅₀ₙₘ = 0.2 to 0.6.
NOTE: Typically, individual colonies are too small to use for inoculation, and exposure of individual cells to even low levels of light will result in photoinhibition and selection for light-resistant mutants. - Centrifuge 1-2 ml of the culture at 2,300 × g for 5 min and discard the supernatant. Do not centrifuge any cyanobacterial cultures at >2,300 × g, as this may damage the cells. Wash the pellet once with BG11 medium.
NOTE: Do not resuspend cells by vortexing, as this may result in loss of pili, which are essential for DNA uptake. Resuspend cells by gentle pipetting. - Add BG11 medium to a final volume of 100 µl. Transfer cells to a 14 ml round-bottom tube.
- Add 1 µg of plasmid A to the cells and mix by gentle tapping. Add <10 µl of plasmid.
NOTE: Preferably, the plasmid should be at a concentration of >100 ng/µl, but concentrations lower than this are adequate for successful transformation. - Lay the tubes down horizontally in the incubator. Incubate cultures for 4-6 hr.
NOTE: Cells can be briefly mixed by tapping every 1-2 hr, but this is not essential. Samples can be placed in a shaking incubator, although this does not significantly improve efficiency. - Spread aliquots of the cell culture/plasmid DNA mixture on BG11 agar plates without antibiotics. Typically, 20 µl and 80 µl aliquots are spread on separate plates.
- ~24 hr later, add 2.5-3 ml of a 0.6% Agar solution in water containing kanamycin (per 20 ml: 0.12 g of agar, 100 µl of 100 mg/ml kanamycin) to the agar plate. Cool this solution to ~42 °C and add it to the edge of the agar plate. Tilt the plate so the solution forms an even 'top agar' layer on the surface.
- Incubate agar plates for a further period of time. Colonies should be visible after approximately 7 days.
NOTE: Agar plates can be stacked 3 high in an incubator. Typically, hundreds of colonies are obtained per transformation. - Streak individual colonies on BG11 + kanamycin (30 µg/ml) agar plates. Divide the agar plate into 6 sectors and use a blunt-end toothpick to streak out the colonies over each sector. Obtaining single colonies is not important; just the growth of the transformants is.
Toegang beperkt. Log in of start een proefperiode om deze inhoud te bekijken.
Resultaten
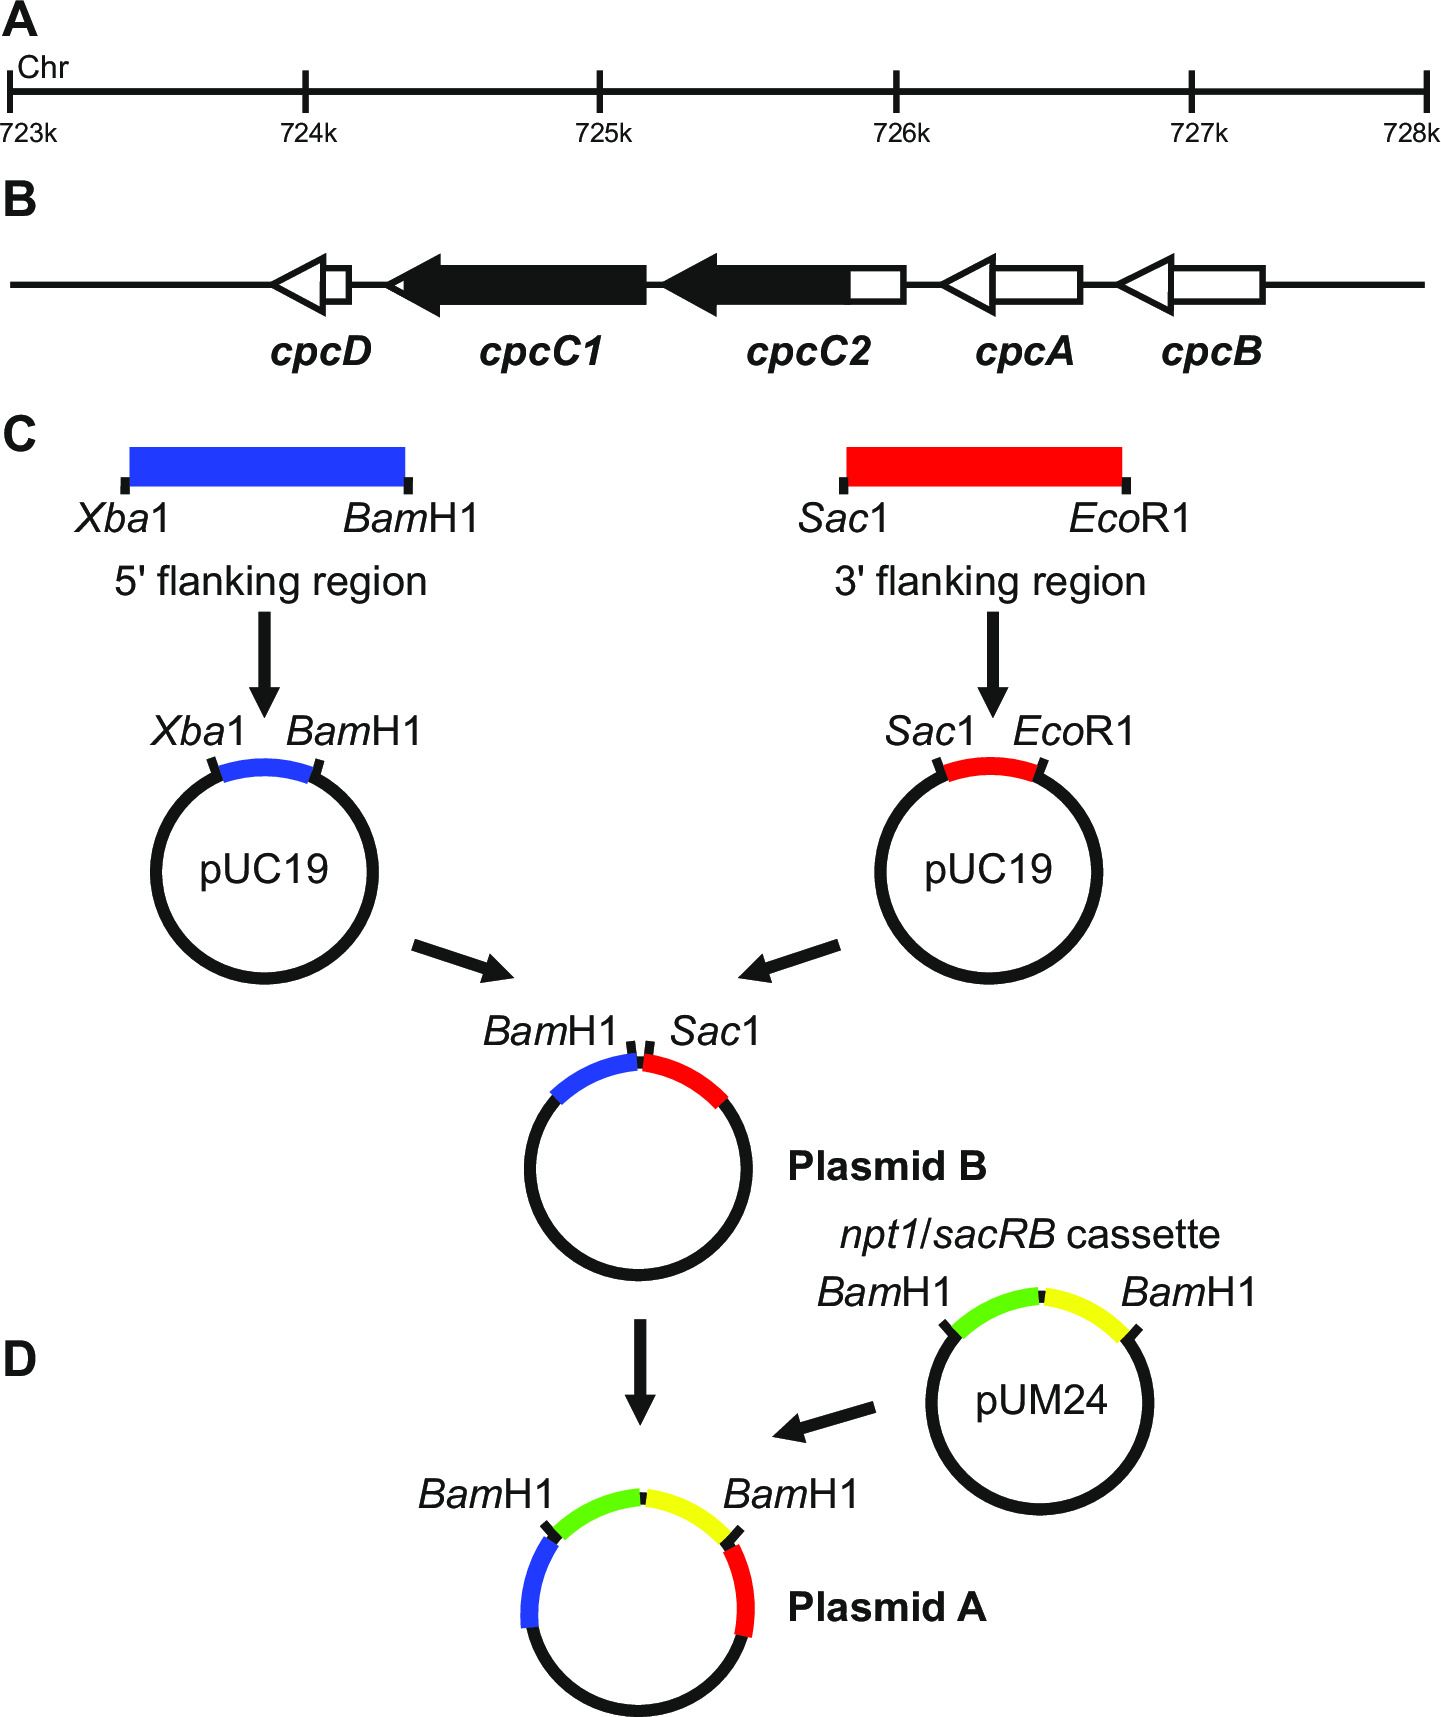
Figure 1: Plasmid construction for the generation of marked and unmarked knockouts, ...
Toegang beperkt. Log in of start een proefperiode om deze inhoud te bekijken.
Materialen
| Naam | Bedrijf | Catalogusnummer | Opmerkingen |
|---|---|---|---|
| NaNO₃ | Sigma | S5506 | |
| MgSO₄·7H₂O | Sigma | 230391 | |
| CaCl₂ | Sigma | C1016 | |
| Citric acid | Sigma | C0759 | |
| Na₂EDTA | Fisher | EDT002 | |
| H₃BO₃ | Sigma | 339067 | |
| MnCl₂·4H₂O | Sigma | M3634 | |
| ZnSO₄·7H₂O | Sigma | Z4750 | |
| Na₂MoO₄·2H₂O | Sigma | 331058 | |
| CuSO₄·5H₂O | Sigma | 209198 | |
| Co(NO₃)₂·6H₂O | Sigma | 239267 | |
| Ferric ammonium citrate | Sigma | F5879 | |
| K₂HPO₄ | Sigma | P3786 | |
| Na₂CO₃ | Fisher | SODC001 | |
| TES | Sigma | T1375 | |
| NaHCO₃ | Fisher | SODH001 | |
| HEPES | Sigma | H3375 | |
| Cyanocobalamin | Sigma | 47869 | |
| Na₂S₂O₃ | Sigma | 72049 | |
| Bacto agar | BD | 214010 | |
| Sucrose | Fisher | SUC001 | |
| Petri dish 90 mm triple vented | Greiner | 633185 | |
| 0.2 µm filters | Sartorius | 16534 | |
| 100 ml conical flasks | Pyrex | CON004 | |
| Parafilm M 100 mm x 38 m | Bemis | FIL003 | |
| Phusion high fidelity DNA polymerase | Phusion | F-530 | |
| Agarose | Melford | MB1200 | |
| DNA purification kit | MoBio | 12100-300 | |
| Restriction endonucleases | NEB | ||
| T4 ligase | Thermo Scientific | EL0011 | |
| Luria Bertani broth | Invitrogen | 12795-027 | |
| MES | Sigma | M8250 | |
| Kanamycin sulfate | Sigma | 60615 | |
| Ampicillin | Sigma | A9518 | |
| GeneJET plasmid miniprep kit | Thermo Scientific | K0503 | |
| 14 ml round-bottom tube | BD falcon | 352059 | |
| Glycerol | Sigma | G5516 | |
| DMSO | Sigma | D8418 |
