Een abonnement op JoVE is vereist om deze inhoud te bekijken. Log in of start vandaag met uw gratis proefperiode.

Methodenartikel

A 3D-Printed Silicone-Coated Device to Model Catheter-Associated Urinary Tract Infection

587 weergaven

30 oktober 2025

In dit artikel

Samenvatting

Source:
Ocean E. Clarke1, Romy A. Dop1, Tom Hasell1, Joanne L. Fothergill1, Daniel R. Neill2

1University of Liverpool, 2 University of Dundee

This video demonstrates the use of a 3D-printed, silicone-coated device that mimics the inner surface of urinary catheters to simulate catheter-associated urinary tract infection.
Protocol

All procedures involving sample collection have been performed in accordance with the institute's IRB guidelines.

1. Additive manufacturing of Flexipeg models

  1. Print pegs (24 pegs required per peg lid) and peg lids in high-temperature stable resin using stereolithography (100 µm layer height).
    NOTE: High-temperature stable resin is utilized for pegs, and peg lids can be autoclave sterilized before experimentation.
  2. 3D print both mold components and parts of the test tube rack using fused deposition modeling (FDM) with 60% infill.
    NOTE: Any durable resin is suitable for FDM, as molds and test tube racks can be ethanol-sterilized and do not require stability at high temperatures.
  3. Ensure that model components have been printed correctly and remove any excess residue from the printing process using 70% ethanol.
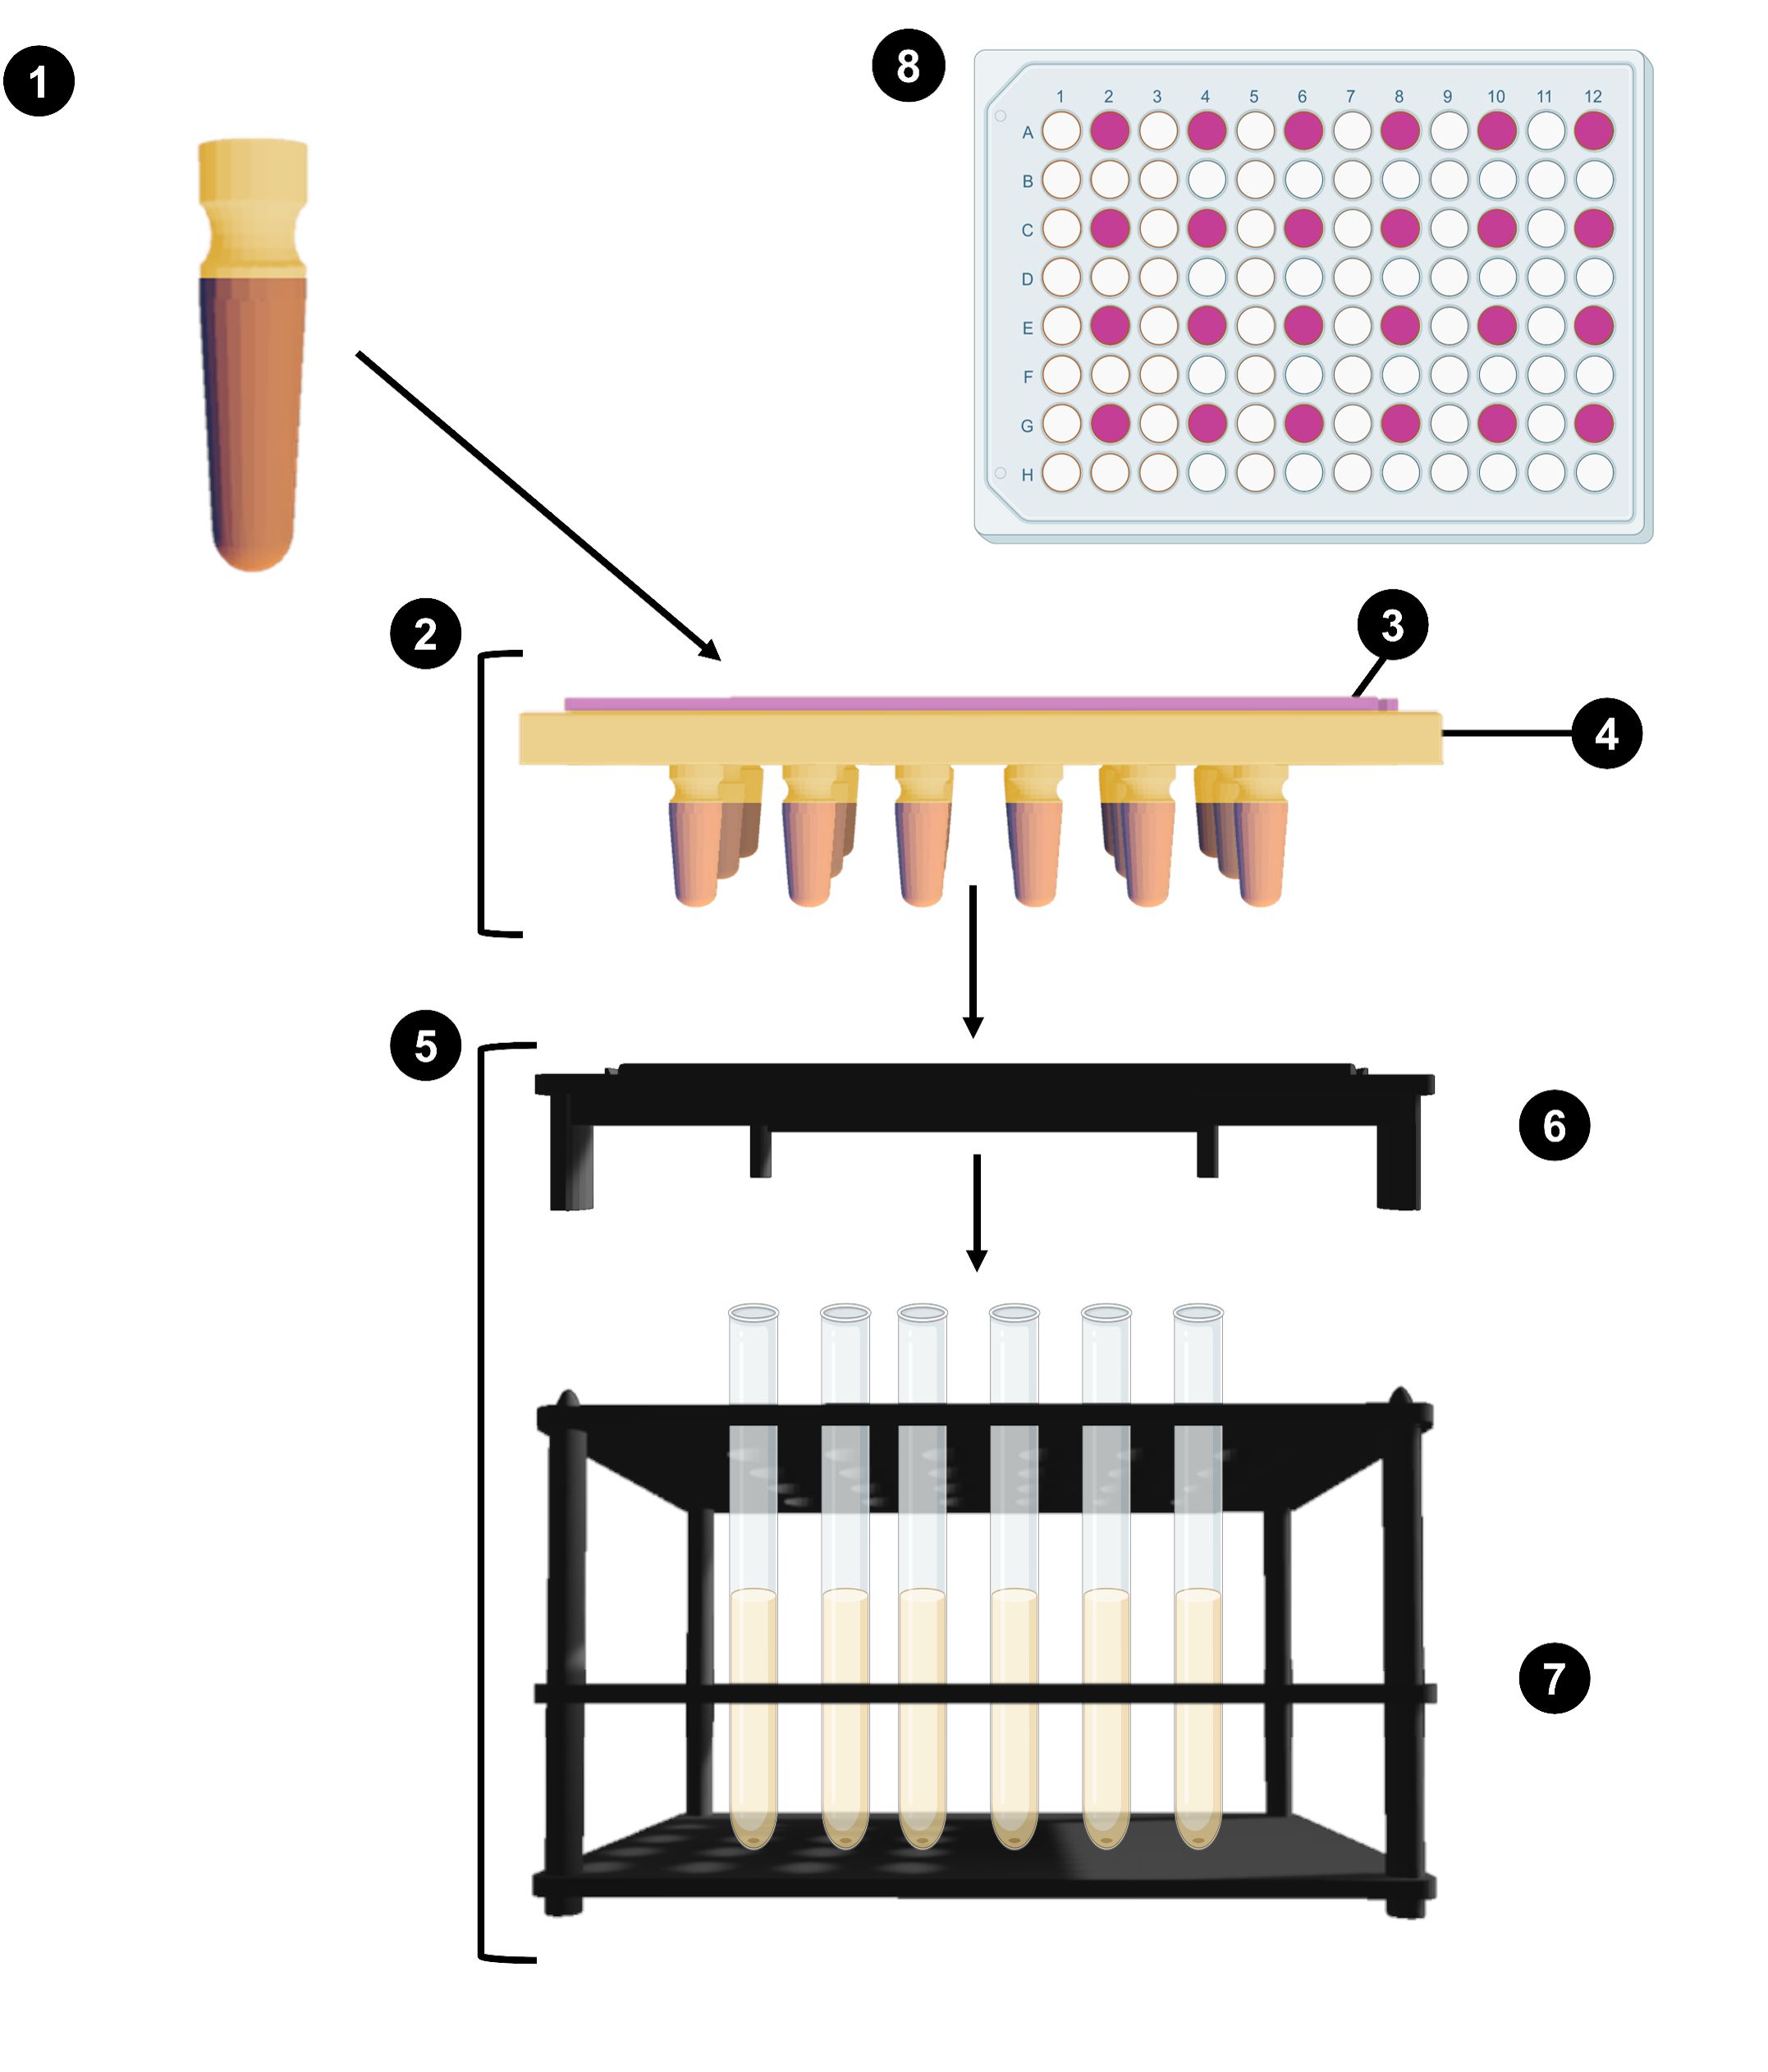
  4. Assemble the silicone mat mold as shown in Figure 1, holding the sides in place with tape if necessary.

2. Flexipeg model preparation

  1. Silicone mat preparation
    1. Weigh 18 g of silicone base (10:1 base to catalyst polydimethylsiloxane (PDMS), condensation cure) into a beaker and gently mix in 2 g of catalyst until well combined.
      NOTE: Avoid overly agitating the silicone mix to prevent bubbles from forming within the mold.
    2. Pour the combined silicone mixture into the FDM-printed mold, wiping any excess silicone mixture off the sides and top of the mold. Allow to cure overnight (a minimum of 18 h) at room temperature (RT).
    3. Remove the mat from the mold, and trim any excess silicone from the sides. Ensure the mat fits within the peg lid, as shown in Figure 1.
  2. Peg coating
    1. Insert the pegs into a silicone mat (24 pegs per mat) and secure the mat to the peg lid or a plastic tray of similar dimensions to the mat using tape.
    2. Weigh out 27 g of silicone base into a shallow plastic tray (approximately the same dimensions as a 96-well plate) and thoroughly mix in 3 g of catalyst until well combined.
    3. Invert the peg lids so the pegs are facing downwards, and immediately dip the pegs into the silicone mixture. Invert the peg lid and allow the excess silicone to drip down the pegs and the pegs to cure overnight at room temperature.
      NOTE: Fast-cure silicone (6-8 h full cure; 40-60 min work time) will continue to drip/flow prior to curing; therefore, it is not imperative to coat the entire peg in PDMS when dipping, as any excess will coat the rest of the peg during curing.
    4. Once cured, repeat steps 2.2.2 to 2.2.3. until the pegs have been coated three times in PDMS. Ensure the first coating layer is completely cured before proceeding to the second coating step.
      NOTE: Final peg coatings should be <2 mm thick with no visible imperfections. If silicone remains tacky after overnight incubation at RT, allow it to cure for 24 h, and discard coatings if pegs are still tacky to the touch.
    5. Using a sterile scalpel, trim around the base of the silicone-coated pegs (as close to the bottom as possible) to remove the pegs from the coating setup.
      NOTE: This process should be repeated until the desired number of pegs and silicone mats are prepared. Excess PDMS used in the peg coating process can be used to cast new silicone mats before curing.
  3. Model setup
    1. Insert coated pegs into the silicone mat and secure the mat in the peg lid, as shown in Figure 1.
    2. Cover the underside of the peg lid/silicone mat (attached to the peg base) with autoclavable tape to keep the pegs in place. Place the peg lid setup into a sealed autoclavable bag, and autoclave sterilize before use.
      NOTE: Pegs in the peg lid will fit into a 96-well plate in one singular orientation. After taping the peg setup, check the alignment of the pegs in a spare 96-well plate and label the autoclave tape accordingly with the correct lid orientation.

3. Inoculation of models

  1. Preparation of bacterial culture
    1. Prepare overnight cultures of on-test bacterial isolates by suspending a loopful of bacterial colonies grown on solid media in 10 mL of Luria-Bertani (LB) broth. Incubate overnight (18 h) at 37 °C with agitation.
      NOTE: A minimum of three biological replicates are recommended for use in the Flexipeg biofilm model.
    2. Normalize cultures to an OD600nmof 0.1 (approximately 108 colony-forming units (CFU)/mL following plate dilution) in a 1 mL final volume of phosphate-buffered saline (PBS).
  2. Microplate setup and inoculation
    1. Aliquot 135 µL of pooled human urine (PHU) into each on-test well in a 96-well plate in accordance with the plate layout in Figure 1 (8). Each well represents one technical replicate (a minimum of n = 3 technical replicates are required per biological replicate).
      NOTE: Artificial urine media (AUM) can be utilized instead of PHU if desired by the user.
    2. Inoculate each on-test well with 15 µL of the normalized overnight culture, resulting in a final well volume of 150 µL. Reserve at least 100 µL of normalized overnight culture for serial dilutions to validate the CFU/mL of the inoculum.
    3. Prepare negative controls by aliquoting 150 µL of sterile PHU only into relevant wells.
    4. Following the microplate setup, insert the pegs into their respective wells (as determined prior to autoclave sterilization of pegs), and ensure the peg lid is flush with the surface of the plate. Cover the peg lid with the microplate lid, holding it in place with autoclave tape if necessary.
    5. Place the peg models in a sealed plastic tub/bag with a damp blue roll to prevent evaporation, and incubate statically for 24 h at 37 °C.
  3. Inoculum validation
    1. Aliquot 180 µL of PBS into rows 2-6 of the first column of a 96-well microplate and add the reserved 100 µL of normalized overnight culture into the first well.
    2. Remove 20 µL of the normalized overnight culture from the first well and aliquot into the second well, gently pipetting up and down to mix.
    3. Repeat step 3.3.2 until the initial inoculum has been diluted to the final well (1 × 10⁵).
    4. Plate 10 µL spots of each dilution onto appropriate solid media in triplicate. Incubate statically overnight at 37 °C.
    5. Following incubation, count the number of colonies in each spot to calculate the actual CFU/mL of the inoculum.

4. Biofilm quantification

  1. Peg processing
    1. Following incubation, remove the peg model from the microplate and invert it under a flame or within a microbial safety cabinet (pegs facing up). Discard microplates.
    2. Transfer the peg lid to a fresh microplate containing 180 µL aliquots of sterile PBS to remove any unadhered cells. Repeat twice in fresh PBS for a total of three wash steps.
      NOTE: To prevent damage to surface-associated biofilms, avoid disrupting pegs when removing the peg lid from each microplate (i.e., touching the well edges).
  2. CFU/mL enumeration (biofilm-associated)
    1. Working aseptically under a flame or in a microbiological safety cabinet, set up the tube rack (manufactured in step 1.2.) with sterile glass test tubes as shown in Figure 1, and attach the rack top that fits the peg lid.
    2. Aseptically, aliquot 600 µL of sterile PBS into each test tube.
    3. Place the peg lid into the rack, with pegs in line with the tubes in the rack. Remove any autoclave tape on the peg lid.
    4. Using sterile forceps, push the pegs through the peg lid and into the corresponding test tubes aligned below.
    5. Replace the tube lids, and vortex each tube for 60 s to disaggregate the biofilm-associated cells from the peg surface.
    6. Remove 100 µL from each tube and serial dilute as described previously in step 3.3 in sterile PBS.
    7. Using a serological pipette plate 10 µL spots of each dilution on appropriate solid media, and incubate statically at 37 °C overnight.
    8. Following incubation, count the number of colonies on each dilution plate and use it to calculate the CFU/ mL.
  3. Crystal violet staining
    1. Aliquot 180 µL of 0.1% (w/v) crystal violet (in sterile water) into the 24 on-test wells of a 96-well microplate.
    2. Insert the rinsed peg model (pegs and peg lid) into the corresponding wells of the microplate. Incubate statically at room temperature for 20 min.
    3. Following incubation, remove the peg model from the microplate and discard the microplate.
    4. In an appropriately sized tub, rinse the entire peg set up in tap water whilst gently agitating. Repeat three times.
    5. Invert the peg model and allow the pegs to fully dry at RT.
    6. Aliquot 180 µL of 30% acetic acid into a fresh 96-well microplate and insert the dried peg model into the corresponding wells. Incubate at RT for 30 min.
    7. Remove the peg model from the microplate and read OD540nm of the stained wells using a microplate reader or spectrophotometer.
    8. To calculate biofilm formation on pegs, average the OD540nm of the stained negative control pegs and subtract from the average of the on-test pegs.

Toegang beperkt. Log in of start een proefperiode om deze inhoud te bekijken.

Resultaten

PCR setup and process diagram with test tubes and microplate for DNA amplification analysis.

Figure 1: A schematic representation of the Flexipeg model setup. (1) A single Flexipeg, coated in po...

Toegang beperkt. Log in of start een proefperiode om deze inhoud te bekijken.

Materialen

Lijst van materialen gebruikt in dit artikel
NaamBedrijfCatalogusnummerOpmerkingen
96-well MicroplatesGreiner650161U-shaped/round bottom.
Acetic acidSLS695092-2.5LSIG≥ 99.7% ACS reagent.
Crystal violetMerck61135-25G
Individual pegIn-houseFlexipeg components to be 3D printedAdditive manufacture using high temperature stable resin (24 pegs needed per Flexipeg model). Manufactured using Formlabs high temp resin by Protolabs (NL).
Luria-Bertani (LB) brothNeogenNCM0088BLB broth (Miller).
Lid that fits a 96 well plateIn-houseFlexipeg components to be 3D printedAdditive manufacture using high temperature stable resin.
Mold to prepare silicone matIn-houseFlexipeg components to be 3D printedAdditive manufacture from any durable material. Manufactured using ABS prototyping resin by Protolabs (NL).
Mold to prepare silicone mat sideIn-houseFlexipeg components to be 3D printedAdditive manufacture from any durable material.
Phosphate-buffered salineMerckP4417-50TAB
Pooled human urine--Collected from healthy donors following ethical approval by central university research ethics committee.
Rack for glass tubesIn-houseFlexipeg components to be 3D printedAdditive manufacture from any durable material.
Silicone (PDMS)MB FibreglassGP3481-FPolycraft General Purpose RTV Condensation Cure Mould Making Silicone Rubber.
Top that fits the peg lidIn-houseFlexipeg components to be 3D printedAdditive manufacture using high temperature stable resin.
Foley cathetersGreat Bear Healthcare UK Ltd 14 ch, 100% silicone

Trefwoorden

3D geprint apparaatkatheter geassocieerde urineweginfectiebiofilmvormingkristalvioletkleuringspectrophotometrische metingseri le verdunningmenselijke urinezuiveringsmonsterbacteri le inoculatiemicroplaatlezer