All procedures involving animals have been reviewed by the local institutional animal care committee and the JoVE veterinary review board.
1. Setting Up and Incubating the ITO-treated Slide for Cocultures
- Undivided cocultures
- Liquify the agarose at 70 °C on a hot plate.
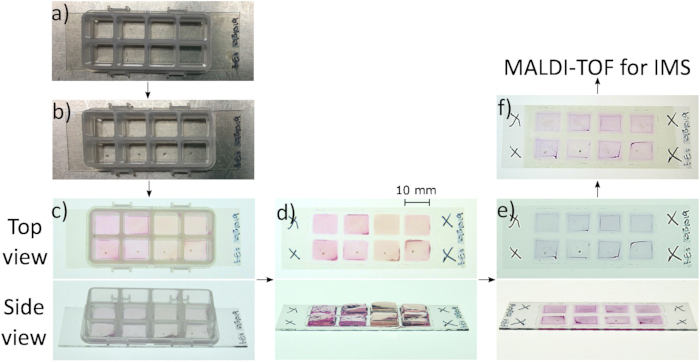
- Place the 8-well divider on top of the indium tinoxide (ITO)-treated slide (Figure 1A). The rubber bottom on the divider aids in adhesion to the slide, but make sure to apply continuous gentle downward pressure during agarose plating to ensure no leaking or mixing between wells.
- Collect cells in a 15 mL conical tube, centrifuge (5 min at 800 rpm), and resuspend to 50k cells per 150 μL in 1x DMEM media. If a different cell density is optimal, make sure that at this step the cell suspension is 2x the final density desired (e.g., for a final concentration of 50,000 cells in 300 μL, cell density at this step is 50,000 cells in 150 μL).
- Before plating cell culture, add ovarian explant to the center of the well (Figure 1B).
- Add agarose to each cell culture in individual 2 mL tubes just before plating. For each well, combine 200 μL of cell suspension and 200 μL of liquified agarose in a 2 mL tube. For example, for four wells, combine 800 μL of cell suspension and 800 μL of 2% agarose. Some mixture will be left over but making slightly more than necessary avoids air bubbles during pipetting.
- Add agarose to individual cell cultures immediately before plating that cell culture. The agarose will cool in under a minute, so be prepared to plate quickly.
- Immediately add 300 μL of the cell/agarose mixture to each well (Figure 1C). Figure 1C shows three cell conditions and one media condition, each plated with and without an ovary.
- Incubate slide at 37 °C and 5% CO₂ in a humidified incubator.
- Divided cocultures
- Cut dividers from thin, smooth plastic (Figure 2A).
NOTE: This experiment uses the sides of a sterile disposable media basin because they are flat and thin. Cut them just wide enough to fit snugly into the hypotenuse of the well (~13 mm).
- Liquify the agarose at 70 °C on a hot plate.
- Place the 8-well divider on top of the ITO-treated slide (Figure 2B). The rubber bottom on the divider aids in adhesion to the slide, but make sure to apply continuous gentle downward pressure during agarose plating to ensure no leaking or mixing between wells.
2. Drying Slide and Preparing for MALDI-TOF MS
- After four days (or any preferred time point), remove the chamber divider from the agarose plugs and the slide (Figure 1D). Gently detach the sides of the agarose from the chamber with a flat spatula and gently pull the chamber upward, being careful not to move any agarose plugs. If they do move, gently reposition them so that they are not touching one another.
- Place the slide in a 37 °C oven for approximately 4 hours, rotating 90° every hour.
NOTE: The rotation of the slide is important to ensure even heat distribution throughout the sample.
- Once dry, remove the slide from the oven (Figure 1E).
- Apply matrix solution using the sprayer (Figure 1F), with the following parameters: temperature = 30 °C, flow rate = 0.2 mL/min, number of passes = 8, direction = CC, and nozzle distance = 40 mm.
NOTE: In lieu of a matrix sprayer, an artistic airbrush can be used to apply liquid matrix. The same matrix solution can be used to spray, but approximately twice as much solution is required. With the slide clamped so that it hangs vertically, spray the slide from a 90° angle approximately one foot away until the matrix layer is visible.
- Add 1 μL of calibrant (Phosphorus Red for targets <500 Da, a peptide mixture (see Table of Materials) for targets <5,000 Da) to clear spots on the slide. Phosphorus Red requires no mixing with the matrix, but the peptide mixture requires 1:1 mixture with the matrix to aid ionization. Wait for the calibrant to dry.
- Draw an X using a permanent marker on each corner of the slide and take an optical image using a camera or a scanner at 1,200 dpi.