All procedures involving animal models have been reviewed by the local institutional animal care committee and the JoVE veterinary review board.
Use New Zealand White (NZW) rabbits weighing 2−3 kg Lightly sedate animals placed in a restraining bag with subcutaneous acepromazine as above (1 mg/kg). Remove all fur on the face and dorsal surface of the skull to visualize the surgical landmarks. Trim fur with cutting shears leaving residual fine fur about 1 mm in length. Remove all residual fur using mild depilatory cream following the manufacturer's instructions.
1. Removal of OSLG
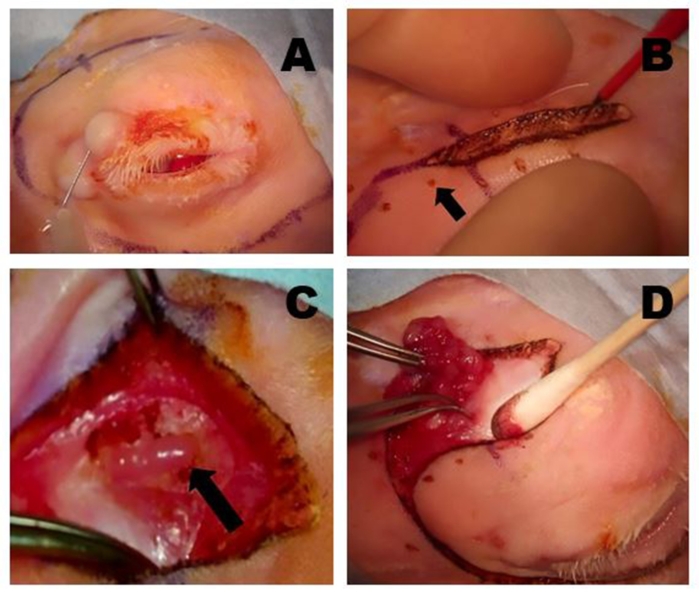
- Infiltrate the incision sites (surgical marking pen lines and upper posterior lid) with a 50:50 mixture of 2% lidocaine with 1:100,000 epinephrine and 0.5% bupivacaine using a 5 cc syringe with a 30 G needle (Figure 1A).
NOTE: Syringe and needle size are not critical.
- Use a Colorado needle connected to an electrosurgical unit to make the skin incisions along the surgical markings. Settings can vary based on clinical response and typically are between 10 to 15 units for both cut and coagulation (Figure 1B).
- Apply opposing tension across the skin incision to separate the tissues and expose the underlying frontoscutularis muscle fibers.
- Apply medial pressure on the globe to aid visualization of the OSLG, seen as bulging tissue located just medial or deep to the frontoscutularis muscle fibers. If necessary, move these muscle fibers to the side in order to expose the underlying incisure.
- With toothed forceps (0.3) and capsulotomy scissors, gently retract and cut the fibrous capsule overlying the OSLG. The OSLG typically has a pale tan color (Figure 1C).
- Using toothed or non-toothed forceps, grasp the OSLG gland tissue and gently pull it out through the superior incisure using a "hand over hand" technique. Cut small, fibrous bands using capsulotomy scissors to free the gland from its position in the orbit (Figure 1D).
NOTE: As the OSLG gland tissue is removed, it will begin to coalesce into a large tube-like structure (main excretory duct).
- When the gland has been removed as completely as possible, use generous cautery with the Colorado needle to create tissue char, truncating the gland within the incisure as deeply as possible. This will later serve as a confirmatory landmark during removal of the PSLG.
2. Removal of PSLG.
- Evert the upper eyelid using a cotton-tipped applicator. The bulbous end of the PSLG is usually easily visible.
NOTE: In some anatomic dissections, it may be possible to visualize the main excretory duct as a pale linear structure about 1 or 2 mm wide.
- Engage the PSLG with toothed forceps (0.3) and retract it from the eyelid surface while using capsulotomy scissors to cut around its base separating it from the underlying tarsus (Figure 2A).
- Control moderate bleeding with the monopolar cautery.
- Apply continuous traction on the separated tissue to maintain a tissue plane for dissection. This will allow the main excretory duct of the SLG to be removed as well (Figure 2B).
NOTE: As the dissection is carried out, it will typically advance to the superior orbital rim where it is possible to see the cautery marks left behind from removal of the more superior and medially located OSLG.