All procedures involving animal models have been reviewed by the local institutional animal care committee and the JoVE veterinary review board.
1. Surgery
- Site preparation
- Place the rabbit on a heated pad (39 °C) covered by a mattress pad (to avoid burns) on the surgery table. Shave the scalp.
- Apply a lubricating gel on the eyes to avoid irritation and dryness. Disinfect the site by scrubbing the skin with povidone iodine (10%). Then drape the rabbit with a sterile surgical drape and cut out an access area for the skull.
- Disinfect the surgical site with povidone iodine (10%) for a second time. Apply a lubricating gel on the eyes to avoid irritation and dryness.
- Prepare a draped table (sterile drape) on which to place the complete surgical tray.
- Surgical site opening
- Anesthetize locally with a subcutaneous (SC) injection of lidocaine 2% (1 mL) on the skull.
- Incise through the skin (with a scalpel) along the calvarial sagittal line, from the orbits to the external occipital protuberance (~4 cm in length). Ensure that the periosteum is incised.
- Gently elevate the periosteum (with a periosteal elevator) on both side of the incision. Rinse the site with sterile saline.
- Cylinder placement
- Locate the median and coronal sutures on the skull (Figure 2A, B). Note that these anatomical lines form a cross. The cylinders will be placed in each of the quadrants defined by the cross, ensuring that the edge of the cylinder is not over the suture (Figure 2C).
- Place the first cylinder on the left upper quadrant (left frontal bone), and try to lay the device flat. Fix in the position with strong hand pressure and screw a micro-screw, until resistance is felt. Ensure that the screw head is flush with the surface of the cylinder tab.
- Repeat the same procedure on the other tab to fix the cylinder tightly onto the skull. Ensure that the cylinder is hermetically fixed to the bone.
- Repeat the procedure on the right upper quarter (right frontal bone), left lower quarter (left parietal bone) and right lower quarter (right parietal bone).
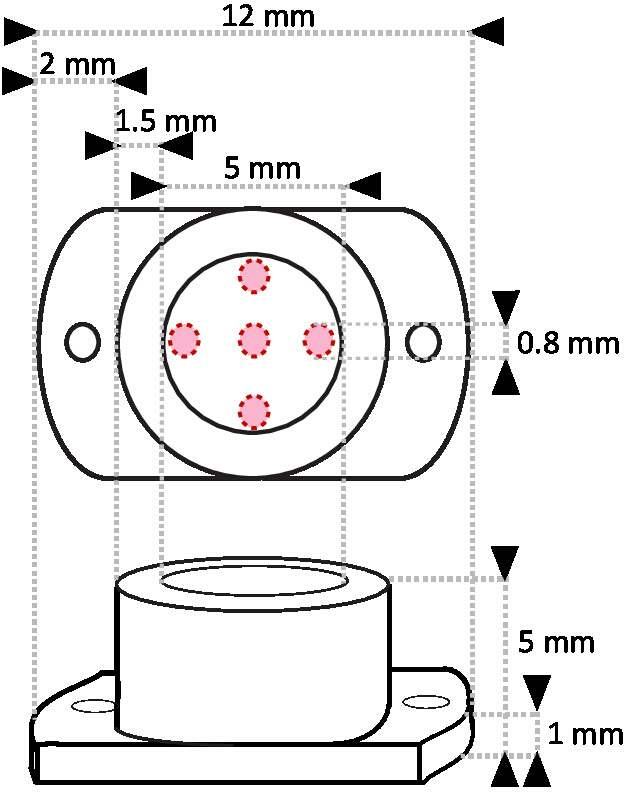
- Bone drilling of 5 intramedullary holes within the area circumscribed by the cylinders (Figure 1)
- Drill an intramedullary hole under saline irrigation (0.8 mm in diameter, ~1 mm in depth) with a round bur on the bone, in the center of the area circumscribed by the cylinder. Ensure that bleeding appears.
- Drill two more intramedullary holes along the axis passing through the two tab screws, at the inner edges of the cylinder. Along the perpendicular axe, drill two more intramedullary holes at the inner edges of the cylinder. Ensure that bleeding appears.
- Repeat the operation within the three other cylinders.
- Filling cylinders with material samples and capping (Figure 3)
- Prepare the desired bone substitute material according to manufacturer instructions or material specifications.
- Fill the first cylinder to the brim with the material sample and close the cylinder by fitting the cap. Repeat the process in the 3 other cylinders.
- Surgical site closure
- Close the skin above the cylinders with an intermittent non-resorbable suture.
- Apply a sprayable dressing onto the wound.
2. Post-surgical treatment
- Stop analgesia and anesthesia (propofol and fentanyl perfusion arrest) supply and check the recovery of autonomous breathing.
- Stop the ventilation once the animal has recovered autonomous breathing. Maintain the animal under pure oxygen before complete awakening.
- Inject buprenorphine hydrochloride SC (0.02 mg/kg, 0.03 mg/mL, 0.67 mL/kg) and repeat the injection every 6 h for 3 days as post-surgical analgesia.
- Transfer the animal into its usual housing with water and complete feeding.