All procedures involving animal models have been reviewed by the local institutional animal care committee and the JoVE veterinary review board.
1. Preparations
- Prepare 10 L of phosphate-buffered saline (PBS): 32.27 g of sodium hydrogen phosphate (Na2HPO4·12H2O), 4.5 g of Sodium dihydrogen phosphate (NaH2PO4·2H2O), 80.0 g of sodium chloride (NaCl) added to ultrapure water to a final volume of 10 L. Store solution at room temperature (RT).
- Prepare 200 mL of PBS-T: 200 mL of PBS from step 1.1 with 100 µL of polyoxyethylene (10) octylphenyl ether to a final concentration of 0.05% (vol: vol). Store at RT.
- While wearing gloves and eye protection, prepare 50 mL of 15% sucrose in 10% buffered neutral formalin solution: 7.5 g of sucrose added to 10% buffered neutral formalin solution (Table of Materials) to a final volume of 50 mL. Store at RT.
CAUTION: Inhalation and/or skin/eye contact with formaldehyde in 10% buffered neutral formalin solution can be hazardous. Handle with caution.
- Prepare 1.5 mL of 200 units/mL phalloidin-fluorescent dye conjugate stock solution: phalloidin-fluorescent dye conjugate (300 units in 1 vial, lyophilized solids, excitation, and emission wavelengths: 581 nm and 609 nm, respectively) suspended in 1.5 mL of methanol. Store the solution in the dark at -20 °C.
- Prepare 5 mg/mL 4',6-diamidino-2-phenylindole, dihydrochloride (DAPI) stock solution: 10 mg of DAPI in 2 mL of N, N-dimethylformamide (DMF). Store the solution in the dark at -20 °C.
- Prepare 5% bovine serum albumin (BSA) in PBS: 0.5 g of BSA, 10 mL of PBS. Store at 4 °C.
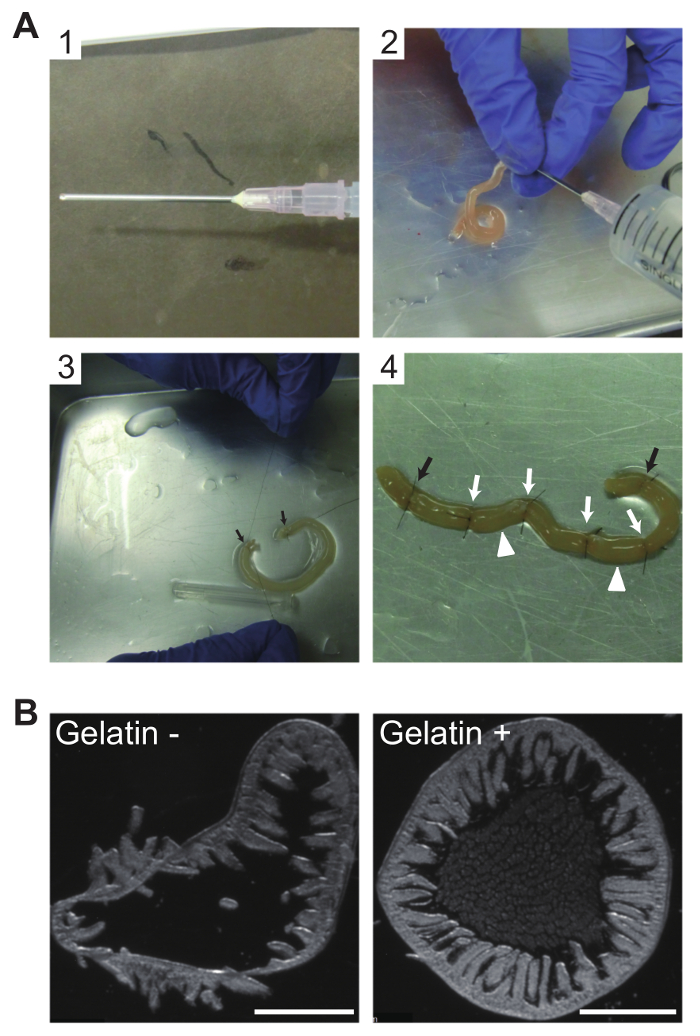
- Remove the beveled tip of an 18-gauge straight needle using a nipper, and pinch the nipped end with a pincher in a lengthwise direction to allow liquid to flow through the needle lumen (Figure 1A1).
NOTE: The protocol can be paused here.
2. Animal Dissection and Isolation of Jejunum
- Perfusion fixation of a mouse
- Wear gloves and work in a well-ventilated area.
- Prepare a 100 mL glass beaker, 10% buffered neutral formalin solution, surgical tools (scissors, forceps), a metallic tray, 6-0 nylon cut sutures, an 18-gauge straight needle prepared as in 1.7, a 22-gauge winged needle, a 20-mL syringe.
- Load 20 mL of 10% buffered neutral formalin solution from the glass beaker into the 20-mL syringe and attach the 22-gauge winged needle to the outlet.
- Prepare liquid gelatin by adding 1 g of gelatin powder to 20 mL of PBS (final 5% gelatin) in a 50-mL centrifuge tube. After soaking at RT for 15 min, incubate at 50 °C in a water bath for 15 min without shaking.
- Briefly vortex and incubate at 50 °C for another 15 min to completely dissolve the gelatin. Leave the tube at RT until use.
- Euthanize an adult mouse by cervical dislocation.
- Place the mouse from step 2.1.6 on a metallic tray and make a small incision on the skin through the ensiform cartilage using surgical tools.
- Expand the incision with both hands to expose the thoracic and abdominal regions.
- Open the peritoneum to expose the diaphragm, and then open the diaphragm on both sides.
- Cut the thoracic cage along the anterior axillary lines on both sides, then remove the thoracic wall by cutting in a transverse direction at the position of the thymus to expose the heart.
- Make a small incision on the auricle of the right atrium to drain the blood and insert a 22-gauge winged needle into the apex of the left ventricle. Push the plunger to perfuse the tissues with a 10% buffered neutral formalin solution.
- After exposing organs in the pelvis, cut off the end of the rectum from the anus, and separate the intestines from the body by cutting the mesentery.
- To isolate the jejunum, cut the intestines at 4 cm from the anal side of the gastric antrum. Discard the anal half of the remaining small intestine.
- Clip the jejunum in half to facilitate the flushing procedure. Load 20 mL of 10% buffered neutral formalin solution into the 20-mL syringe, and attach the 18-gauge straight needle prepared in step 1.7 to the outlet.
- Inject 10% buffered neutral formalin solution from one end of the clipped jejunum to flush out the intestinal contents and to fix the gut lumen surface (Figure 1A2).
- Wash the gut lumen by injecting PBS as described in step 2.1.15.
- Flush liquid gelatin into the gut lumen as described in step 2.1.15 to replace PBS with liquid gelatin.
- Close one end of the clipped jejunum by suture ligation using a 6-0 nylon cut suture, fill the jejunum with liquid gelatin, and close the opposite end by suture ligation (Figure 1A3).
- Add four suture knots to fit a sausage-shaped jejunum section to the depressed portion of a cryomold (Figure 1A4).
NOTE: For cryomolds with a 20 mm x 25 mm x 5 mm depressed section, a ~20 mm sausage-like jejunum section is preferable.
- Soak the tissues in 50 mL of 15% sucrose in 10% buffered neutral formalin solution overnight at 4 °C.
NOTE: These steps ensure cryoprotection by sucrose and protein fixation by formalin of gelatin and tissue. Formalin-gelatinized gelatin does not melt at RT, whereas non-fixed gelatinized gelatin at 4 °C melts at RT.
3. Snap Freezing of Gelatin-filled Jejunum Tissues
- By cutting the jejunum at the suture knots, three sausage-like jejunum pieces with both ends ligated are obtained (Figure 1A4). Align the sausage-like pieces in a cryomold for the addition of embedding compound for the preparation of frozen tissue specimens.
- Snap freeze the cryomold in isopentane cooled with liquid nitrogen. Store cryomolds at -80 °C
NOTE: The protocol can be paused here.
4. Immunofluorescence of Tuft Cells Using Free-floating Cryosections
- Cryosectioning
- Set both the cryostat chamber temperature (CT) and object temperature (OT) to -22 °C. Place the frozen tissue block in a cryomold in the cryostat chamber for at least 15 min.
- Add 3 mL of PBS to a 35-mm culture dish.
- Remove the frozen tissue block from the cryomold and cut the block in half with a razor blade to expose the transverse section of the jejunum. Mount one half of the block on a chuck (a cryostat adaptor) to section the cutting plane with the razor blade.
- Section the gelatin-filled jejunum into 30 µm-thick sections. Use frozen forceps to gently transfer the sections into the 35-mm culture dish prepared in step 4.1.2 (Figure 2B, right).
- Application of primary antibodies
- Wash the free-floating sections in the 35-mm culture dish 3 times for 5 min each with 3 mL PBS-T with mild shaking on a reciprocal shaker (approximately 36 times/min).
- Prepare antigen retrieval solution: 0.3 mL of antigen retrieval solution concentrate (Table of Materials) in 2.7 mL of ultrapure water. Add 3 mL of antigen retrieval solution to the 35-mm culture dish containing free-floating sections.
- Close the lid, seal the gap between the dish and the lid with a strip of vinyl tape, and incubate at 50 °C in a hybridization incubator for 3 h without shaking.
- Remove the dish from the incubator and cool at RT for 20 min. After removing the vinyl tape, wash the sections 3 times for 5 min each with 3 mL of PBS-T and mild shaking.
- Aspirate the PBS-T and add 5 drops of blocking solution (Table of Materials) onto the sections. Incubate at RT for 5 min with mild shaking.
- Prepare the primary antibody solution: 495 µL of 5% BSA in PBS with 5 µL of phospho-Y1798 girdin (pY1798) antibodies (Table of Materials). Add 500 µL of primary antibody solution onto the sections (the blocking solution does not need to be removed).
- Place the dish in a humidified incubation chamber and incubate overnight at 4 °C with mild shaking.
NOTE: The overnight incubation can be extended to up to three nights.
- Application of secondary antibodies
- Wash the sections 3 times for 5 min each in 3 mL of PBS-T with mild shaking.
- Prepare diluted DAPI stock solution: 2 µL of DAPI stock solution (Step 1.5), 998 µL of PBS.
- Make secondary antibody solution: 476 µL of 5% BSA in PBS, 10.5 µL of diluted DAPI solution, 12.5 µL of phalloidin-fluorescent dye conjugate stock solution, 1 µL of goat anti-rabbit IgG-fluorescent dye conjugate (wavelength: excitation 496 nm, emission 520 nm).
- After aspirating the PBS-T, apply the secondary antibody solution and incubate in a light-shielded incubation chamber at RT for 30 min with mild shaking.
- Wash the sections 3 times for 5 min each with 3 mL of PBS-T and mild shaking.
- After the final wash, remove the PBS-T and replace it with 3 mL of PBS lacking polyoxyethylene(10) octylphenyl ether. Transfer the dish to a stereoscopic microscope.
- Place 200 µL of PBS in a droplet on the center of a MAS-coated white glass slide and transfer one jejunum section from the dish into the droplet using a P200 pipet tip.
- After adjusting the section alignment under the stereoscopic microscope, aspirate all remaining PBS surrounding the section.
- Add 20 µL of aqueous mounting media and place a 20 x 20 mm coverslip atop the media.
- Immediately seal the coverslip edges with xylene-based mounting media. Place the slide on a wooden mappe and allow the xylene-based mounting media to solidify at RT for 2 - 3 h.
NOTE: The protocol can be paused here. After the xylene-based mounting media solidifies, the slides can be stored for 2 - 3 weeks in a light-shielded slide box at RT.
5. Confocal Microscopy
- Put immersion oil on the 63X objective of a confocal microscope. Turn the coverslip slide down and place the slide on the stage.
- Digitize the TC images acquired at laser wavelengths 405, 488, and 555 nm and save the images in tiff format (.tiff).
NOTE: Choose a detection filter set that is appropriate for the fluorescence dyes (i.e., excitation/emission maxima: 358/461 nm, 490/525, and 590/617).