Een abonnement op JoVE is vereist om deze inhoud te bekijken. Log in of start vandaag met uw gratis proefperiode.

Methodenartikel

Constructing Patterned Neuronal Circuits on a Multi-Electrode Array

887 weergaven

8 juli 2025

In dit artikel

Samenvatting

Source: Kanner, S., et al. Design, Surface Treatment, Cellular Plating, and Culturing of Modular Neuronal Networks Composed of Functionally Inter-connected Circuits. J. Vis. Exp. (2015)

This video demonstrates the process of culturing neuronal cells on a patterned multi-electrode array (MEA) to establish modular neuronal networks. This method allows the study of neural signal transmission and cellular interactions.
Protocol

1. Multi-Electrode Array (MEA) Preparation

  1. Clean MEA in this order (Table of Materials):
    1. Wash with water under tap and sonicate in a concentrated, enzymatic detergent 3 times.
    2. Sonicate in distilled water 3 times.
    3. Wash with distilled water (in hood, 1,000 µl tip) for 3 times and place under ultraviolet (UV) for 30 min.
  2. Supporting network preparation:
    1. Prepare the designed support network mold.
      1. Pour polydimethylsiloxane (PDMS) into a 12-well plate (22 mm diameter).
      2. When the PDMS is hardened, remove the mold and, using a scalpel, cut a hole in the middle to create a ring shape.
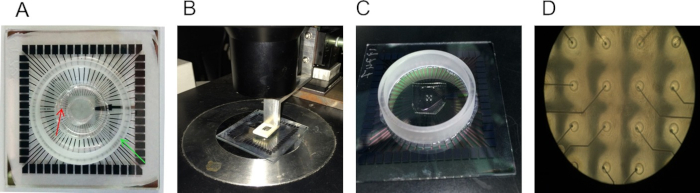
      3. Place a designed support network mold on the center of the MEA (Figure 1A) and cover the rest of the surface with poly-D-lysine (PDL) for 2 hr at room temperature (RT).
    2. Remove PDL using a pipette and wash with distilled water.
    3. Remove the mold and leave to dry (Figure 1A).
  3. Align stencil to MEA in the following way:
    1. Place the stencil on the designated micromanipulator. Use an inverted microscope to accurately align the patterned structure to electrodes and lower the stencil until it is placed on the MEA surface (Figure 1B).
      Note: Contact with a well-cleaned MEA provides competitive adhesion between the PDMS and the MEA itself.
    2. Lift the micromanipulator and, if necessary, use tweezers to apply a small amount of pressure above the PDMS to prevent it from detaching from the MEA.
    3. Gently press the stencil to the MEA surface, and use a microscope to verify that it is firmly attached and well aligned (Figure 1C-D).
  4. Place MEA in a vacuum chamber for 15 min; put a 1 ml drop of PDL on the stencil.
  5. Insert into the vacuum chamber 2 times for 20 min each. Leave PDL to dry O/N in the incubator.
  6. Before plating, remove the PDMS stencils from MEAs and wash them using sterile water. Place under UV illumination for 7 min.

2. Plating

  1. Calculate the number of cells needed for plating using a hemocytometer
    1. Make sure the counting chamber (hemocytometer) is clean and place a cover slip on it (Use alcohol to clean).
    2. Dilute 10 µl of the cell suspension in 190 µl of plating medium (dilution 1:20).
    3. Load 10 µl of the diluted cells onto the edge of the counting chamber and slowly pipette the cells out, allowing the chamber to fill itself.
    4. Using an inverted microscope, visualize the hemocytometer grid. Determine the number of cells in the chamber by direct counting (healthy cells should be round). Count the cells within the large square without those crossing the edges.
    5. Calculate the concentration of cells:
      Total number of cells/1000 µl = Total cells counted × dilution factor × 104 (area of the hemocytometer).
      Note: For example, if the dilution factor was 20 and the total cells counted were 100:
      100 × 20 × 104 = 0.1 x 10⁷ cells/1,000 µl or 1 x 10⁶/100 µl. In order to plate 0.75 x 10⁶ cells, take 75 µl out of the cells.
  2. Take the number of cells needed for plating per single MEA or Petri dish, resuspend the cells to prevent aggregation, and plate them at the center, on top of the patterned area (the cells can be diluted in the medium if needed). For the MEA, place a 100 µl drop in the middle. For the coverslip, place a 1,000 µl drop in the middle.
  3. Incubate the plated cells at 37 °C for 40 min. Add plating medium to the plated cells, up to 1 ml per MEA and 2 ml per coverslip.
  4. Keep at 37 °C and dilute with fresh growth medium enriched with 0.5 Pen-Strep, 2% B-27, and 0.75% glutamax every 4 days.
  5. From 6/7 DIV, after seeing connections between the islands, dilute medium with 10 µl/ml FUDR (25 mg deoxyuridine + 62.5 mg uridine in 12.5 ml MEM (Minimum Essential Medium Eagle)) or any other anti-mitotic agent to prevent glial overgrowth.

Toegang beperkt. Log in of start een proefperiode om deze inhoud te bekijken.

Resultaten

Assembly and microscopy of microfluidic devices; optical analysis setup; microchannel examination.
Figure 1. PDMS structures deposition on a MEA. (A) PDMS mold with a ring shape (marked with the red arrow) mounted on a MEA. The mold is used to coat the area destined for the supporting neuronal network and located at the periphery of the culturing ar...

Toegang beperkt. Log in of start een proefperiode om deze inhoud te bekijken.

Openbaarmakingen

No conflicts of interest declared.

Materialen

Lijst van materialen gebruikt in dit artikel
NaamBedrijfCatalogusnummerOpmerkingen
PDMS, Sylgard 184Dow Corning
Nalgene Vacuum ChamberThermo5305-0609
Poly-D-Lysine PDLSigmaP7886
12 well culture plateSigmaCLS3336
5-Fluoro-2'-deoxyuridineSigmaF0503
MEA1060-Inv-BCMulti Channel Systems
TC02Multi Channel Systems
Pen StrepBiological Industries Beit Haemek03-033-1c
B-27Gibco17504044
glutaMAXGibco35050-038
MEM Minimum Essential Medium-EagleBiological Industries Beit Haemek01-025-1B
Micro Electrode Arrays 4QMulti Channel Systems60-4QMEA1000iR-Ti-prcleaning manual: http://www.multichannelsystems.com

Tags

Gepatten stencilPDL-coatingcellplatingvacuümkamerUV-sterilisatiemicromanipulatorregistratie van neurale signalenmodulaire netwerken