Een abonnement op JoVE is vereist om deze inhoud te bekijken. Log in of start vandaag met uw gratis proefperiode.

Methodenartikel

Monitoring Electrical Signals from the Afferent Neurons in an Immobilized Zebrafish Larva

974 weergaven

8 juli 2025

In dit artikel

Samenvatting

Source: Lunsford, E. T., et al. Activity of Posterior Lateral Line Afferent Neurons during Swimming in Zebrafish. J. Vis. Exp. (2021).

This video demonstrates the recording of electrical signals from the afferent neurons in a paralyzed zebrafish larva by positioning a micropipette near the lateral line ganglion and forming a loose seal for signal capture. The extracellular solution maintains neuronal viability during this process.

Protocol

All procedures involving animal models have been reviewed by the local institutional animal care committee and the JoVE veterinary review board.

1. Preparation of materials for electrophysiological recordings

  1. Make a silicone elastomer-bottomed recording dish.
    1. Dispense a thin layer of self-mixing silicone elastomer components (e.g., Sylgard) into a cover glass-bottomed tissue culture dish until it levels with the rim of a shallow well. Approximately 0.5 mL is sufficient.
    2. Cover and cure the dish for a minimum of 48 h at room temperature.
  2. Make dissection pins.
    1. Using a DC power supply, provide a negative charge (5 V) to a 100 mL beaker of etchant (3M KOH) and attach a tungsten wire (0.002 inch; 50.8 µm diameter) to the positively charged output.
      ​CAUTION: Negative and positive wires should not contact one another during this procedure as you may run the risk of producing sparks, which could pose a potential fire hazard.
    2. Etch the tungsten wire by quickly and repeatedly dipping the tip into the etchant bath until the tip narrows to a sharp point. Under a stereomicroscope, cut the wire approximately 1 mm from the tip with a straight-edge razor blade. Repeat three more times, and then insert pins into the cured recording dish using fine forceps.
  3. Prepare recording electrodes.
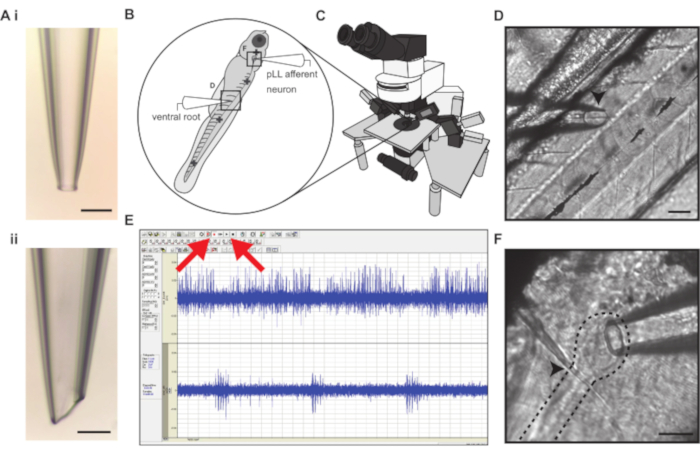
    1. Using a horizontal micropipette puller with box filament, pull a borosilicate glass capillary tube (inner diameter: 0.86 mm, outer diameter: 1.50 mm) into electrodes with a 30 µm diameter tip with slight taper (Figure 1 Ai) that will be used to record afferent neurons from the posterior lateral line.
    2. Pull an additional borosilicate glass capillary tube into a pair of electrodes with smaller tip diameters (1-5 µm). Holding one electrode in each hand, gently run the tips across one another to break them to a ~30° angle. Using a microforge, polish the beveled tip until smooth.
  4. Generate the protocol in electrophysiology recording programs.
    1. Ensure the right head stage is connected to the Channel 1 input in the back of the microelectrode current and voltage clamp amplifier for the afferent neuron recordings.
      NOTE: Computer specifications for the current and voltage clamp amplifier minimally require a 1 Ghz or better processor, Windows XP Pro or Mac OS X 10.46.6, a CD-ROM drive with 512 MB RAM, 500 MB hard drive space, and 2 USB ports.
    2. Open the computer-controlled amplifier software.
    3. Set Channel 1 to current-clamp mode by clicking the IC button.
    4. Input the following parameter under the I-Clamp 1 tab. Primary Output: 100x AC Membrane Potential (100,000 mV/mV), Gain: 1,000, Bessel: 1 kHz, AC: 300 Hz, Scope: Bypass. Secondary Output: 100x AC Membrane Potential (100 mV/mV), Gain: 1, Lowpass Filter: 10 Hz.
    5. Save the channel parameter as Ch1_Aff.
    6. Install and open the patch clamp electrophysiology software.
    7. Click on Configure and select Lab Bench to set up the analog signals by adding Ch1_Aff to Digitizer Channels (e.g., Analog IN #0 and Analog IN #1) connected by BNC coaxial cable to the amplifier's corresponding Channel 1 Scaled Outputs. Click on OK.
      NOTE: The minimum computer requirements for the digitizer are: a 1 Ghz or better processor, Windows XP Pro or Mac OS X 10.46.6, CD-ROM drive 512 MB RAM, 500 MB hard drive space, and 2 USB ports.
    8. Click on Acquire and select New Protocol.
    9. In the Mode/Rate tab, select Gap Free; under Acquisition Mode, set Trial Length to either Use available disk space (i.e., record until stopped) or a desired set Duration (hh:mm:ss), and then set the Sampling rate per signal (Hz) to 20,000 to maximize the resolution.
    10. Under the Inputs tab, select the Analog IN Channels that were previously configured (in step 1.4.6) and select Ch1_Aff for the corresponding channel.
    11. Under the Outputs tab, select Cmd 0 and Cmd 1 for Channel #0 and Channel #1, respectively.
      1. Connect Channel 1 Command on the amplifier to Analog Output 0 on the digitizer via BNC coaxial cable.
    12. The remaining tabs can remain under default settings. Click on OK and save the protocol.

2. Solution preparation

  1. Prepare Hank's solution: 137 mM NaCl, 5.4 mM KCl, 0.25 mM Na2HPO4, 0.44 mM KH2PO4, 1.3 mM CaCl2, 1.0 mM MgSO4, 4.2 mM NaHCO4; pH 7.3. Dilute to 10% Hank's solution by adding the appropriate volume of deionized water to the stock.
  2. Prepare the extracellular solution: 134 mM NaCl, 2.9 mM KCl, 1.2 mM MgCl2, 2.1 mM CaCl2, 10 mM glucose, and 10 mM HEPES buffer, pH 7.8 adjusted with NaOH. Vacuum filter the extracellular solution through a filter with a 0.22 µm pore size.
  3. Prepare α -bungarotoxin: Dissolve 1 mg of lyophilized α-bungarotoxin in 10 mL extracellular solution to produce 0.1% dilution.
  4. Prepare Euthanasia solution: 50% (mg/L) buffered pharmaceutical-grade MS-222 in 10% Hank's solution.
    CAUTION: α-bungarotoxin is a potent neurotoxin that paralyzes muscles by blocking cholinergic receptors. Gloves are required and eye protection is recommended while handling the paralytic.

3. Preparation of larvae for electrophysiological recordings

  1. Immobilize zebrafish larvae.
    1. Use larvae from the laboratory-bred population of zebrafish (Danio rerio; 4-7 days post fertilization) and house in embryo solution (10% Hank's solution) at 27 °C.
    2. Using a large-tipped transfer pipette, transfer the larva from the housing into a small Petri dish (35 mm) and remove as much of the surrounding solution as possible.
      NOTE: Removing the embryo solution prevents dilution of the paralytic and increases its efficacy. The corner of a task wipe can be used to wick away the remaining embryo solution, and it is critical not to contact the larvae or leave them exposed to air.
    3. Immerse larvae in 10 µL of 0.1% α-bungarotoxin for approximately 5 min.
      NOTE: The time necessary to immobilize larvae varies between preparations. A healthy preparation depends on closely monitoring sustained fast blood flow and decreased motor responses. Brief overexposure to the paralytic can lead to a slow decline in the preparation's overall health, even after a thorough washout. It is best to apply a wash before the larva is completely immobilized while it still shows signs of subtle muscle vibrations.
    4. Wash the paralyzed larva with the extracellular solution and bathe for 10 min.
      NOTE: The washout allows for the larva to transition from subtle muscle vibrations to complete paralysis. Also, α-bungarotoxin is an antagonist of the nicotinic acetylcholine receptor (nAChR) α9-subunit, which is a critical component of the endogenous feedback circuit this protocol observes; however, this effect has been shown to be reversible in Xenopus and zebrafish hair cells after a 10 min washout.
  2. Pin fish in the recording dish.
    NOTE: Anesthesia (e.g., MS-222, Tricaine) is not required while preparing larval zebrafish (4-7 dpf) as it interferes with animal health. In fact, larval zebrafish are exempt from certain vertebrate protocols.
    1. Using a transfer pipette, move the larva from the extracellular solution bath to the silicone-bottomed recording dish. Fill the remainder of the dish with the extracellular solution.
    2. Under a stereomicroscope, gently position the larvae with fine-tipped forceps above the center of the silicone mat, lateral side up, with the body's anterior and posterior ends running left to right, respectively. Then grasp an etched pin from the silicone mat using fine-tipped forceps and insert the pin, orthogonally to the silicone, through the dorsal notochord of the larvae directly dorsal to the anus. Insert the second pin through the notochord near the end of the tail and insert the third pin through the notochord dorsal of the gas bladder (Figure 1B).
      NOTE: While inserting pins, it is important to target the center of the notochord width to prevent impinging blood flow or damaging surrounding musculature. The notochord is dorsal to the posterior lateral line nerve, so with proper pinning, no damage is expected to the lateral line sensory neurons. Insert after first contact so as to not disturb the surrounding tissue. Ideally, the diameter of the pin is less than half the width of the notochord to ensure clean insertion. If the pins exceed this width, repeat step 1.2 until the desired pin width is attained. If the blood flow slows after pinning, repeat from step 1.3 onward with a new specimen.
    3. Insert the fourth pin through the otic vesicle while providing slight rotation towards the anterior as the pin inserts into the encapsulant (Figure 1B). As a slight rotation is applied, watch for the tissue between the cleithrum and otic vesicle to reveal the cluster of afferent somata.
      ​NOTE: Angled insertion of the fourth pin is to ensure the exposure of the posterior lateral line afferent ganglion, which is otherwise obstructed by the large otic vesicle.

4. Afferent neuron recording

  1. Fill the afferent recording electrode with 30 µL of the extracellular solution, insert it into the right head stage pipette holder (Figure 1B, C), and lower it into the dish solution while applying positive pressure (1-2 mm Hg) produced by a pneumatic transducer.
  2. Locate and loosely attach to posterior lateral line afferent ganglion.
    1. Using a micromanipulator, lower the afferent electrode tip until it is holding position above the cleithrum.
    2. Increase the magnification to 40x immersion and locate the intersection of the posterior lateral line nerve and cleithrum. Follow the lateral line nerve anterior from the cleithrum to where the fibers innervate the posterior lateral line afferent ganglion, distinguishable by the discrete cluster of soma (Figure 1F).
    3. Bring the electrode tip over the afferent ganglion and lower the pipette until the tip contacts the epithelium. Gently, maneuver the electrode so that the entire tip circumference contacts the afferent ganglion.
    4. Apply negative pressure (20-50 mm Hg) with the pneumatic transducer and hold.
      NOTE: The negative pressure applied to the afferent ganglion is gentle. Increasing negative pressure can improve signal-to-noise, but afferent neuron health declines under sustained aggressive suction, which decreases the probability of a successful recording.
  3. Record afferent neuron activity.
    1. The left head stage should be connected to the amplifier, which relays the amplified signal into a digitizer that outputs the said signal into the patch clamp electrophysiology software to be monitored on an adjacent computer.
    2. In pClamp10, click on the Play button on the toolbar to monitor afferent neurons.
    3. Ensure that the whole cell, loose patch recording of afferent neurons is achieved once spikes occur spontaneously, roughly every 100-200 ms (Figure 1E).
    4. Gradually, increase the afferent neuron recording electrode pressure back to atmospheric (0 mm Hg) and hold for the remainder of the recording.

Toegang beperkt. Log in of start een proefperiode om deze inhoud te bekijken.

Resultaten

Electrophysiology setup: Micropipettes, microscope, fish neuron diagram; data graph; neural activity.
Figure 1: Simultaneous electrophysiological recording of posterior lateral line afferent neuron and ventral motor root activity. (A). Example of a loose-patch afferent (i) and ventral motor root (ii) r...

Toegang beperkt. Log in of start een proefperiode om deze inhoud te bekijken.

Openbaarmakingen

No conflicts of interest declared.

Materialen

Lijst van materialen gebruikt in dit artikel
NaamBedrijfCatalogusnummerOpmerkingen
100 mL beakerPYREX1000Resceptacle for etchant
10x water immersion objectiveOlympusUMPLFLN10xWLow magnification for positioning larvae and recording electrode
40x water immersion objectiveOlympusLUMPLFLN40XWHigher magnification for position electrode tip and establishing patch-clamp
BNC coaxial cablesThorLabs2249-C-12Connecting amplifier and digitizer channels; require 4
Borosilicate glass capillaries w/ filamentWarner InstrumentsG150F-3Inner diameter: 0.86, outer diameter: 1.50; capillary glass used to form recording electrodes
ComputerN/AN/AAny computer should work
DC Power SupplyTenma72-420Used for electrically etching dissection pins
Electrophysiology digitizerAxon Instruments, Molecular DevicesAxon DigiData 1440AEnables acquisition of patch-clamp data
FilamentSutter Instrument CompanyFB255B2.5 mm box filament used in micropipette puller
Fine forcepsFine Science ToolsDumont #5 (0.05 x 0.02 mm) Item No. 11295-10Used to manipulate larvae and insert pins
Fixed stage DIC microscopeOlympusBX51WIMicroscope used to visualize and establish patch-clamp recordings
Flexible, tapered pipette tipFisher Scientific02-707-169Flexible tips enable insertion into recording electrode to dispense extracellular solution at the tip
FluoroDishWorld Precision Instruments Inc.FD3510-100Cover glass bottomed dish recording dish
KimWipeKimTech34155Task wipe used for wicking away excess fluid from larvae
Kwik-GardWorld Precision Instruments Inc.710172Self-mixing sylgard elastomer
Microelectrode amplifierAxon Instruments, Molecular DevicesMultiClamp 700BPatch clamp amplifier for dual channel recordings
MicroforgeNarishigeMF-830 microforgeTo polish recording electrode
Micromanipulator control unitSiskiyouMC1000-eR/T4-axis dial coordinator for controlling micromanipulator
Micropipette pullerSutter Instrument CompanyFlaming/Brown P-97For pulling capillary glass into recording electrodes
Microscope control unitSiskiyouMC1000ePositions the microscope around the fixed stage and preparation
Motorized micromanipulatorSiskiyouMX7600Positions the headstage and attached recording electrode for patch-clamp recording
MultiClamp CommanderMolecular Devices2.2.2Downloadable from Axon MultiClamp 700B Commander download page
Optical air tableNewport CorporationVH3036W-OPTBreadboard isolation table to float microscope and minimize vibrations during recordings
pCLAMPMolecular Devices10.7.0Downloadable from Axon pCLAMP 10 Electrophysiology Data Acquisition & Analysis Software Download page
Petri-dishFalcon35-3001Used to immerse larvae in paralytic
Pipette holderMolecular Devices1-HL-UHold recording electrode and connect to the headstage
Pneumatic transducerFluke Biomedical InstrumentsDPM1BFor controlling recording electrode internal pressure
Potassium hydroxideSigma-Aldrich221473-25GEtchant for etching dissection pins
Silicone tubingTygon14-169-1ATubing to connect pneumatic transducer to pipette holder
StereomicroscopeCarl ZeissStemi 2000-CUsed to visualize pin tips and during preparation of larvae
Straight edge razor bladeCanopusorder from amazon.comCuts the tungsten wire while making dissection pins
syringeBecton Dickinson Compoany309602Filled with extracellular solution to inject into recording electrodes
Transfer pipetteSigma-AldrichZ135003-500EASingle use, non-sterile pipette for transfering larvae
Tricaine methanesulfonateSyndel12854Pharmaceutical aneasthetic used to euthanize larvae with high dosage.
Tungsten wireWorld Precision Instruments Inc.7155000.002 inch, 50.8 μm diameter; used to make dissection pins
Vacuum filtration unitSigma-AldrichSCGVU11RESingle use, sterile, vacuum filtration units used to sterilize extracellular solution used for electrophysiology electrode ringer
Voltage-clamp current-clamp headstageMolecular DevicesCV-7BSupplied with MultiClamp 700B amplifier used as left and right headstages
α-bungarotoxinThermoFisherB1601For immobilizing the larvae prior to recording

Tags

Registratie van elektrische signalenmicropipettechnieklaterale lijn ganglionextracellulaire oplossingimmobilisatieprotocolalpha bungartoxinegebruik van micromanipulatorelektrofysiologische opstelling