Methodenartikel

In Vivo Calcium Imaging Using Synaptically Localized Calcium Sensors in Drosophila melanogaster

964 weergaven

8 juli 2025

In dit artikel

Samenvatting

Source: Hancock, C. E. et al., In Vivo Optical Calcium Imaging of Learning-Induced Synaptic Plasticity in Drosophila melanogaster. J. Vis. Exp. (2019).

This video demonstrates a method for in vivo calcium imaging using synaptically localized calcium sensors in flies. It outlines the steps for preparing the flies for microscopy, conducting olfactory conditioning, and visualizing odor-induced calcium influx.

Protocol

1. Transgenic fruit flies, Drosophila melanogaster

  1. Cross female virgin and male flies (raised at 25 °C in 60% relative humidity on a 12 h light/dark cycle) carrying the desired Gal4 and UAS constructs, respectively, to produce flies in which specific neurons of interest express a genetically encoded calcium indicator.
  2. Age the female progeny of the above cross until they are in the range of 3-6 days post-eclosion. Female flies are preferable because of their slightly larger size.

2. Preparation of the fruit fly for in vivo calcium imaging

  1. Select a single female fly and anesthetize on ice for no longer than 5 min.
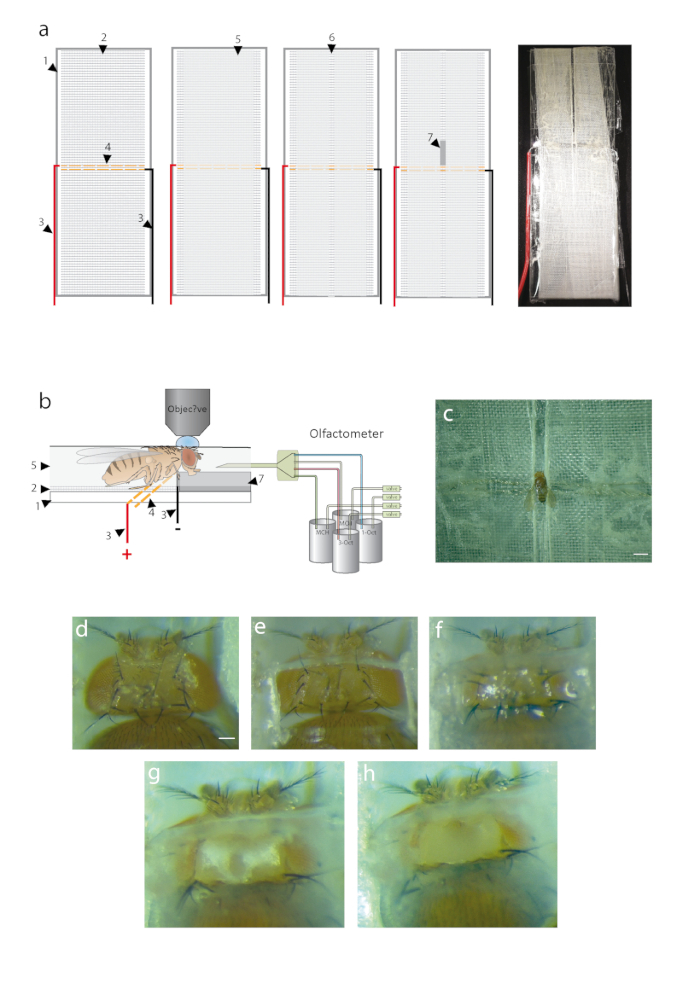
  2. Using fine forceps, place the fly in the imaging chamber (demonstrated in Figure 1c). Ensure the thorax and legs are in contact with the electrical wires in the bottom of the chamber and that the head lays flat. Fix the position of the fly using clear adhesive tape.
    NOTE: This protocol requires a custom-built chamber in which the flies are fixed, with the head capsule accessible for opening, and the flies able to receive both odor stimulations to the antennae and electric shocks to the thorax and legs (Figure 1).
  3. Using a surgical scalpel blade fixed to the scalpel handle (see Table of Materials), cut a window in the tape around the head of the fly, leaving the antennae covered and only the anterior-most portion of the thorax exposed.
  4. Surround the sides and back of the head with blue-light curing glue, carefully manipulated using an insect pin held by concave-convex jaws. Set the glue using a blue light-emitting LED lamp.
  5. Check that the glue is completely set and clear any residual unhardened glue from the dorsal surface of the fly head.
  6. Apply a drop of Ringer's solution (see Table of Materials) to cover the exposed cuticle of the head.
  7. Using a very fine-bladed stab knife, cut through the cuticle. For the most efficient removal of the cuticle, first cut across the posterior of the head using the ocelli as a starting point. Then, cut up each side, medial to the eyes, to form a flap of the cuticle that can be easily torn off using forceps.
  8. Remove any excess cuticle that may block the brain region of interest.
  9. Carefully clear the dorsal surface of any trachea using fine forceps, avoiding disruption of the brain tissue itself. Remove and refresh Ringer's solution (see Table of Materials) as required to clear the area of tissue debris.
  10. Place the hypodermic odor delivery needle in a position approximately 1 cm from the head of the fly. Ensure there is nothing that could obstruct odor delivery to the antennae.
  11. At the microscope, connect the imaging chamber to the odor-delivery system via the hypodermic odor-delivery needle.
  12. To allow the fly to fully to recover from anesthesia and surgery, and to adapt to the air flow, implement a 10 min resting period at this stage.

3. In vivo calcium imaging

  1. Use a multiphoton microscope equipped with an infrared laser and a water immersion objective (see Table of Materials), installed on a vibration-isolated table. For the visualization of green fluorescent protein (GFP)-based calcium indicators, tune the laser to an excitation wavelength of 920 nm and install a GFP band-pass filter.
  2. Using the coarse Z adjustment knob, scan through the Z axis of the brain and locate the brain region of interest. Use the crop function to focus scanning on only this area to minimize scan time and to rotate the scan view such that the anterior of the head is facing downwards.
  3. Adjust the frame size to 512 x 512 px, scan speed to > 4 Hz, and scan region (in the Y dimension) so that the neurons of interest are covered.

4. Visualization of odor-evoked calcium transients through olfactory conditioning

  1. Use an odor delivery system that can deliver several odor stimuli in a temporally precise manner.
    1. Use an additional computer to control the device, and to communicate with the imaging microscope software to coordinate odor stimulations with image capture during experiments.
    2. Initiate a pre-programmed macro package capable of linking the image acquisition software and odor delivery program (e.g., a VBA macro package installed in the microscope control software, see Table of Materials) that is responsive to an external input trigger provided by the initiation of an odor delivery protocol in a separate program).
  2. Start the measurement by monitoring "pre-training"/naïve odor-evoked calcium transients at a resolution of 512 x 512 px and a frame rate of 4 Hz. Deliver a 2.5 s odor stimulus flanked by additional image acquisition for 6.25 s preceding odor onset (to establish an F0 baseline value) and 12.5 s after odor offset. Repeat this with a second odorant and then with a third odorant.
  3. Continue 3 min after this measurement with classical conditioning ("training") the fly.
    1. Select one of the odors presented in the "pre-training" phase to become the conditioned stimulus (CS+) odor and another to become the CS- odor. Present the CS+ odor using the computer-controlled odor-deliver system for 60 s alongside twelve 90 V electric shocks.
    2. After a 60 s break, present the CS- odor alone for 60 s. Use as odorants 4-methylcyclohexanol and 3-octanol. Do not present the third odorant (e.g., 1-octen-3-ol) during this training as it is used as control only before (step 4.2.) and after (step 4.4) the training phase.
  4. Measure the "post-training" odor-evoked calcium transients again by repeating the "pre-training" odor stimulation protocol (step 4.2.) 3 min after finishing the training phase (step 4.3).
    NOTE: The timing of this step should reflect the time of interest after memory formation (e.g., carry out this step 3-4 min after the conditioning step to investigate short-term memory). Typically, flies can survive for several hours in this preparation.
  5. Save imaging files in an appropriate format (e.g., Tiff) for later image analysis.

5. Image analysis

  1. To analyze images, open Tiff (or similar) files in the image analysis software such as Fiji.
  2. Align the stacks using a movement correction algorithm to ensure minimal movement in the X and Y directions. Discard any recordings that show strong movement in the Z axis.
  3. Select the software tool used to mark a region of interest (ROI) around the area that is to be examined. This should be as precise as possible to limit the influence of background fluorescence.
  4. Use the respective software tool to extract temporal fluorescence intensity data as data files from the selected ROI, such that a value is generated for each frame of the recording.
  5. Open the data using a data analysis program to calculate the ΔF/F0 values for each odor trace. F0 = average fluorescence in the 2 s before odor onset. ΔF = the difference between the raw fluorescence in a given frame and F0. From these values, calculate a ΔF/F0 value for each frame, which can be plotted against time to reflect relative fluorescence throughout the odor stimulus period.

Toegang beperkt. Log in of start een proefperiode om deze inhoud te bekijken.

Resultaten

Olfactometer setup for Drosophila antenna response analysis; includes diagram and microscopy images.
Figure 1: Construction of a mounting chamber and preparation of a fly for imaging. (a) Steps for the construction of the fly mounting chamber. The base is formed of a standard microscope slide (1) covered with a fine plastic mesh (2). T...

Toegang beperkt. Log in of start een proefperiode om deze inhoud te bekijken.

Openbaarmakingen

No conflicts of interest declared.

Materialen

Lijst van materialen gebruikt in dit artikel
NaamBedrijfCatalogusnummerOpmerkingen
1-Octen-3-olSigma-Aldrich, St. Louis, MO, USAO5284Chemical used as odorant
3-OctanolSigma-Aldrich, St. Louis, MO, USA218405Chemical used as odorant
4-MethylcyclohexanolSigma-Aldrich, St. Louis, MO, USA153095Chemical used as odorant
Bandpass filter for EGFP (525/50 nm)Carl Zeiss Microscopy GmbH, Jena, Germany
Clear adhesive tapeTesa SE, Norderstedt, GermanyStandard claer adhesive tape
Concave-convex jawsFine Science Tools, North Vancouver, Canada10053-09Blade Holders with concave-convex jaws
Fine forcepsFine Science Tools, North Vancouver, Canada11412-11Forceps with tip 0.1 x 0.06mm
Hypodermic needleSterican - B. Braun, Melsungenk, Germany46651201.20x40mm
Insect Minutien pinsFine Science Tools, North Vancouver, Canada26002-10Diameter 0.1mm, tip 0.0125mm
KentoflowKent Express Dental Supplies, Gillingham, UK953683Blue light-curing glue
Microscope slideCarl Roth GmbH & Co. KG, Karlsruhe, Germany656.1Standard objective slide 76 x 26 mm
Mineral oilSigma-Aldrich, St. Louis, MO, USAM8410Used as diluent for odorants
Mode-locked Ti-Sapphire laser Chameleon Vision 2Coherent Inc., Santa Clara, CA, USATunable infrared femtosecond laser
Multiphoton Microscope LSM 7MP equipped with BiG detectorsCarl Zeiss Microscopy GmbH, Jena, GermanyMultiphoton microscope, multiple companies provide similar devices.
Plan-Apochromat 20x (NA = 1.0) water immersion objectiveCarl Zeiss Microscopy GmbH, Jena, Germany421452-9900-000Objective W "Plan-Apochromat" 20x/1.0 DIC M27 70mm
Ringer's solutionn.a.n.a.5mM KCl, 130mM NaCl, 2mM MgCl2, 2mM CaCl2, 5mM Hepes-NaOH, 36mM sucrose, pH = 7.4
Stab knifeSharpoint, Surgical Specialties Corporation, Reading, PA, USA72-15515.0mm Straight restricted blade depth
Surgical scalpel bladeSwann-Morton, Sheffield, UK303Product No. 11
Surgical scalpel handleSwann-Morton, Sheffield, UK907Product No. 7S/S
Visual Basics of Applicatons (VBA) software to receive a trigger from the odor-delivery device and the electric shock application device (power supply) to interact with the ZEN software from Zeiss that controls the microscope.Custom-written and available upon requestn.a.n.a.

Herprints en machtigingen

Toestemming aanvragen om de tekst of afbeeldingen van dit JoVE-artikel te hergebruiken

Toestemming aanvragen

Trefwoorden

Mushroom body neuronengenetisch gecodeerde calciumindicatormultifotonmicroscopieolfactorische conditioneringgeurenafgifte systeemfluorescentieregistratieleer ge nduceerde synaptische plasticiteit

Gerelateerde artikelen