All procedures involving animal models have been reviewed by the local institutional animal care committee and the JoVE veterinary review board.
1. Animals
- Use male and female rats 3 months of age in this study.
- Keep animals in a 12 hr light/dark cycle with free access to food and water.
2. Preparation of KAX (Ketamine + Xylazine + Acepromazine) Cocktail for Animal Anesthesia
- Dissolve 50 mg of xylazine (20 mg/ml) in 5 ml ketamine (100 mg/ml) with 1 ml acepromazine (10 mg/ml) and 3 ml of distilled water. Mix thoroughly.
- Sterilize with a syringe filter and store this solution into a 10 ml serum bottle.
3. KAX Injection
- Weigh animal (g) and return to cage until ready for injection.
- Inject 0.1 ml KAX/100 g animal body weight intraperitoneally, using a 1 ml insulin syringe with a 28 G needle.
- Allow for animal to become unconscious. Check reflexes by pinching the feet and tail.
- Keep all animals safely in the lab for the duration of surgery.
- Post-surgery, replace animals to their cages and keep comfortable in room temperature (RT) until consciousness is regained. Only return animals to the animal facility when the animals awaken and resume normal behavior.
4. Preparation for Surgery and Microneedle Assembly
- Make a sterile 2 M NaCl solution.
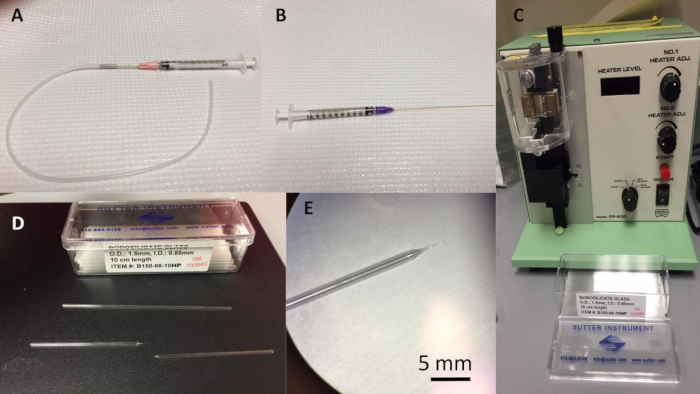
- Use a microelectrode puller (Figure 1C) to pull one 0.86 mm inner diameter heavy polished standard and thin-walled borosilicate tube into two finely tapered glass microneedles (Figure 1D, Figure 1E).
- Backfill one microneedle from the previous step with 2 M saline using a backfilling syringe needle and a 1 ml syringe (Figure 1B). Tap out air bubbles from the tip of the electrode.
- Fill a second 1 ml syringe with 2 M NaCl. Connect an 18 G needle and then attach a length (approximately 10 inches) of polyethylene tubing (Figure 1A). Use the syringe plunger to fill the polyethylene tubing with saline through the needle.
- When both the microneedle and tubing are filled with saline, carefully connect the two. Eliminate any air in the connection between them (Figure 2).
- Finely bevel the tip of the microneedle by scraping it very lightly against the grain of a course paper towel.
- Check the resistance of the microneedle by gently pushing the plunger on the syringe until a fine stream of liquid can be seen on the paper towel. The stream of liquid should be no wider than 0.5 mm.
5. Preparation of Animal
- Apply 1 - 2 drops topical anesthetic to cornea (Proparacaine Hydrochloride Ophthalmic Solution, USP, 0.5%). Wait until no ocular reflex occurs.
- Trim whiskers with scissors.
- Saturate a cotton tip applicator with betadine solution and swab area around the experimental eye.
- Using a microscope, attach a hemostat to clamp the bottom eyelid to bulge the eye, expose the episcleral vein and restrict eye movement. (Figure 3, arrowhead)
6. Glaucoma-inducing Saline Injection
- When the microneedle assembly and the animal are prepared, begin injections.
- When the animal is confirmed to be unresponsive to feet/tail pinch, carefully pierce the episcleral vein with the microneedle by coming at a low angle between 10 and 20 degrees to the vein (Figure 3, white arrow). A successful puncture into the vein is apparent when blood enters the tip of the microneedle (Figure 3, black arrow).
- Slowly and manually inject approximately 50 µl saline into the vein. This should take approximately 10 sec. The veins will blanch white as the salt circulates through the vasculature (Figure 4, arrowhead). Some regions may maintain a blood red appearance (Figure 4, arrow).
- Perform a second injection into the vein, opposite to the site of the first, to ensure thorough retinal damage to the complete retinal ganglion cell layer.
Note: Within minutes, one should see a distinct cloudy appearance through the iris of the eye as the salt circulates through the vascular system.
- Leave the opposite eye untreated for use as an internal control.