Methodenartikel

Generating A Cortical Stab Injury in a Mouse Model to Induce Reactive Astrogliosis

8 juli 2025

In dit artikel

Samenvatting

Loading...
$$\rightleftharpoonup{xx}$$ $$\longleftharp{xx}$$, $$\longrightharp{xx}$$,

Source: Allahyari, R. V. et al. Triggering Reactive Gliosis In Vivo by a Forebrain Stab Injury. J. Vis. Exp. (2015)

This video demonstrates the cortical stab injury procedure in mice, involving skull exposure and brain lesion creation. It induces reactive astrogliosis, a neuroprotective response of astrocytes, to study CNS trauma, inflammation, and repair mechanisms.
Protocol

Loading...
$$\rightleftharpoonup{xx}$$ $$\longleftharp{xx}$$, $$\longrightharp{xx}$$,

All procedures involving animal models have been reviewed by the local institutional animal care committee and the JoVE veterinary review board.

1. Prepping Mouse for Surgery

  1. Remove the mouse from the home cage and weigh (g).
  2. Place the mouse into an isoflurane induction chamber and set oxygen to 2 L/min and isoflurane vaporizer to 5 to induce a surgical plane of anesthesia, about 3-5 min. Monitor for slowed breathing and immobilization. Check that the mouse is fully sedated using the toe pinch reflex.
  3. When the mouse is fully sedated, place it in a stereotaxic frame, and secure the nose in the nose cone, which is attached with tubing to the isoflurane. Insert ear bars into the ear canal and tighten, ensuring the head is stable.
  4. Shave the head from ear to ear and from between the eyes to behind the ears.
  5. Sterilize the skin with alternating wipes of isopropyl alcohol and betadine iodine solution, 3 times each.
  6. Apply artificial tears to both eyes to prevent them from drying out during the surgical procedure.

2. Surgical Procedure

  1. Monitor the depth of anesthesia by pinching the toe or tail. The mouse is in the appropriate surgical plane when there is no response and the respiration is slow and even.
  2. Make a parasagittal skin incision from just behind the eyes to almost between the ears in one single, firm motion using a No. 11 scalpel blade. Move the skin aside and clip the right side with the hemostat.
  3. Clear the skull of the overlying membrane using the dull side of the No. 11 scalpel and cotton-tipped applicators. Optionally, wipe the skull with a cotton-tipped applicator dipped in 0.9% saline solution. Allow to dry completely.
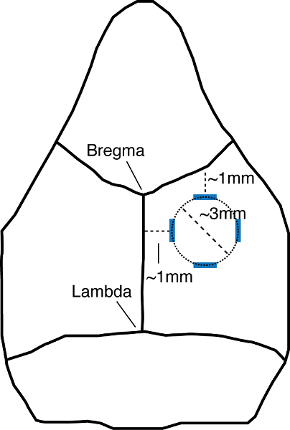
  4. Using a small ruler, mark the anterior border of the craniotomy at 1 mm caudal to the coronal suture and the left edge of the craniotomy at 1 mm lateral to the sagittal suture (Figure 1) with a permanent marker. Then mark the right and caudal borders of the craniotomy at 4 mm from the sagittal and coronal sutures, respectively (Figure 1).
  5. Using a 0.5 mm drill bit, begin to make a craniotomy by drilling slowly following the permanent marker outline. Be sure not to break through the skull completely. Press gently on the isolated piece of parietal bone with No. 5 forceps, areas of weakness will give way to the pressure. When the thinned bone is sufficiently weak throughout the perimeter, the bone piece is ready for removal.
    NOTE: If the investigator experiences difficulty removing the bone in one piece, this suggests that the bone was not sufficiently thinned during drilling. Consider drilling the skull further in subsequent animals to facilitate easy removal of the bone piece.
  6. Using a 10 ml syringe fitted with a 23 G needle, apply a small amount of 0.9% saline to soak the isolated bone and drilled area.
  7. Attach the manipulator arm to the stereotaxic equipment. Attach a new No. 11 scalpel blade to the probe holder with the sharp side of the blade facing rostrally.
    NOTE: Although the rostral and caudal tissues experience the sharp and blunt edges of the blade, respectively, the mechanical damage induced by the penetrating injury is comparable throughout the extent of the lesion. We observe no appreciable differences in major features of reactive gliosis, including upregulation of GFAP expression or proliferation, between rostral and caudal sections.
  8. Keeping the manipulator arm out of the way, carefully lift the isolated bone using 5/45 angled forceps. Insert the tip of the forceps into the side of the isolated bone and lift, using leverage to pull off the piece of bone left behind in one full movement.
    NOTE: Be careful not to stab the brain or disturb the dura underneath the skull.
  9. Take a small piece of the soaked absorbable gel foam and place it on the uncovered brain to prevent it from drying out and soak up any blood that might be present.
  10. Once the gel foam is in place, swing the manipulator arm into place and adjust the blade to the center of craniotomy over the gel foam. Remove the gel foam and lower the blade until the tip touches the dura without puncturing the dura. Mark dorsal/ventral coordinates using the vernier scale on the vertical arm of the stereotaxic.
  11. Using the manipulator's arm, slowly lower the blade precisely 3 mm into the brain. This is achieved by using the vernier scale markings on the manipulator arm. Allow the blade to stay in place for 5-10 sec. Move the stereotaxic arm with blade attachment rostral to caudal three times, allowing the blade to reach the rostral and caudal boundaries of the craniotomy before moving to the opposite end.
    NOTE: The dura is not removed prior to inserting the blade. In contrast to the rat dura, which is ~80 μm in thickness7, the mouse dura is considerably thinner (only a few cell layers thick) and does not produce an appreciable resistance to the scalpel blade during insertion. Use a new scalpel blade for each mouse to ensure that each animal receives a consistent injury.
  12. Slowly raise the stereotaxic arm, removing the blade from the brain. After removal of the blade, immediately place another piece of gel foam on the brain surface to soak up any excess blood or fluid.
  13. Meanwhile, remove the stereotaxic arm and dispose of the No. 11 scalpel blade. Once the bleeding has stopped, remove the gel foam.
  14. Close the wound by suturing the skin with non-absorbable sutures, such as ethilon or prolene. Sutures should be removed 9-10 days following surgery.
  15. Return the mouse to its home cage, and allow the mouse to recover slowly on a heating pad and monitor for any signs of distress. Recovery from isofluorane-induced anesthesia typically occurs within 2-5 min after removal from the isofluorane. Do not leave the animal unattended until it has regained sternal recumbancy.
  16. Administer 0.5-1 ml of lactated Ringer's solution subcutaneously to ensure hydration.

Toegang beperkt. Log in of start een proefperiode om deze inhoud te bekijken.

Resultaten

Loading...
$$\rightleftharpoonup{xx}$$ $$\longleftharp{xx}$$, $$\longrightharp{xx}$$,

Skull diagram showing Bregma, Lambda, surgical area dimensions for neuroanatomical studies.
Figure 1: Schematic of the mouse skull depicting the area of the craniotomy. Blue lines depict the initial markings identifying the boundaries of the area to be drilled. The top and left marks are measured at 1 mm below or lateral to the coronal or sagittal sutu...

Toegang beperkt. Log in of start een proefperiode om deze inhoud te bekijken.

Openbaarmakingen

Loading...
$$\rightleftharpoonup{xx}$$ $$\longleftharp{xx}$$, $$\longrightharp{xx}$$,
No conflicts of interest declared.

Materialen

Lijst van materialen gebruikt in dit artikel
NaamBedrijfCatalogusnummerOpmerkingen
StereotaxHarvard Apparatus726049
High speed micro drillHarvard Apparatus724950
stainless steel scalpel blade, #11MedVetJOR581S
5/45 angled forcepsFine Science Tools11251-35
Gelfoam sponge 12cmx7mmFisherNC9841478
Antibodies and other reagentsManufacturerCatalog NumberDilution (brightfield)
Dilution (fluorescence)
Rb anti-GFAPDAKOZ033429-21:20k
1:1k
Shp anti-BrdUAbcamab18931:2k
1:500
Biotinylated goat anti-rabbitVector LaboratoriesBA-100007:40
Biotinylated rabbit anti-sheepVector LaboratoriesBA-600007:40
Alexafluor 488 goat anti-rabbitLife TechnologiesA-1100807:40
Alexafluor 568 donkey anti-sheepLife TechnologiesA-2109917:40
DAPI Nucleic Acid StainLife TechnologiesD357117:40
Cresyl Violet AcetateSigma AldrichC5042-10G1%

Herprints en machtigingen

Toestemming aanvragen om de tekst of afbeeldingen van dit JoVE-artikel te hergebruiken

Toestemming aanvragen

Trefwoorden

Stereotaxisch frameblootlegging van de schedelhersenlaesieastrocytenactivatietrauma van het centrale zenuwstelselweefselherstelchirurgische procedure

Gerelateerde artikelen