All procedures involving animal samples have been reviewed and approved by the appropriate animal ethical review committee.
1. Storing brains
- Quickly remove the brains from euthanized adult CD1 wildtype mice weighing approximately 30 g using a conventional approach and flash-freeze for 60 seconds in either liquid nitrogen or isopentane pre-chilled with dry ice.
- Store frozen brains at -80 °C in aluminum foil or conical tubes until use.
2. Preparing the brain matrix
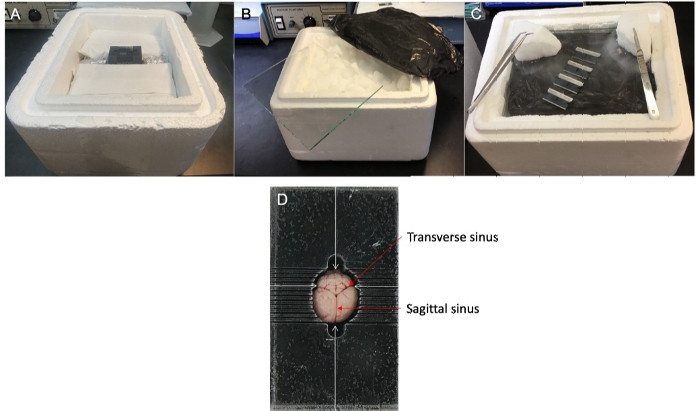
- Twenty-four hours before dissecting tissue, place a clean brain matrix on a stack of thawed freezer packs. Sandwich the sides of the matrix between two freezer packs making sure to leave approximately 0.5 cm between the bottom of the razor slots and the top of the gel packs (Figure 1A). Place aluminum foil on the ends to aid in cooling.
NOTE: When purchasing a brain matrix, buy one that is large enough to encase the entire volume of the brain to be dissected.
- Place the box containing the brain matrix and freezer packs in a -20 °C freezer with the top ajar overnight.
3. Setting up a frozen glass plate
NOTE: The purpose of this setup is to prepare a frozen surface on which to dissect brain sections.
- Place ice in an insulated box up to approximately 5 cm from the top. Then place a 2.5 cm layer of dry ice on top of the ice and cover with black plastic sheeting to aid in visualizing the sample (Figure 1B, Figure 1C).
- Place a glass plate (should just fit in the opening of the box) on top of the plastic and place dry ice on top of the plate in the far corners (Figure 1C).
- Take the frozen brain matrix from the freezer and insert the brain to be cut cortex-side up. Allow it to equilibrate to the temperature in the box for 10 min. Keep the lid on the box during this time.
- Adjust the brain's position in the matrix with cold forceps so that the sagittal sinus and transverse sinus line up with the perpendicular grooves of the block (Figure 1D). This will help ensure symmetric sections for easier dissection. Touch tips of forceps to dry ice briefly to chill before adjusting the brain.
- Once the brain is in position, place a chilled razor blade near its center and press the blade approximately 1 mm into the tissue. Add chilled blades to the rostral and caudal ends to help hold the brain in place (Figure 2A and Figure 2B).
- Starting on the rostral end, add blades one at a time, placing them into the slots and pressing them gently down into the tissue approximately 1 mm (Figure 2B). Continue to add blades at 1 mm intervals working towards the caudal end.
- Make sure the brain does not shift during this time. Line up blades horizontally and vertically (Figure 2B). Low-profile microtome blades may be used to cut sections into 0.5 mm widths. Place these between the larger razor blades (Figure 2C).
- Once blades are in place, press down on top of the group with fingers, palm or some other flat surface (Figure 2C, Figure 2D). Rock the group of blades slowly from side to side to move them through the tissue.
NOTE: This may take some time (1–2 min) and requires patience. There should be resistance to the blades moving through the tissue. Easy entry means the brain is thawing and the block should be cooled with dry ice.
- When all blades have reached the bottom of the slots, grasp each side of the group of blades and rock back and forth to work free of the matrix.
NOTE: Exercise caution to avoid cutting oneself on the sharp edges of the blades.
- Once the group is free, place the stack, rostral side up, on the glass plate (Figure 2E). Place dry ice next to and/or on top of the stack to further freeze the samples for easier separation.
- Place the stack with sharp edges down on the glass plate and separate blades by shifting the stack between thumbs and fingers. The blades should separate from each other with sections attached.
- Line up sections on the glass plate from rostral to caudal (Figure 2F).
- Separate tissue from the blades by flexing blades between fingers, or by separating with a second cold razor (Figures 2G, 2H, 2I).
4. Dissecting sections
- Open the Allen Mouse Brain Atlas or another reference and find landmarks necessary to identify regions of interest. Some obvious landmarks include the anterior commissure, the corpus callosum, the lateral ventricles, and the hippocampus (Figure 3).
- Flip the section to be cut with chilled forceps and ensure the region about to be collected is consistent throughout. During harvesting, consult the reference atlas often to ensure the correct ROI is obtained.
NOTE: A magnifying glass or dissecting microscope is often helpful in this process. Good lighting is also essential. Low wattage LED lamps or a cool lamp can be used for this purpose.
- With a clean scalpel or punch, cut into the section (Figure 4). Prechill each tool before cutting by touching it briefly to dry ice. Push the blade gently but firmly into the tissue, rocking it back and forth to make the cut. Do not push too hard or the tissue will fracture.
NOTE: Tools will warm over time. Slightly warmed blades can help make clean cuts and limit fracturing, but be careful to avoid thawing tissue. Periodically chill tools on dry ice.
- Once an ROI is harvested, place it into labeled, prechilled 1.5 mL tubes. Store harvested tissues at -80 °C until needed.