This video demonstrates the visualization of membrane protein trafficking in Drosophila photoreceptor cells using eGFP-tagged TRPL proteins. It details the preparation of transgenic flies for imaging, the capture of fluorescence images of photoreceptor cells, and the quantification of TRPL trafficking by measuring relative eGFP fluorescence in the rhabdomeres.
Een abonnement op JoVE is vereist om deze inhoud te bekijken. Log in of start vandaag met uw gratis proefperiode.
Methodenartikel
Studying Membrane Protein Trafficking in Drosophila Photoreceptor Cells
935 weergaven
⸱
28 april 2025
In dit artikel
Samenvatting
Protocol
1. General considerations
- Use Drosophila stocks expressing a permanently rhabdomerally located translocating proteins for analyses regarding protein trafficking (e.g., transient receptor potential-like (TRPL) ion channel:: enhanced green fluorescent protein (eGFP), Arrestin 2 (Arr2)::eGFP).
- Predetermine light exposure conditions of selected flies for the experimental approach.
- For dark adaptation, keep the flies in dark boxes for the desired period at 25 °C. For illumination up to 16 h in translocation experiments (e.g., TRPL::eGFP expressing flies), keep flies under a fluorescent tube at room temperature.
- For illuminating flies with colored light, use different colored transparent plastic boxes along with the fluorescent tube.
2. Water immersion microscopy
- Fly preparation
- Prepare the working space with the needed equipment and reagents, as shown in Figure 1. Transfer flies with predetermined age and illumination conditions into a pre-cooled 15 mL centrifuge tube and anesthetize by incubating them on ice for 15 to 30 min.
NOTE: Carry along 1-day old, dark-adapted flies as reference. Generally, dark-adapted flies should be transferred to an icebox with a lid in the dark. Light-adapted flies can be transferred to the ice in room light. - Transfer one ice-anesthetized fly headfirst into a 200 µL pipette tip and push the fly toward the tip carefully with compressed air.
- Cut off the pipette tip just in front of the head using a scalpel. Using tweezers, carefully push the fly a few millimeters away from the tip. Cut off the pipette tip again and push the fly back toward the tip with compressed air so that only the head of the fly protrudes from the pipette tip.
- Adhere a piece of plasticine onto an object slide and press the pipette tip into it so that either the left or the right eye of the fly faces upward (Figure 2A). Right before image acquisition, use a laboratory pipette to adhere a large drop of chilled water to the underside of a water immersion objective (Figure 2B). Immediately proceed to image acquisition for best results.
NOTE: Significant delay in image acquisition results in reawakening and movements of the fly which may lead to blurry images.
- Prepare the working space with the needed equipment and reagents, as shown in Figure 1. Transfer flies with predetermined age and illumination conditions into a pre-cooled 15 mL centrifuge tube and anesthetize by incubating them on ice for 15 to 30 min.
- Image acquisition
- Carefully place the object slide with the prepared fly onto the microscope stage and select a water immersion objective.
- Lower the water immersion objective manually until the fly's eye touches the drop (Figure 3A, B).
- Switch on the microscope UV lamp and select the appropriate filter set. Use the eyepieces to position the fly under the objective and focus the microscope on the surface of the eye.
- Switch the light path toward the microscope camera and generate a live image in the corresponding software. Readjust the focus for the camera and evaluate the orientation of the eye, considering that the eye has to face the microscope objective radially, as illustrated in more detail in Figure 3C-E.
- Use the appropriate LUT (look up table) within the imaging software to detect oversaturation (indicated as red pixels).
- In the case of non-pigmented flies, adjust the exposure time such that the brightest pixels are just below the saturation limit for every image.
- Record an image and save it as a raw file to archive all corresponding metadata of the recording. Export the image in a .tif format for the following quantification.
NOTE: Illuminate the flies for 5 minutes with red light (e.g., 630 nm) immediately after image acquisition, if they are intended to be used for further experiments. Red light deactivates the phototransduction cascade that has been activated excessively by intense short-waved light during image acquisition.
- Data analysis and quantification of relative eGFP fluorescence in the rhabdomeres of water immersion micrographs
- Download, install, and execute the software ImageJ/Fiji.
- Adjust the ImageJ settings by clicking on Analyze > Set Measurements... and check only the box for Mean Gray Value. Import a .tif image by clicking on File > Open... or by dragging and dropping. Choose a representative region of the image that is in focus and enlarge it to 200%-300% by repeatedly pressing Ctrl and + together.
- Select the Oval tool and, while pressing the Shift key, generate a circular selection in the image that is significantly smaller than one fluorescent rhabdomere. Before releasing the mouse button, look for the exact size displayed below the toolbar in the ImageJ main window. Use the same size of circular selection for all analyses.
NOTE: The exact size of the circular selection in pixels or microns depends on the specific setup. Use a circle approximately 1/3 or 1/4 of the rhabdomeral diameter of 1-day old, dark-adapted control flies. - Move the circular selection either by mouse-clicking into it and dragging or by pressing the Arrow Keys on the keyboard.
- To measure the fluorescence intensities within the circular selection, move the circle to the first rhabdomere (r1) and click on Analyze > Measure or use the shortcut Ctrl + M. A Result window listing the measured gray value will pop up.
- Continue with measurements of r2-r6 as repeated measurements and a measurement of the background signal (b). In the case of non-pigmented flies, make additional measurements of the corresponding cell body areas (c1-c6) (Figure 4).
- Repeat steps 2.3.5 and 2.3.6 for two more ommatidia, resulting in three technical replicates. Mark the analyzed ommatidia by using the Pencil tool and save this image for documentation.
- Select and copy the measured gray values from the Result window and paste them into spreadsheet software for further calculations. Sort the values of fluorescence intensity according to their origin into the categories rhabdomere (r), cell body (c), and background (b). Calculate the mean intensity from each category (Ir, Ic, Ib).
- Calculate the relative amount of eGFP present in the rhabdomere.
- Continue with the next image in step 2.3.3. It is recommended to use images from at least five individuals of each experimental group as biological replicates to get a reliable measurement.
Toegang beperkt. Log in of start een proefperiode om deze inhoud te bekijken.
Resultaten
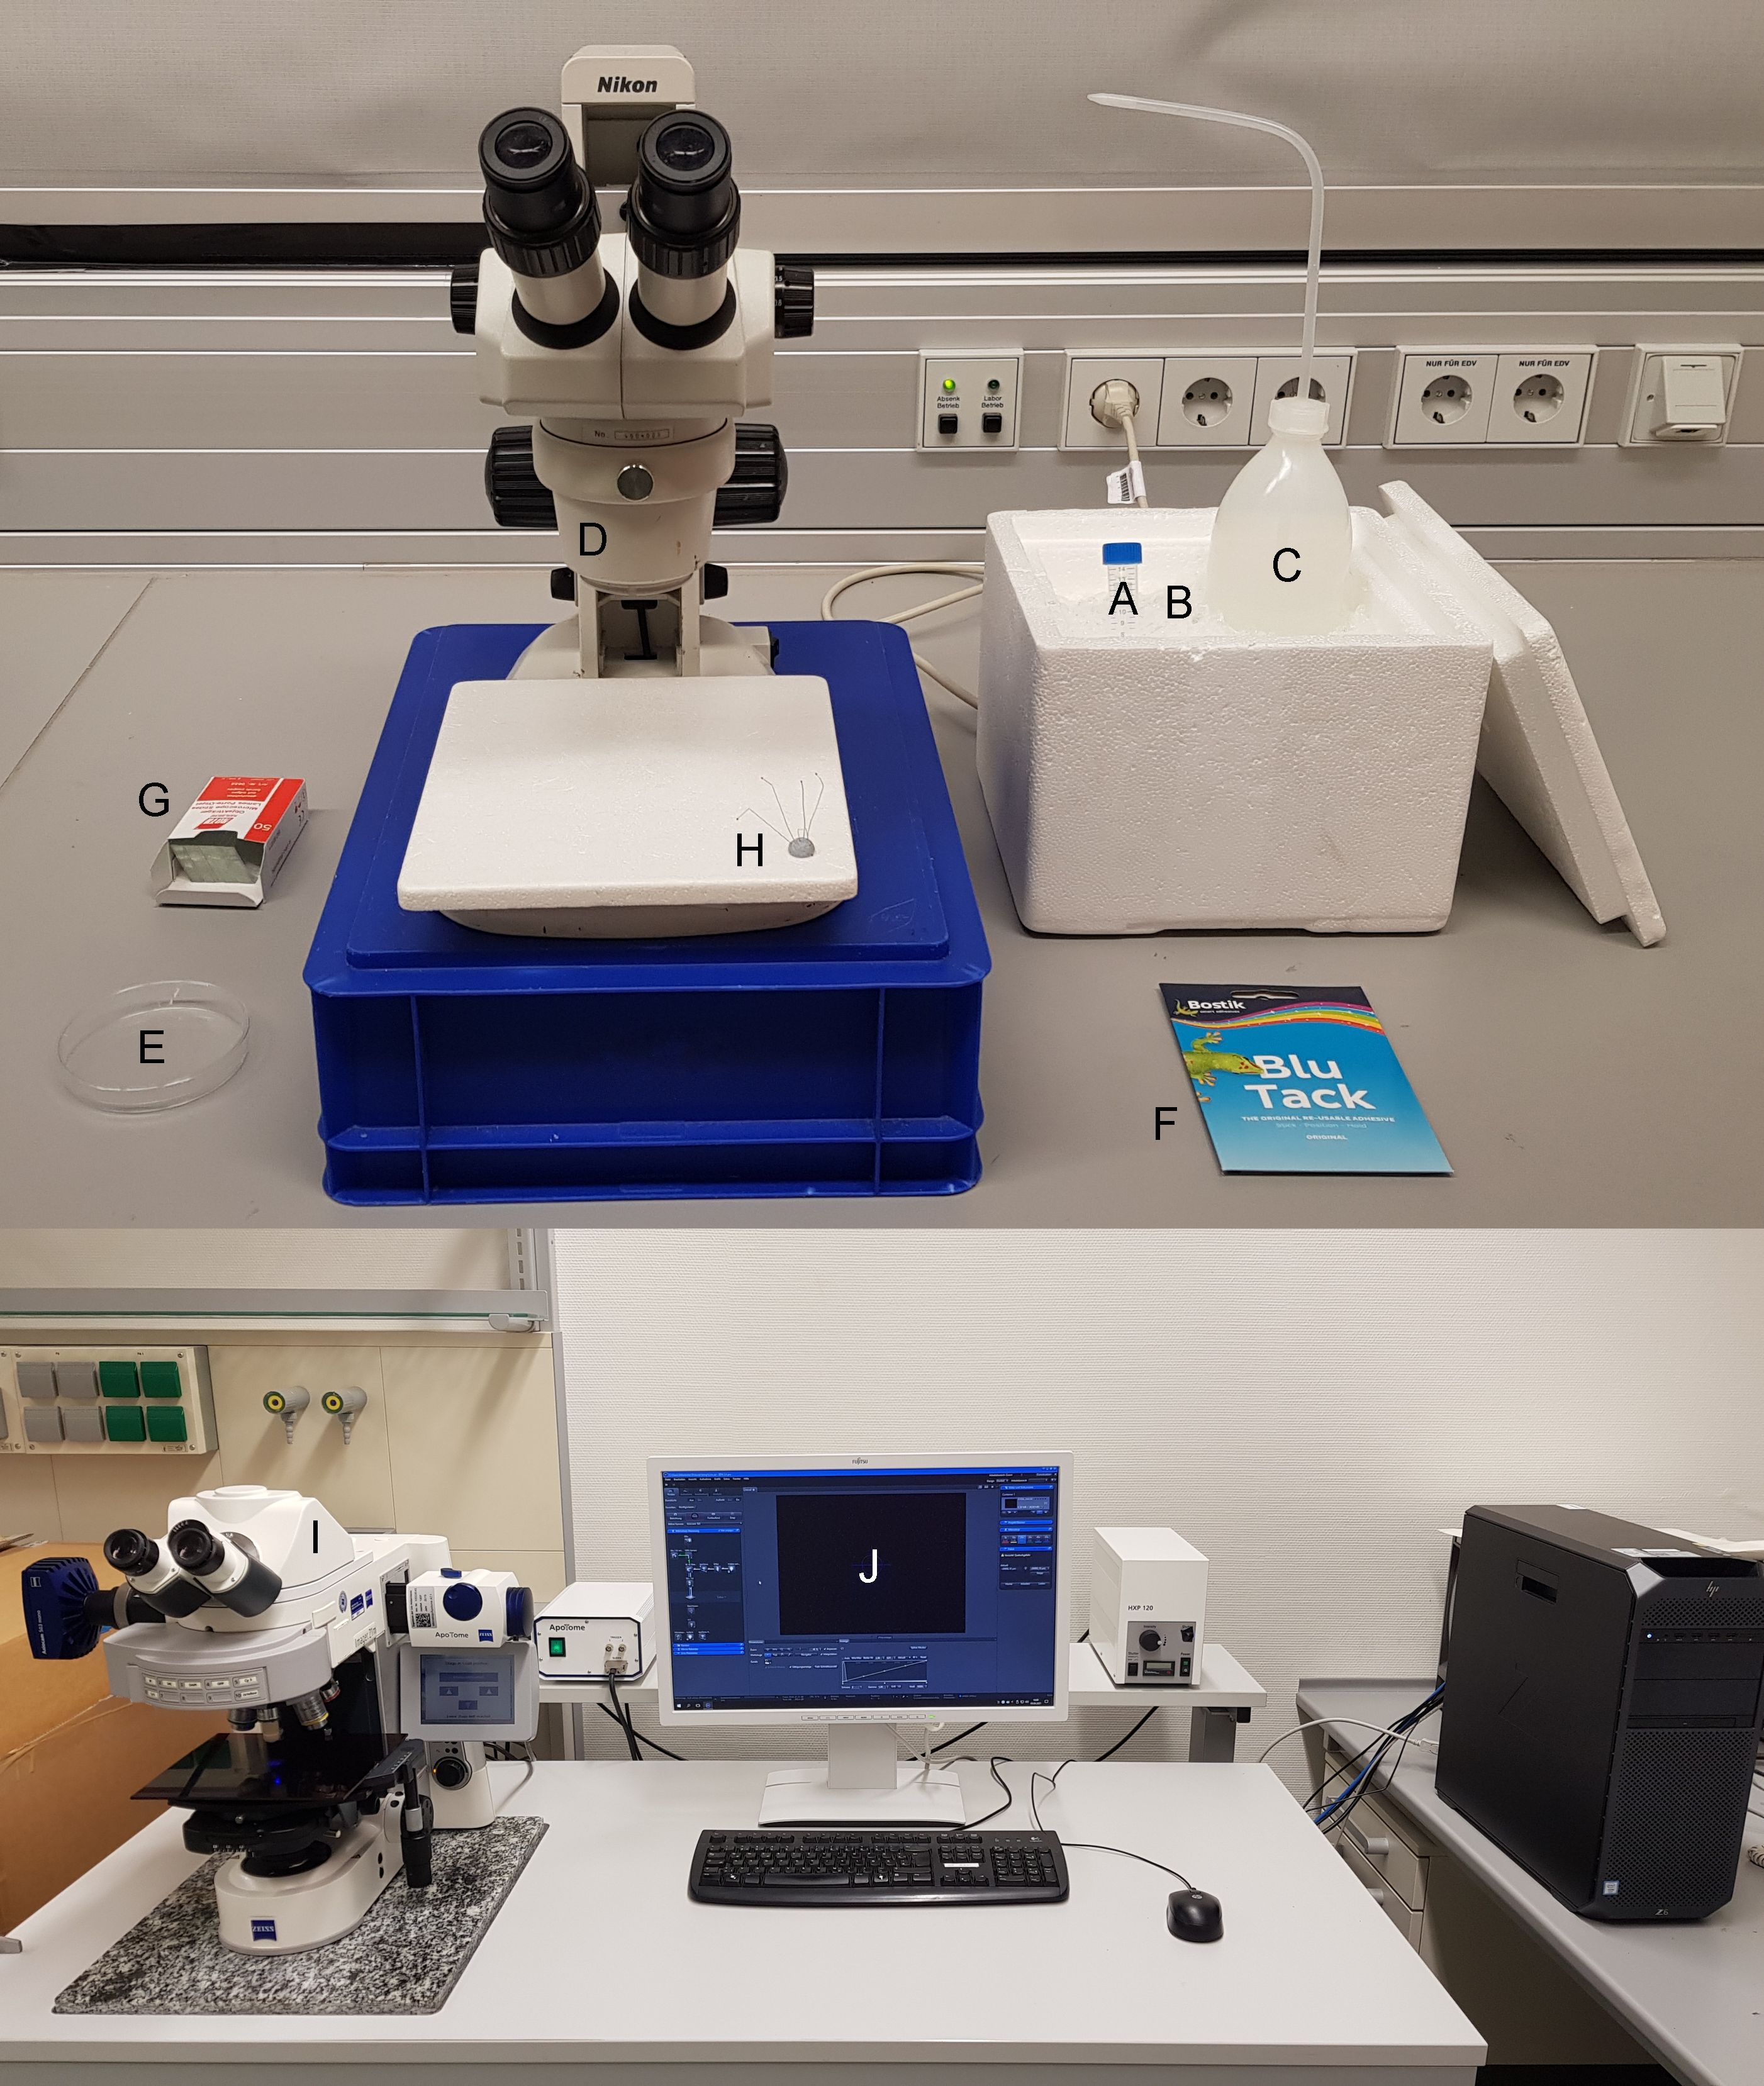
Figure 1: Water immersion microscopy workspace. Materials needed are: (A) 15 mL centrifuge...
Toegang beperkt. Log in of start een proefperiode om deze inhoud te bekijken.
Materialen
| Naam | Bedrijf | Catalogusnummer | Opmerkingen |
|---|---|---|---|
| 15 mL centrifuge tube | Greiner Bio-One | 188271 | |
| Carbon dioxide anaesthesia fly pad | Flystuff | 59-172 | |
| Cold light lamp (KL 1500 LCD) | Zeiss | ||
| Fiji/ImageJ | NIH | ||
| Fluorescence microscope with UV lamp, camera, filter set and software (AxioImager.Z1m, Axiocam 530 mono, 38 HE, ZEN2 blue edition) | Zeiss | ||
| Fluorescent tube | Osram | 4050300518039.00 | |
| Laboratory pipette (20-200 µL) | Eppendorf | ||
| Object slide | Roth | 656.1 | |
| Pipette tips (200 µL) | Labsolute | 7695844 | |
| Plasticine (Blu-Tack) | Bostik | 30811745 | |
| Stereo microscope (SMZ445) | Nikon | ||
| Stereo microscope with UV lamp, camera, filer set and software (MZ16F, MC170 HD, GFP3, LAS 4.12) | Leica |
