This video demonstrates the creation of an experimental aneurysm model in a rabbit using an elastase-treated vessel pouch. After excising a segment of the right CCA, the pouch is treated with elastase, then sutured to the left CCA to restore blood flow. The resulting stress on the weakened pouch walls induces aneurysm formation.
Een abonnement op JoVE is vereist om deze inhoud te bekijken. Log in of start vandaag met uw gratis proefperiode.
Methodenartikel
Developing an Experimental Aneurysm Model in a Rabbit Using an Elastase-Treated Vessel Pouch
900 weergaven
⸱
28 april 2025
In dit artikel
Samenvatting
Protocol
All procedures involving animal models have been reviewed by the local institutional animal care committee and the JoVE veterinary review board.
NOTE: House all animals at a room temperature of 22‒24 Celsius (°C) and maintain a 12-hour (h) light/dark cycle. Provide free access to water, pellet, and ad libitum hay diet every time. Statistical analyses were performed using the non-parametric Wilcoxon-Mann-Whitney-U test. A probability value (p) of ≤ 0.05 was considered significant.
1. Presurgical phase
- Perform a detailed preoperative clinical examination of all rabbits planned for surgery immediately next to a quiet, aseptic operating room, maintaining a temperature of 23 ± 3 °C.
- Record the weight of each animal macroscopically and evaluate the mucous membranes, capillary refill time, and pulse quality.
- Further on, perform cardiac auscultation with a stethoscope and abdominal palpation.
- Based on the clinical findings, attribute an American Society of Anesthesiologists (ASA) classification to each rabbit19. Include only animals with an ASA I score in the study.
- Shave both outer ears with an electric shaver and apply prilocaine-lidocaine cream on both auricular arteries and veins.
- Sedate the rabbit with a combination of 20 milligrams (mg)/kilogram (kg) of ketamine, 100 mg/kg of dexmedetomidine, and 0.3 mg/kg of methadone injected subcutaneously (SC) via a syringe.
- Leave each animal undisturbed for at least 15 min.
- After that, under supplementary oxygenation with 3 liters (l) /minute (min) through a loose face mask and steady monitoring through a pulse oximeter, place a 22 G cannula in the left auricular central artery and another 22 G cannula in the auricular vein of the contralateral ear.
- Shave the surgical field (neck) and inject 0.75% peri-incisional ropivacaine intradermally. Next, shave the forehead and prepare to place pediatric electroencephalographic (EEG) sensors.
- Induce general anesthesia with propofol 1-2 mg/kg intravenously (IV) to effect. Then, immediately intubate the trachea of all rabbits with a silicone tube (3 millimeters (mm) internal diameter) under capnographic control. Afterward, transport all rabbits to the operating room, place them in dorsal recumbency, and connect the tube to a pediatric circle system.
- Achieve anesthesia deepening and maintenance through isoflurane in oxygen, targeting a maximal end-tidal isoflurane concentration of 1.3%.
- Ensure clinical and instrumental monitoring (pulse oximetry, doppler, and invasive blood pressure, 3-lead electrocardiogram, EEG, rectal temperature monitoring, and inhaled and exhaled gases) until tracheal extubation.
- To maintain hydration, Ringer’s lactate is provided at a continuous rate infusion (CRI) of 5 ml/kg/h through venous access. Always confirm proper anesthesia using toe pinches at an interval of 10 min.
- Disinfect the surgical field using povidone-iodine from the manubrium sterni to both jaw angles. Now, perform sterile draping of the surgical field.
- During surgery, provide analgesia with lidocaine at a CRI of 50 microgram (µg)/kg/min and fentanyl at 3‒10 µg/kg/h. Apply spontaneous or assisted ventilation as well as permissive hypercapnia. Perform arterial blood gas analysis at least one time during surgery.
- Treat relevant hypotension (mean arterial pressure < 60 mmHg) with noradrenaline. Prevent hypothermia (rectal temperature ≤ 38 °C) using a heating pad or a heating forced-air warming system.
2. Surgical phase – Step I
- Start the surgery with a median skin incision from the manubrium sterni to the level of the jaw angles/larynx. Sharply dissect the skin and soft tissue with a scalpel, surgical scissors, and forceps. Separate the subcutis and the fat pad medially by blunt dissection.
- Enter the anterior upper ridge of the sternocleidomastoid muscle medially on the left side by blunt dissection using micro forceps and surgical scissors.
- Macroscopically, perform blunt preparation and carefully separate the left CCA from the vagal nerve distally to avoid laryngeal paresis by further using micro forceps and surgical scissors (Figure 1). Note that the bifurcation of the left CCA serves as an intraoperative landmark (Figure 2 and Figure 3A). For all the following steps, use a soft tissue spreader to improve surgical visualization.
- After successful preparation and liberation of the left distal CCA from the vagal nerve, administer papaverine (40 mg/ml, 1:1 diluted in 0.9% isotonic sodium chloride solution) locally. Continuously protect all vessel segments with micro swabs followed by further papaverine administration externally. Place the papaverine-soaked left CCA below the autologous muscle tissue to protect the vessel from drying under the light of the operation microscope.
- Switch sides while maximizing the surgeon’s comfort during the operative procedure. Repeat the same surgical procedure on the right side. Dissect the CCA distally and proximally up to the predefined landmarks (carotid bifurcation at the level of the jaw angles/larynx and internal jugular vein; Figure 3A,B). Reinsert a spreader and administer micro swabs and papaverine as described previously.
- Before the ligation of the right proximal CCA, inject heparin (500 international units (IU)/kg) systemically via a venous ear catheter.
- Use a surgical microscope from now on. First, ligate the right proximal CCA with a 4-0 non-absorbable suture directly at the end of the macroscopically visible proximal landmark to avoid any tension on the arterial vessel.
- Secondly, apply a 6-0 non-absorbable ligature exactly 4‒5 mm distally by using a vessel clip for measurement, considering that after cutting distally from the first 4-0 ligature, the resulting arterial pouch will be of standardized length of about 3‒4 mm in every animal (Figure 4A,C).
- After tightening the 6-0 ligature, clamp the right CCA as far distally as possible with a temporary vessel clip (as normally used in cerebral aneurysm surgery) to avoid any endothelial damage and to create a long vessel segment for irrigation in order to prevent thrombogenesis (Figure 4B).
- Now perform a cut distally to the 4-0 non-absorbable ligature. To harvest the arterial pouch (Figure 4C), perform a second cut distally to the 6-0 non-absorbable ligature.
- Clean the arterial pouch meticulously from all soft tissue and measure its length, width, and depth (Figure 4C) with a vessel clip. If no further modification is needed, keep the autologous arterial graft in a heparinized solution (500 IU/100 ml in 0.9% isotonic sodium chloride) at room temperature until further use.
3. Arterial pouch degradation
- If an arterial pouch degradation is needed, clean it meticulously of soft tissue and preincubate it with 100 IU of porcine elastase dissolved in 5 ml of Tris-buffer at room temperature on the day of experiment for 20 min. Do not use a brush technique. Incubate the arterial pouch intra- and extra-luminally by using a shaker.
- Before putting the pouch in a heparinized solution of 0.9% isotonic sodium chloride, gently swipe it three times for 3 min with anatomical forceps in 0.9% isotonic sodium chloride solution to wash out the remaining porcine elastase.
- If needed, keep the lumen of the arterial pouch opened up with a microtube made of silicone; meticulously protect the left and right CCA during the whole surgical procedure with wet micro paddings.
4. Surgical phase – Step II
- For further preparation of the CCA, place two round micro swabs directly beneath it to move the artery more superficially. Now, put one micro swab with purple padding under the left CCA at the distal third for better visualization of the artery.
- Flush the right proximal CCA with a solution of 0.9% isotonic sodium chloride combined with 500 IU of heparin dissolved in 100 ml of 0.9% isotonic sodium chloride. In order to create a tension-free anastomosis, place the right CCA under the fat pad/peritracheal musculature by using surgical scissors to tunnel it to the left side. Remove the soft tissue of the artery.
- Now perform a 2 mm fish mouth incision on the proximal side of the right CCA using a micro scissor and forceps.
- Change the side on the operating table. Clip the left distal CCA with another temporary vessel clip followed by the proximal left CCA with two temporary vessel clips. Protect all exposed vessel segments from drying out under the surgical light using wet micro swabs.
- Liberate the distal third of the left CCA completely from soft tissue and perform an arteriotomy. Use surgical microforceps and gently grab some soft tissue. Now elevate the artery and incise the left distal CCA slowly with a surgical microscissor. Flush the vessel segments with heparin (500 IU dissolved in 100 ml of 0.9% isotonic sodium chloride solution).
- After performing the arteriotomy with curved micro forceps and micro scissors, enlarge the arteriotomy located at the distal third of the left CCA distally, measuring about 2-fold of the diameter of the right blunt of the carotid artery and the autologous graft. This allows sufficient blood flow into the arterial pouch.
- Take the arterial pouch out of the heparinized saline solution. Place the pouch in the surgical field, where the bifurcation is planned. Start suturing the rear of the right carotid blunt caudally-located with a non-absorbable 9-0 suture, followed by a suture on the cranially-located rear side at the level of the fish mouth incision. Finish sewing the rear from distal to proximal by single stitches.
- While suturing, keep all elastase preincubated pouches moist with continuous irrigation. While suturing the vessel wall of the pouch, use curved surgical micro forceps to gently open up the lumen with its tip. Whenever suturing parts of the left or proximal right CCA, use straight surgical micro forceps. Afterwards, suture the horizontal back side.
- Next suture the horizontal front side, starting at the dome of the aneurysm moving to its base. Afterwards, start with single stitches distally on the front side moving caudally.
- For all steps 4.5‒4.8 while suturing the anastomosis pay attention just to grab the part of the vessel close to the arteriotomy to avoid iatrogenic stenosis. Also, continuously moisten all vessel segments during the whole surgical procedure extraluminally with a syringe filled with heparinized sodium chloride solution (500 IU dissolved in 100 ml of 0.9% isotonic sodium chloride) and protect them with wet micro swabs.
- Before finishing the anastomosis, irrigate the whole complex with a heparinized 0.9% isotonic sodium chloride solution intraluminal (500 IU dissolved in 100 ml of 0.9% isotonic sodium chloride). Beware that elastase-modified arterial pouches have to be sewn on as quickly as possible because of their strong tendency to dry out and to thrombose. Because of the aggressive behavior of the residual elastase concentration in the pouch regarding digesting circumferential vessels, proceed fast with the surgery to re-perfuse the vessel complex quickly.
- Remove all temporary vascular clamps stepwise.
- Remove the distal clamp from the left CCA. Accept minor bleeding and staunch it by gently imprinting micro swabs on the anastomosis. Afterwards, remove the clamp of the right CCA, press gently with micro swab and forceps to avoid thrombus formation.
- If needed, replace the temporary vascular clips to provide enough coagulation. Afterward, relieve both vessel clips from the left side proximally. If needed in any step, replace clips to allow coagulation or to perform re-stitching.
- At this stage perform fluorescence angiography of the vessel complex (Figure 5)
NOTE: Fluorescence angiography is performed by administering 1 ml of fluorescein IV, using 2 bandpass filters, a smartphone with video camera, and a bicycle spotlight. This procedure has been already described elsewhere20,21,22. - Lastly, close the operative situs. Readapt and gently suture the fat pad with a 3-0 resorbable suture with single nodes to protect the anastomosis. Close subcutis and skin in the same fashion.
5. Postsurgical phase
- Discontinue the isoflurane and systemic analgesia administration at the end of the surgery and provide tracheal extubation as soon as the swallowing reflex has returned.
- Administer 0.5 mg/kg of meloxicam IV, 10 mg/kg aspirin (ASS) IV, 100 µg of vitamin B12 SC and 20 mg/kg of clamoxyl IV.
- Provide supplementary oxygenation and active warming until the rabbits have spontaneously regained sternal recumbency.
- Perform postoperative follow-up and animal care four times a day for the first three days in accordance with the guidelines for the assessment and management of pain in rodents and rabbits23,24.
- Administer post-operative analgesia via a fentanyl patch (12 µg/h) applied on the outer ear, meloxicam once a day SC for three days, and methadone as rescue therapy SC, according to the score sheet for pain evaluation. Administer 250 IU/kg low-molecular heparin (LMH) subcutaneously for three days in all rabbits.
Toegang beperkt. Log in of start een proefperiode om deze inhoud te bekijken.
Resultaten
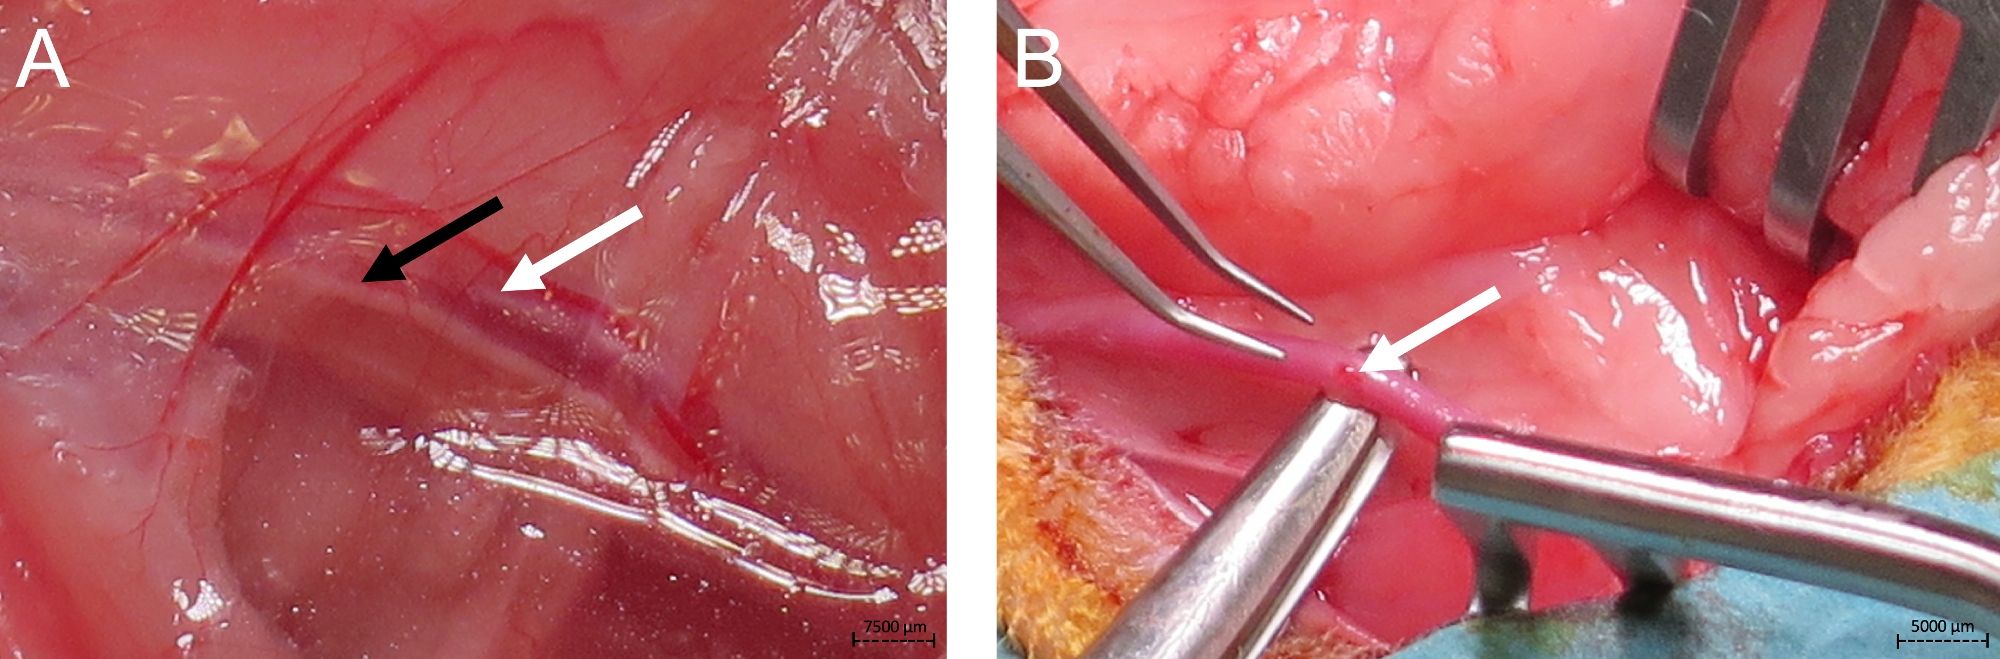
Figure 1: Initial operative step.
Initial operative step, depicting the left carotid artery (white arrow), vagal nerve (black arrow) (
Toegang beperkt. Log in of start een proefperiode om deze inhoud te bekijken.
Materialen
| Naam | Bedrijf | Catalogusnummer | Opmerkingen |
|---|---|---|---|
| 3-0 resorbable suture | Ethicon Inc., USA | VCP428G | |
| 4-0 non-absorbable suture | B. Braun, Germany | G0762563 | |
| 6-0 non-absorbable suture | B. Braun, Germany | C0766070 | |
| 9-0 non-absorbable suture | B. Braun, Germany | G1111140 | |
| Adrenaline | Amino AG | 1445419 | any generic |
| Amiodarone | Helvepharm AG | 5078567 | any generic |
| Anesthesia machine | Dräger | any other | |
| Aspirin | Sanofi-Aventis (Suisse) SA | 622693 | any generic |
| Atropine | Labatec Pharma SA | 6577083 | any generic |
| Bandpass filter blue | Thorlabs | FD1B | any other |
| Bandpass filter green | Thorlabs | FGV9 | any other |
| Bipolar forceps | any other | ||
| Bicycle spotlight | any other | ||
| Biemer vessel clip (2 x) | B. Braun Medical AG, Aesculap, Switzerland | FD560R | temporary |
| Bispectral index (neonatal) | any other | ||
| Blood pressure cuff (neonatal) | any other | ||
| Clamoxyl | GlaxoSmithKline AG | 758808 | any generic |
| Dexmedetomidine | Ever Pharma | 136740-1 | any generic |
| Electrocardiogram electrodes | any other | ||
| Elastase | Sigma Aldrich | 45125 | any generic |
| Ephedrine | Amino AG | 1435734 | any generic |
| Esmolol | OrPha Swiss GmbH | 3284044 | any generic |
| Fentanyl (intravenous use) | Janssen-Cilag AG | 98683 | any generic |
| Fentanyl (transdermal) | Mepha Pharma AG | 4008286 | any generic |
| Fluoresceine | Curatis AG | 5030376 | any generic |
| Fragmin | Pfizer PFE Switzerland GmbH | 1906725 | any generic |
| Glyco | any generic | ||
| Heating pad | any other | ||
| Isotonic sodium chloride solution (0.9%) | Fresenius KABI | 336769 | any generic |
| Ketamine | Pfizer | 342261 | any generic |
| Laboratory shaker | Stuart | SRT6 | any other |
| Lidocaine | Streuli Pharma AG | 747466 | any generic |
| Longuettes | any other | ||
| Metacam | Boehringer Ingelheim | P7626406 | any generic |
| Methadone | Streuli Pharma AG | 1084546 | any generic |
| Microtubes | any other | ||
| Micro needle holder | any other | ||
| Midazolam | Accord Healthcare AG | 7752484 | any generic |
| Needle holder | any other | ||
| O2-Face mask | any other | ||
| Operation microscope | Wild Heerbrugg | any other | |
| Papaverine | Bichsel | any generic | |
| Prilocaine-lidocaine creme | Emla | any generic | |
| Propofol | B. Braun Medical AG, Switzerland | any generic | |
| Pulse oxymeter | any generic | ||
| Rectal temperature probe (neonatal) | any other | ||
| Ropivacaine | Aspen Pharma Schweiz GmbH | 1882249 | any generic |
| Scalpell | Swann-Morton | 210 | any other |
| Small animal shaver | any other | ||
| Smartphone | any other | ||
| Soft tissue forceps | any other | ||
| Soft tissue spreader | any other | ||
| Stainless steel sponge bowls | any other | ||
| Sterile micro swabs | any other | ||
| Stethoscope | any other | ||
| Straight and curved micro-forceps | any other | ||
| Straight and curved micro-scissors | any other | ||
| Straight and curved forceps | any other | ||
| Surgery drape | any other | ||
| Surgical scissors | any other | ||
| Syringes 1 ml, 2ml and 5 ml | any other | ||
| Tris-Buffer | Sigma Aldrich | 93302 | any generic |
| Vascular clip applicator | B. Braun, Germany | FT495T | |
| Vein and arterial catheter 22 G | any generic | ||
| Vitarubin | Streuli Pharma AG | 6847559 | any generic |
| Yasargil titan standard clip (2 x) | B. Braun Medical AG, Aesculap, Switzerland | FT242T | temporary |
