This video demonstrates the assessment of extracellular excitatory neurotransmitter levels in rats with chronic epilepsy induction. After implanting a microdialysis probe into the brain and confirming the absence of seizures using electroencephalography (EEG), extracellular fluid is collected to evaluate elevated neurotransmitter levels in epileptic rats. A high-potassium solution is then infused to sustain neuronal excitability and trigger an increased release of neurotransmitters, with samples collected to assess the potassium-induced peak in excitatory neurotransmitters.
Een abonnement op JoVE is vereist om deze inhoud te bekijken. Log in of start vandaag met uw gratis proefperiode.
Methodenartikel
Assessment of Excitatory Neurotransmitter Levels in Chronic Epilepsy-Induced Rats
970 weergaven
⸱
28 april 2025
In dit artikel
Samenvatting
Protocol
All procedures involving animal models have been reviewed by the local institutional animal care committee and the JoVE veterinary review board.
This protocol is specifically adjusted for glutamate and aspartate determination in rat brain dialysates obtained under EEG control of microdialysis sessions in epileptic and non-epileptic rats. Many of the materials described here may be easily replaced with those that one uses in his laboratory for EEG recordings or microdialysis.
1. Assembly of the Microdialysis Probe-electrode Device
- Use a 3-channel two-twisted electrode (with at least 20 mm cut length of the registering electrode and a 10 cm long grounding electrode) and couple it to a guide cannula to prepare the device. See examples of 3-channel electrode and guide cannula for dialysis in Figure 1A-1B.
- Remove (Figure 1C) and insert (Figure 1D) the metal guide cannula into the dummy plastic cannula a few times prior to the usage to ease its removal at the moment of its switch for microdialysis probe in animal.
- Bend the twisted wires of registering electrode two times (Figure 1E-1F) to align the wires with the dummy cannula of the guide and cut the electrode tip (Figure 1G) to be 0.5 mm longer than the tip of the guide cannula (Figure 1H) using the digital caliper.
- Have ready the 1 mm long silicon circlet (O.D. 2 mm, thickness 0.3 mm; Figure 1I) and insert the tip of the guide cannula and the tip of the twisted electrodes into the silicon circlet using the tweezers (Figure 1J). Fix it onto the foot of the guide cannula pedestal with polymer glue of rapid action or resin (Figure 1K). See the example of the completed devices in Figure 1L and Figure 2A.
- Sterilize the device under germicidal UV light for 4 h. Turn over the device four times so as each of its sides is exposed to the light for 1 h.
Note: Many home-made electrodes and microdialysis probes may be assembled in a similar way. The head of above-described implant for rats has the following dimensions: 7 mm width x 5 mm depth x 10 mm length from the top to pedestal toe; the implant tip is about 11 mm long, 600 µm in diameter and all the device weights about 330-360 mg. The device may be reused two or three times if (i) a sufficient length of the ground electrode is left on the skull during the surgery for the next use and (ii) when the animal is killed, and the device recovered together with the dental cement it is left in acetone overnight, such that the cement may be mechanically disaggregated, and the device washed and sterilized again.
2. Stereotaxic Surgery
- Use a stereotaxic apparatus and probe clip holder (Figure 2B) for the device implantation following the contemporary standards for aseptic and pain-free surgeries.
- Anesthetize the adult Sprague-Dawley rats with ketamine/xylazine mixture (43 mg/kg and 7 mg/kg, i.p.) and fix it onto the stereotaxic frame. Add isoflurane anesthesia (1.4% in air; 1.2 mL/min) to initial ketamine/xylazine injection as it allows to control the depth of anesthesia in time. Shave the fur on the animal’s head.
- Swab the head skin surface by iodine-based solution followed by 70% ethanol to prepare it for aseptic surgery.
- Implant the guide cannula-electrode device prepared in precedence (1.1 – 1.5) into the right ventral hippocampus using the following coordinates: nose bar + 5.0 mm, A – 3.4 mm, L + 4.5 mm, P + 6.5 mm to bregma. Follow standard techniques for stereotaxic surgeries.
- Ensure that it does not cover the anchoring screws. When mounting it onto the stereotaxic apparatus, grasp the device for the guide cannula head as this may be easily aligned to the probe holder.
- Anchor the device to the skull with at least four stainless screws screwing them into the skull bone (1 screw into the left and 1 screw into the right frontal bone plates, 1 screw into the left parietal and 1 screw into the interparietal bone plates). Add a drop of tissue glue to further fix each screw to the skull bone.
- Cover half of screw threads with methacrylic cement. Promote the binding of the cement by making shallow grooves in the bone to increase the adherence.
- Once the tip of the device is positioned into the brain tissue, twist the wire of the ground electrode around 3 anchoring screws. Cover all mounted screws and the device with the dental cement.
- Monitor the animals during the surgery and for about 1 h thereafter until upright and moving around the cage. Keep them on a warming pad to avoid hypothermia. Allow the rats to recover for at least 7 days after the device implantation.
- Monitor the animals at least once daily for 3 days after the surgery for signs of pain or distress. Give the animals with the antibiotic cream (gentamycin 0.1%) close to the incised site to prevent the infection and an analgesic (tramadol 5 mg/kg, intraperitoneal [i.p.]) for 3 days to prevent the post-surgical pain.
3. Temporal Lobe Epilepsy Induction by Pilocarpine and Assignment of Animals to Experimental Groups
- After a week of post-surgical recovery, assign the animals randomly to groups: (i) control animals receiving vehicle and (ii) epileptic animals that will receive pilocarpine. Use a proportionally higher number of animals for epileptic group since not all the pilocarpine administered rats will develop the disease.
- Inject a dose of methylscopolamine (1 mg/kg, subcutaneous [s.c.]) and 30 min after, a single injection of pilocarpine (350 mg/kg, i.p.) to induce the status epilepticus (SE). Inject methylscopolamine and the vehicle (saline) into the control rats. Use 1 mL syringe with 25G needle for all i.p. administrations.
- Check visually the animals to start to have behavioral seizures (moving vibrissa within 5 min, nodding head, cloning the limbs) and within 25 min to clone continuously all the body (SE).
- Arrest the SE 2 h after the onset to have a mortality of about 25% and a mean latent period of approximately 10 days by administration of diazepam (20 mg/kg, i.p.). Observe and record any seizure behavior beginning immediately after the pilocarpine injection and continue for at least 6 h thereafter.
- Give the animals saline (1 mL, i.p.) using 1 mL syringe with 25G needle and sucrose solution (1 mL, per os [p.o.]) using 1 mL syringe and flexible feeding 17G needle for 2-3 days after SE to promote the recovery of body weight loss.
- Exclude the animals that do not achieve the initial body weight within the first week after pilocarpine SE from the study (except for the acute group killed 24 h after SE, where the body weight follow up is not possible).
- Assign post-SE animals randomly to different experimental groups (Figure 3): acute phase (where the microdialysis takes place 24 h after SE), latency (7-9 days after SE), first spontaneous seizure (approximately 11 days after SE), and chronic period (starts about 22-24 days after SE, i.e. about 10 days after the first seizure). Monitor the animals for the occurrence of spontaneous seizures.
NOTE: Use the following inclusion/exclusion criteria for further experiments in epileptic rats: development of convulsive SE within 1 h after pilocarpine administration; weight gain in the first week after SE and the correct positioning of the microdialysis probe and electrode.
4. Epileptic Behavior Monitoring and Analysis
- Long-term monitoring of epileptic behavior
- Approximately 6 h after pilocarpine administration (i.e., at the end of direct observation by the researchers), place the animals into the clean home cages and start the 24 h video monitoring.
- Continue the 24 h video monitoring until day 5, using a digital video surveillance system.
- Beginning on day 5, connect the rats in their home rectangular cages to tethered EEG recording system and continue the 24 h video monitoring.
- Set the parameters on the amplifier positioned outside of the Faraday cage (set amplification factor on each channel according to the specificity of the EEG signal of each single animal) and start the EEG acquisition observing the EEG signal produced by unconnected cables. Use sampling rate 200 Hz and low pass filter set to 0.5 Hz.
- Connect the animal to cables holding an animal's head between two stretched fingers of one hand and screwing down the connectors to the electrode pedestal using the other free hand. Start the acquisition.
CAUTION: Ensure that the signal is free of artifacts. Common artifacts are the spikes greatly exceeding the scale. - A day before the microdialysis experiment, transfer the animals into the tethered EEG system equipped with plexiglass cylinders for microdialysis. Disconnect the animals from the EEG tethering system in home cage screwing up the connectors from the electrode without restrain the animal. Place the animal into the high plexiglass cylinders.
- Monitoring of epileptic behavior a day before and during the microdialysis session
- Switch on the amplifier positioned outside of the Faraday cage. Open the EEG software. Start the EEG acquisition by observing the EEG signal produced by unconnected cables.
- Connect the animal to the tethered EEG recording system holding an animal's head between two stretched fingers of one hand and screwing down the connectors to the electrode pedestal using the other free hand. Set an amplification factor (gain) on each channel of amplifier according to electrode signal of single animal so the EEG signal is in scale. Let the animal explore the new cage (cylinder) for at least 1 h under the direct observation of the researcher.
- NOTE: 24 h before the microdialysis experiment, the rats are briefly anesthetized with isoflurane for the switch of guide cannulas to microdialysis probe. Take advantage of the moment when they are anesthetized to connect them to the EEG recording system.
- Shorten or prolong pendulous cable according to animal's commodity. Make sure that the cables do not interfere with animal's movements and lying posture.
- Check for the correct image framing of the video cameras. Start the video-EEG recording.
- Identification of seizures and EEG activity
- Use a software player to watch the videos. Scroll the movie 8 times faster than the real time playing and individuate the generalized seizures (see animal to rear with forelimb clonus or animal rearing and falling with forelimb clonus). Slow down the video and note the precise time of the beginning and of the end of the behavioral seizure.
- Process the data by counting the number of generalized seizures observed in 24 h of video records and express them in terms of seizure frequency and duration as mean values of all seizures observed in 24 h.
- Define the EEG seizures as the periods of paroxysmal activity of high frequency (>5 Hz) characterized by a >3-fold amplitude increment over baseline with progression of the spike frequency that lasts for a minimum of 3 s or similar. Use EEG software to process the raw EEG recordings. Split the EEG traces into 1 h fractions. Copy the EEG tracing fractions to file for software automatic spike analysis.
- Analyze the EEG activity data using EEG software and predefined parameters (4.3.3.). Conduct all video analyses in two independent investigators who are blind to the group of analyzed animals. In case of divergence, make them re-examine the data together to reach a consensus.
5. Microdialysis
- In vitro probe recovery
- Prepare the probe for its first use according to the manufacturer’s instructions, handling it in its protective sleeve.
- Run the experiment in triplicate: prepare three 1.5 mL test tubes loading them with 1 mL of Ringer’s solution containing the mixture of standards (2.5 µM of glutamate and 2.5 µM of aspartate). Put three loaded 1.5 mL test tubes into the block heater set to 37 °C and position it on the stirrer.
NOTE: Use the same standard solutions for chromatography calibrations. - Seal the 1.5 mL test tubes with paraffin film and puncture it with sharp tweezers to make a hole of about 1 mm in diameter.
- Take the probe and insert it into the hole made in paraffin film. Immerse the membrane at least 2 mm under the solution level. Fix further the probe to 1.5 mL test tube by paraffin film.
CAUTION: Ensure that the tip does not touch the walls of the 1.5 mL test tube. - Connect the probe inlet to the syringe mounted on the infusion pump using fluorinated ethylene propylene (FEP)--tubing and tubing adapters. Optionally, use fine bore polythene tubing of 0.28 mm inner diameter (ID) and 0.61 mm outer diameter (OD) and colored tubing adapters (red and blue tubing adapters) for connections.
- Start the pump at 2 µL/min and let the fluid appear at the outlet tip. Connect the probe outlet to the 0.2 mL collecting test tube using FEP-tubing and tubing adapters.
NOTE: Use FEP-tubing for all connections. Cut the desired length of tubing by using a razor blade. Use tubing adapters of different color for inlet and outlet of the probe. Let the pump run for 60 min. Check for leaks and air bubbles. These should not be present. - Set the pump to the flow rate 2 µL/min and start to collect the samples on the outlet side of the tubing.
- Collect three 30 min perfusate samples and three equal volume samples of the solution in the 1.5 mL test tube. Take the equal volume samples from the 1.5 mL test tube every 30 min using the microsyringe immersed into the standard solution in the 1.5 mL test tube.
- Repeat the experiment (5.1.1-5.1.8) setting up the pump to the flow rate 3 µL/min (5.1.7) to have a probe recovery comparison when using two different perfusion flow rates.
- When finished, stop the pump and rinse the tubing with distilled water, 70% ethanol and push the air into it. Store the probe in a vial filled with clean distilled water. Rinse the probe thoroughly by perfusing it at 2 µL/min by distilled water prior the storage.
- Analyze the concentration of the glutamate and aspartate in the samples by chromatography.
- Calculate the recovery using the following equation:
Recovery (%) = (Cperfusate /Cdialysed solution) x 100.
- Microdialysis sessions in freely moving rats
- Preparative procedures: probe insertion and testing, infusion pump setting and start
- Prepare the microdialysis probes for the first use according to the manufacturer user's guide and fill them with Ringer’s solution. Cut about 10 cm long pieces of FEP-tubing and connect them to inlet and outlet cannulas of the probe using the tubing adapters of different colors.
- Make sure that the tubing touches the adapters with no dead space in all connections.
- 24 h before the microdialysis experiment, anesthetize briefly the animal with isoflurane (5% in air) in an induction chamber until recumbent. Remove the dummy cannula from its guide using the tweezers and holding the animal's head firmly. Insert the microdialysis probe, endowed with a dialyzing membrane, into the guide cannula and firm further the microdialysis cannulas inserted in their guide by modeling clay.
CAUTION: Do not let the probe touch the walls of the protective probe sleeve when extracting. - Put the animal into the plexiglass cylinder and let it explore the new ambience. Connect the animal to the tethered EEG recording system as described above (follow the points 4.2.2 and 4.2.3).
- Follow the awake and freely moving rat movements and connect the inlet of the probe to the 2.5 mL syringe with blunted 22G needle containing Ringer’s solution using the tubing adapters. Push Ringer’s solution inside the probe ejecting 1 mL of Ringer’s solution in 10 s pushing continuously the piston of 2.5 mL syringe. Check for the drop of the liquid appearing on the outlet. The probe is now ready for use.
- Fill up the 2.5 mL syringes connected to FEP-tubing by tubing adapters with Ringer’s solution and mount them onto the infusion pump. Start the pump at 2 µL/min. Let it run overnight.
NOTE: Use the desired length of all FEP-tubing but calculate the tubing dead volume to know when the high K+ stimulation should be started and to correlate the quantification data with neurochemical changes in animal brain. Use the air bubble created in the tubing under the working flow to calculate this time.
- Collection of samples during EEG recording and potassium stimulation
- Verify the absence of seizures in the 3 h preceding the onset of sample collection (video-EEG recordings) and continue to monitor seizure activity during microdialysis.
- Stop the pump carrying the FEP-tubing cannulated syringes filled up with Ringer’s solution. Mount onto the pump another set of 2.5 mL syringes connected to FEP-tubing with tubing adapters filled up with a modified Ringer’s solution containing 100 mM K+ solution.
- Start the pump at 2 µL/min and let it run. For more rapid filling of the tubing, set the pump at 5 µL/min for the time of filling. Check for the absence of air bubbles in the system. Ensure that the tubing touches the adapters with no dead space in all connections.
- Test the probe if ready for use in animal as described above (5.2.1.5).
- NOTE: If for some reason the probe does not work, change it. For these cases, keep a few prepared microdialysis probes ready to use near the microdialysis-EEG workstation. Disconnect the animal from EEG cables and anesthetize it briefly with isoflurane if necessary to realize the change.
- Connect the FEP-tubing of syringes filled up with Ringer’s solution to the inlet cannula of the probe in each animal and wait for the appearance of the liquid drop on the tip of the outlet.
- Connect the outlet of the probe to the FEP-tubing, which leads to collection in the test tube. Insert the FEP-tubing into the closed 0.2 mL test tube with a perforated cap. Ensure that the tube stays in the place by fixing with a piece of modeling clay.
- Continue to run the pump at 2 µL/min for 60 min without collecting samples to equilibrate the system (zero sample).
- Collect 5 consecutive 30 min dialysate samples (60 µL respective volume) under baseline conditions (perfusion with normal Ringer’s solution). Store samples on ice.
- Calculate the time it takes liquid to pass from the pump into the animal's head (it depends on dead volume of tubing, i.e., air bubble time) and switch the FEP-tubing that goes from the syringes containing normal Ringer’s solution to syringes containing modified (100 mM K+) Ringer’s solution at this time without stopping the pump. Check for the absence of air bubbles in the system. Let the pump run for 10 min. CAUTION: In 10 min of high K+ stimulation, the animals tend to move themselves frenetically and usually present a great number of wet dog shakes (control and out of seizure cluster animals) or behavioral seizures (epileptic animals), so be ready to intervene to protect the tubing and cables from twisting.
- After 10 min, switch the tubing from the syringes containing 100 mM K+ Ringer’s solution to normal Ringer’s solution and let the pump run. Do not turn off the pump during the solution changes so that that there will be a drop of the liquid at the end of the tubing to be connected in line.
- From the moment at which the dialysate contains high potassium, i.e., after collection of the fifth post-equilibration dialysate, collect the dialysate fractions every 10 min (20 µL) for 1 h. Collect 3 additional 30 min dialysate samples and stop the pump. Store the samples on ice.
- Store the samples at -80 °C after the experiment until High-performance liquid chromatography (HPLC) analysis.
- Repeat the microdialysis experiment for 3 consecutive days, except for the acute (24 h) and first seizure group, in which only one microdialysis session takes place 24 h after SE or within 24 h after the first spontaneous seizure (Figure 3).
- Preparative procedures: probe insertion and testing, infusion pump setting and start
Toegang beperkt. Log in of start een proefperiode om deze inhoud te bekijken.
Resultaten
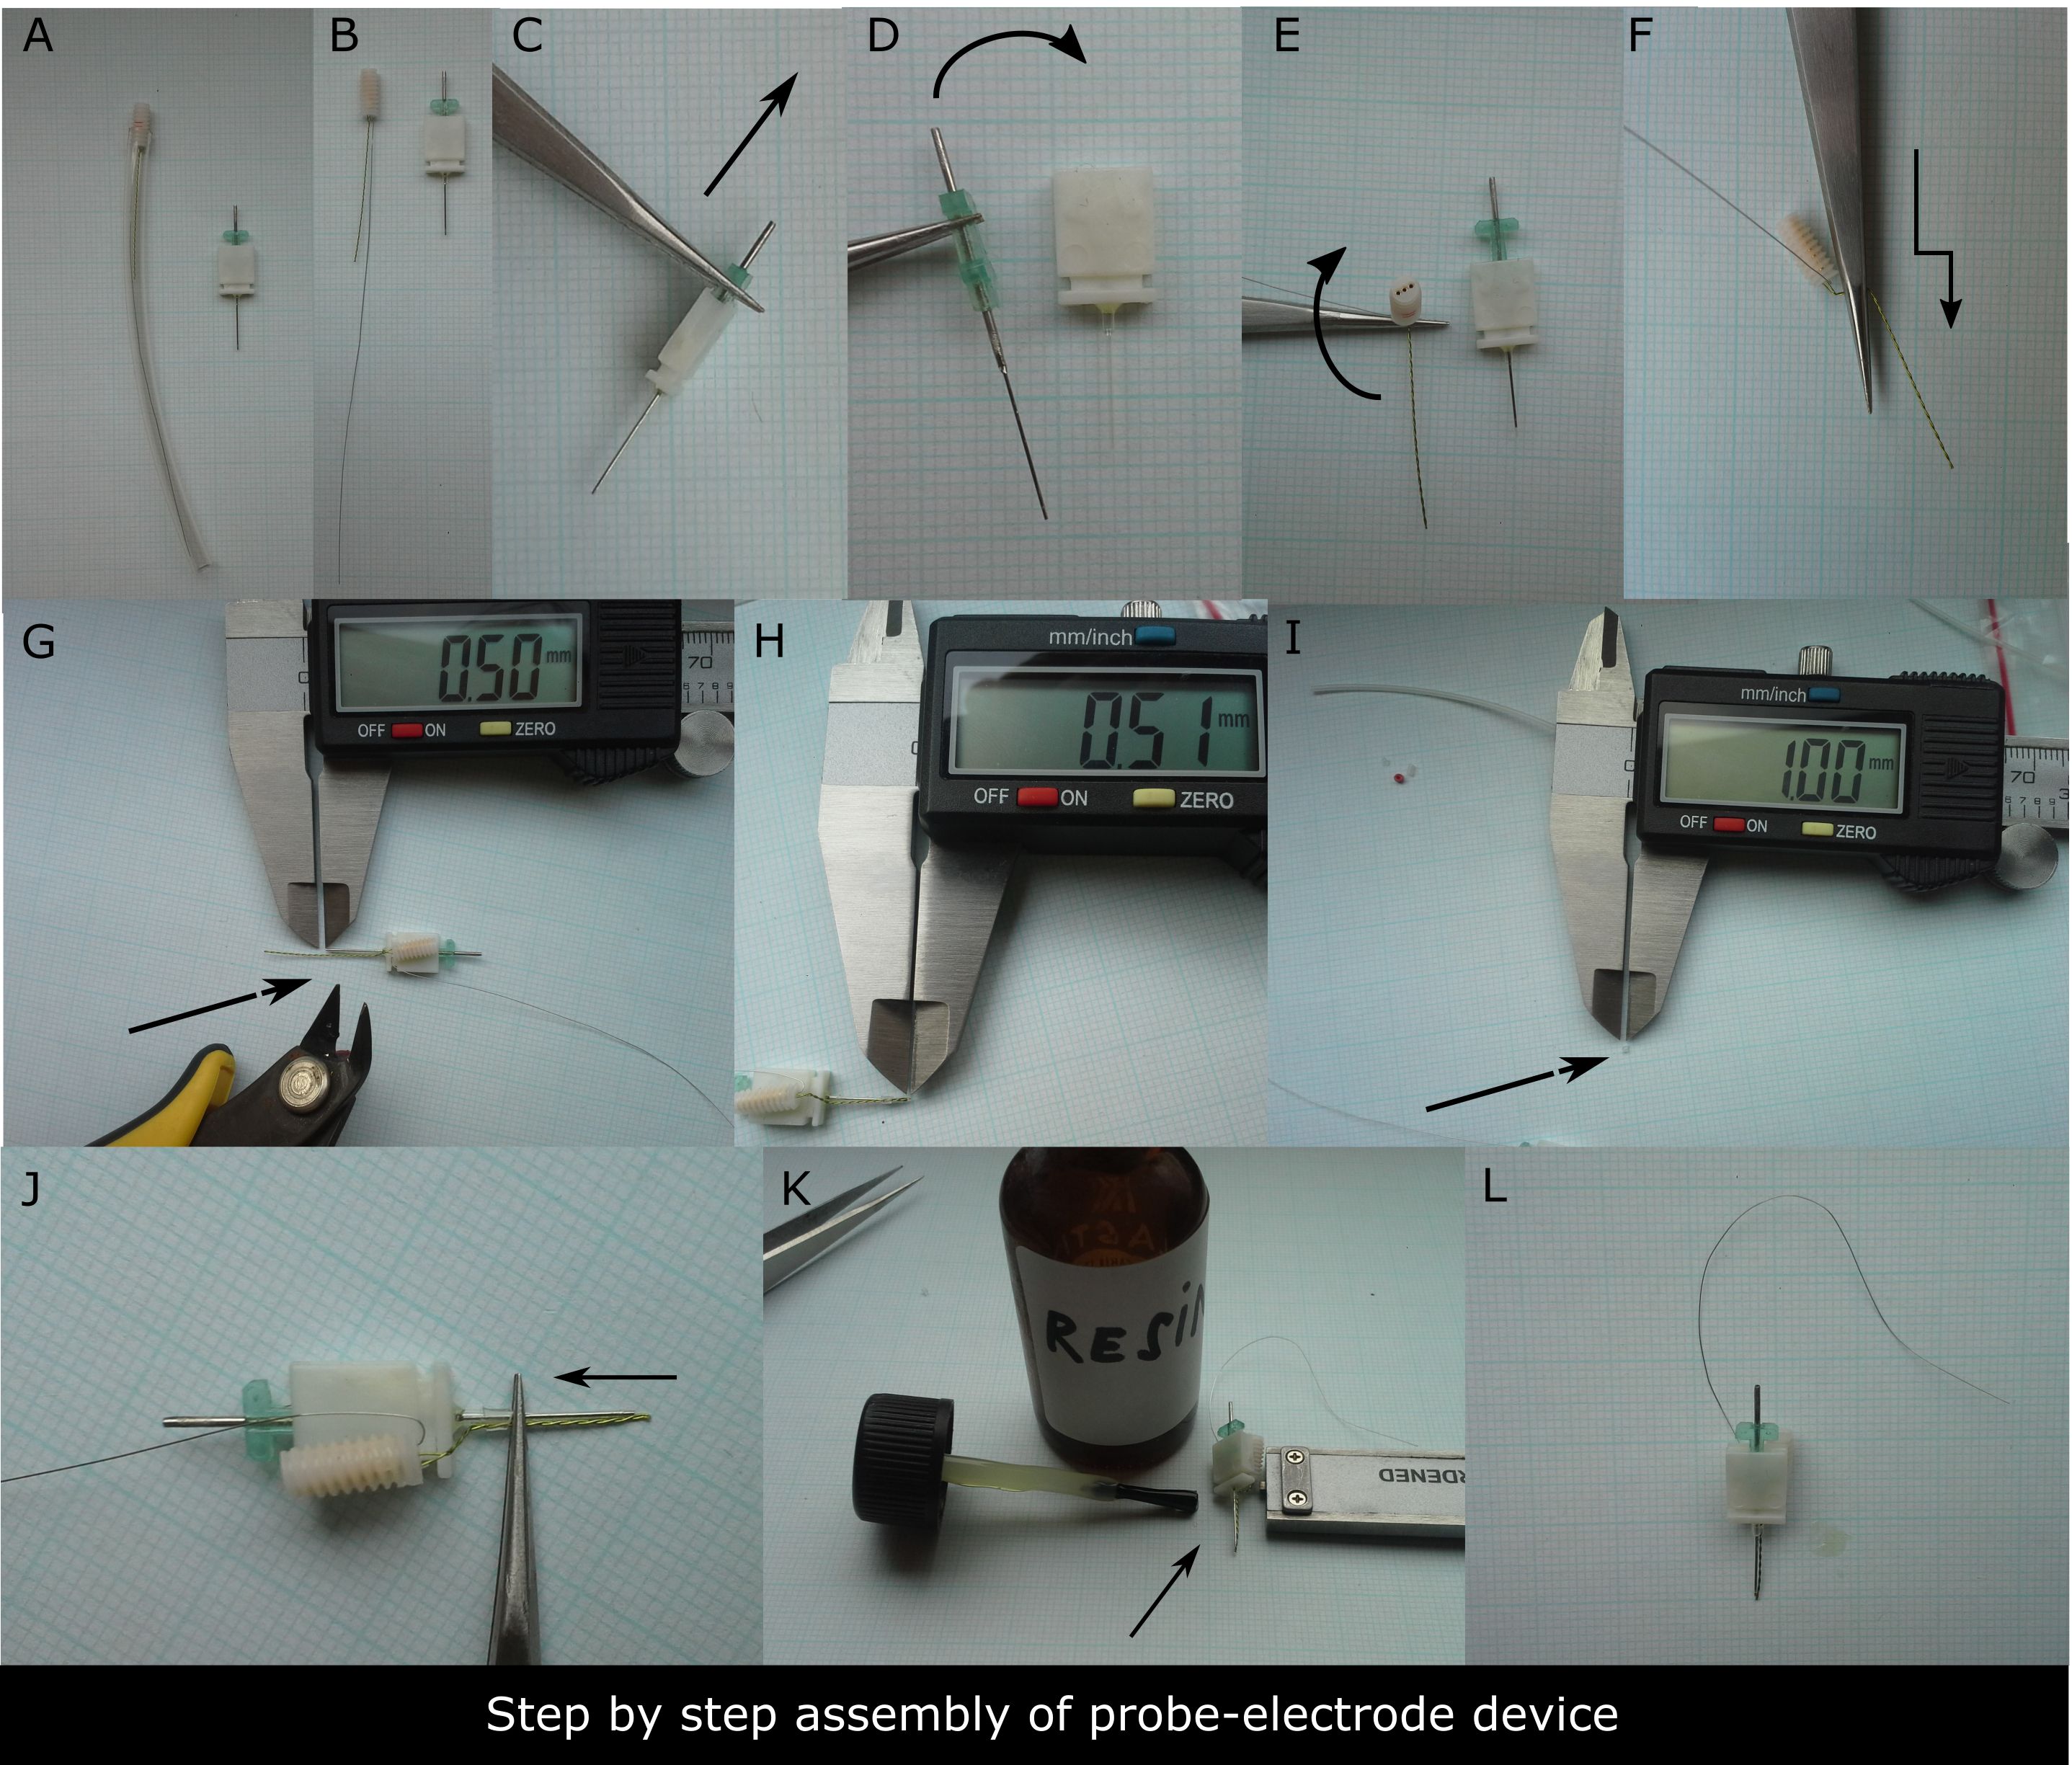
Figure 1. Step-by-step preparation of the device to be implanted. (A) 3-channel electrode with 10 cm lon...
Toegang beperkt. Log in of start een proefperiode om deze inhoud te bekijken.
Materialen
| Naam | Bedrijf | Catalogusnummer | Opmerkingen |
|---|---|---|---|
| 3-channel two-twisted electrode | Invivo1, Plastic One, Roanoke, Virginia, USA | MS333/3-B/SPC | Material |
| guide cannula | Agn Tho's, Lindigö, Sweden | MAB 4.15.IC | Material |
| Resin KK2 Plastik | Elettra Sport, Lecco, Italy | KK2 | Material |
| Super Attack gel Loctite | Henkel Italia Srl, Milano, Italy | 2047420_71941 | Material |
| Imalgene-Ketamine | Merial, Toulouse, France | 221300288 (AIC) | Solution |
| Xylazine | Sigma, Milano, Italy | X1251 | Material |
| Isoflurane-Vet | Merial, Toulouse, France | 103120022 (AIC) | Solution |
| Altadol 50 mg/ ml - tramadol | Formevet, Milano, Italy | 103703017 (AIC) | Solution |
| Gentalyn 0.1% crm - gentamycine | MSD Italia, Roma, Italy | 20891077 (AIC) | Material |
| simplex rapid dental cement | Kemdent, Associated Dental Products Ltd, Swindon, United Kingdom | ACR811 | Material |
| GlasIonomer CX-Plus Cement | Shofu, Kyoto, Japan | PN1167 | Material |
| probe clip holder | Agn Tho's, Lindigö, Sweden | p/n 100 5001 | Equipment |
| Histoacryl® Blue Topical Skin Adhesive | TissueSeal, Ann Arbor, Michigan, USA | TS1050044FP | Material |
| Valium 10 mg/2 ml - diazepam | Roche, Monza, Italy | 019995063 (AIC) | Material |
| 1 mL syringe with 25G needle | Vetrotecnica, Padova, Italy | 3 | Material |
| rat flexible feeding needle 17G | Agn Tho's, Lindigö Sweden | 7206 | Material |
| Grass Technology apparatus | Grass Technologies, Natus Neurology Incorporated, Pleasanton, California, USA | M665G08 | Equipment (AS40 amplifier, head box, interconnecting cables, telefactor model RPSA S40) |
| modular data acquisition and analysis system MP150 | Biopac, Goleta, California, USA | MP150WSW | Equipment |
| digital video surveillance system | AverMedia Technologies, Fremont, California, USA | V4.7.0041FD | Equipment |
| microdialysis probe | Agn Tho's, Lindigö Sweden | MAB 4.15.1.Cu | Material |
| microdialysis probe | Synaptech, Colorado Springs, Colorado, USA | S-8010 | Material |
| block heater | Grant Instruments, Cambridge, England | QBD2 | Equipment |
| stirrer | Cecchinato A, Aparecchi Scientifici, Mestre, Italy | 711 | Equipment |
| infusion pump | Univentor, Zejtun, Malta | 864 | Equipment |
| fine bore polythene tubing | Smiths Medical International Ltd., Keene, New Hampshire, USA | 800/100/100/100 | Material |
| blue tubing adapters | Agn Tho's, Lindigö Sweden | 1002 | Material |
| red tubing adapters | Agn Tho's, Lindigö Sweden | 1003 | Material |
| 2.5 mL syringe with 22G needle | Chemil, Padova, Italy | S02G22 | Material |
| vial cap | Cronus, Labicom, Olomouc, Czech Republic | VCA-1004TB-100 | Material |
| septum | Thermo Scientific, Rockwoood, Tennessee, USA | National C4013-60 8 mm TEF/SIL septum | Material |
| glass insert with bottom spring | Supelco, Sigma, Milano, Italy | 27400-U | Material |
| autosampler vial | National Scientific, Thermo Fisher Scientific, Monza, Italy | C4013-2 | Material |
| Smartline manager 5000 system controller and degasser unit | Knauer, Berlin, Germany | V7602 | Equipment |
| Smartline 1000 quaternary gradient pump | Knauer, Berlin, Germany | V7603 | Equipment |
| Ringer solution | composition in mM: MgCl2 0.85, KCl 2.7, NaCl 148, CaCl2 1.2, 0.3% BSA | Solution | |
| modified Ringer solution | composition in mM: MgCl2 0.85, KCl 100, NaCl 50.7, CaCl2 1.2, 0.3% BSA | Solution | |
| saline | 0.9% NaCl, ph adjusted to 7.0 | Solution | |
| sucrose solution | 10% sucrose in distilled water | Solution |
