This video demonstrates the method of retrograde labeling of Drosophila motor neurons using lipophilic dyes. The dye enters the axon, travels retrogradely, and labels the neurons green, allowing detailed visualization of their morphology and projections under a confocal microscope.
Een abonnement op JoVE is vereist om deze inhoud te bekijken. Log in of start vandaag met uw gratis proefperiode.
Methodenartikel
Retrograde Labeling of Drosophila Motor Neurons Using Fluorescent Lipophilic Dyes
915 weergaven
⸱
28 april 2025
In dit artikel
Samenvatting
Protocol
1. Equipment and Supplies
- Materials for collecting embryos and training adults to lay eggs
- Prepare the filtration apparatus by severing a 50 mL tube and cutting open a hole in the cap to set a mesh filter with pores of 100 µm (Table of Materials) in between the tube and the cap.
NOTE: Alternatively, cell strainers with pores of 100 µm (Table of Materials) can be used for the filtration step of embryo collection. - Make agar plates with grape agar premix (Table of Materials) according to the listed instructions. Briefly, gently stir one packet of the powder mix into 500 mL of room temperature (RT, 23 °C) distilled water (dH2O) and microwave the dissolved mixture to a vigorous boil. After cooling down to 70−75 °C, pour the mixture into Petri dishes (60 mm). After the agar is solidified, store the plates at 4 °C.
- Prepare yeast paste by mixing active dry yeast (Table of Materials) and water to a paste consistency, and keep at 4 °C.
- Use egg-collection cages (for 60 mm Petri dish, Table of Materials) that provide sufficient airflow.
- Prepare the filtration apparatus by severing a 50 mL tube and cutting open a hole in the cap to set a mesh filter with pores of 100 µm (Table of Materials) in between the tube and the cap.
- Preparation of dissection needles and dye injection micropipettes
- Prepare dye injection micropipette and dissection needle from the same capillary tubing with an inner diameter of 0.6 mm and an outer diameter of 1.2 mm (Table of Materials). Pull the capillary tubing by a micropipette puller at 7% from 170 V maximum output (Table of Materials) to create a sharp needle with a taper of ~0.4 cm in length.
- For dye injection, adjust the micropipette with a micropipette beveled (Table of Materials) by a bubble beveling technique described in instrument's manual.
- In short, soak the grinder with a wetting agent (Table of Materials) to prevent the water from 'dragging' the needle tip. Place the needle on the micropipette clamp at 25−30° and lower the tip onto two-thirds of the radius out from the center of the beveling surface. Grind the needle while a syringe with tubing pushes air into the needle to ensure that the micropipette will be clear of glass shavings.
- Mark the micropipette with a fine-tip permanent marker to indicate the position of the opening at the tip after beveling as it is challenging to locate the narrow opening of the micropipette that is formed at an angle.
2. Preparation for Embryo Collection
- Ensure that the adult flies (20−40 wild-type Canton-S or white flies), males and females, are maintained in young (<7 days) and healthy conditions for the ideal egg collection.
NOTE: To stimulate egg-laying, flies are trained in their egg collection cage a couple of days prior to egg collection on agar plates streaked with yeast paste at least once every day.
3. Embryo Staging
- Allow the flies to lay eggs overnight (or at least 15 h) at RT to collect the embryos at 15 h after egg laying (AEL), i.e., stage 16, to view the dendritogenesis of the anterior corner cell (aCC) and raw prawn 3 (RP3) motor neurons. In the morning, collect the plate with the eggs.
NOTE: The embryos at 15 h AEL will have a distinct 4-chamber gut. For imaging different stages follow their specific morphological criteria and aging conditions. - To collect the embryos, dechorionate the eggs laid on the plate with 50% bleach for 5 min.
- Once the chorions have cleared, pour the contents of the plate through the filtration apparatus or cell strainer to isolate the embryos. Using a squeeze bottle of water, dilute the bleach left on the plate and gather as many embryos as possible by decanting the mixture into the filter.
- Wash the embryos on the filter 3−4x with more water or until the bleach odor dissipates. Remove the filter from the apparatus and wash the embryos onto another clean plate with water. Decant the water from the new plate that the embryos are on.
- Prepare a glass slide by covering it with two layers of vinyl tape in the center, forming a rectangle. Cut a rectangular pool out of the tape using a razor blade. Place a thin strip of double-sided tape towards the upper end of the pool, this is where the embryos will be placed as shown in Figure 1.
- Using fine forceps, individually select 5−10 embryos at 15 h AEL and place them on the double-sided tape with the dorsal side facing up. Add insect Ringer's saline to the dissection pool to protect the embryos from desiccation (Figure 1).
4. Dissection and Staining
- Using a glass needle under a dissecting microscope (Table of Materials), cut through the midline of a single embryo at its surface from its posterior to its anterior end. Then drag the embryo out from the vitelline membrane from the tape onto the glass (boxed in Figure 1). Take care not to damage the interior tissues of the embryo.
- Flip the epithelial tissues from the center and attach the epidermal edge onto the surface of the glass slide (Figure 1, inset).
- Using a tube-connected needle with a tip opening of ~300 µm (prepared by breaking the thin tip of a dissection needle), aspirate or blow air to detach and remove the dorsal longitudinal tracheal trunks as well as any remaining guts.
- Use 4% paraformaldehyde (PFA) in phosphate-buffered saline (PBS) to fix the embryos for 5 min at RT. Wash the embryos 3x with PBS.
- Stain the embryos with 1 µL of anti-horseradish peroxidase antibody conjugated with cyanine 3 dye (anti-HRP Cy3) (Table of Materials) in 200 µL of PBS for 1 h. Wash the embryos with PBS 3x after staining.
NOTE: The dye of anti-HRP can be changed based on the lipophilic dyes of choice for injection.
5. Filling of the Injection Micro-pipette
- Heat lipophilic dyes (5 mg/mL of 3,3´-dioctadecyloxacarbocyanine, perchlorate (DiO) or 1,1′-dioctadecyl-3,3,3′,3′- tetramethylindodicarbocyanine, 4-chlorobenzenesulfonate salt (DiD), Table of Materials) to 60 °C in a 1:10 mixture of ethanol:vegetable oil before use.
- Prepare an oil-dissolved dye slide for the injection micropipette. Place the micropipette into the capillary holder (Figure 2, #1). Using the micromanipulator (Table of Materials), adjust the micropipette to be over the dye slide. Then, adjust the stage to place the micropipette onto the dye (Figure 2, #2).
- To fill up the micropipette, use a microinjector (Table of Materials) (Figure 2, #3). Collect the dye in the micropipette by setting the Pi (injection pressure) between 200−500 hPa (hectopascal), the Ti (injection time) between 0.1−0.5 s and Pc (compensation pressure) to 0 hPa for 5 min (Figure 2, #4).
- Once the dye has been collected, remove the dye slide and place the sample onto the microscope stage. Next, increase the Pc to a range of 20−60 hPa before lowering the micropipette into the sample to prevent contamination of PBS by capillary action.
6. Dye Injection into Neurons
- Locate the embryo in the center using the microscope with 10x objective lens (Table of Materials) and align the micropipette with the embryo.
NOTE: The size of the dye droplet can be adjusted by changing the Pi or the size of the opening of the micropipette tip. The droplet should be 10−20 µm, which is approximately the width of 1 muscle. - Change the objective lens to a water-immersion 40x lens (Table of Materials) and submerge the lens into PBS to see the embryo.
- Use fluorescence microscopy to check the neuronal morphology marked by anti-HRP Cy3 and determine the injection site.
- During injection, use brightfield microscopy to see the dye droplet. When the embryo is in focus, change the position of the micropipette to make gentle contact with the tip of the axon of interest (e.g., aCC, RP3).
- Drop the dye in a right abdominal (A2−A6) hemi-segment at the neuromuscular junction of aCC or RP3 (Figure 3) with either DiD or DiO, by using the neurons marked by anti-HRP Cy3. Using the hand control (mouse; Figure 2, 5) release the dye and remove the micropipette after dropping the dye with the micromanipulator and move onto the next injection site.
NOTE: Unlike other dyes (e.g., Lucifer yellow, calcein) which spread into neighboring cells through gap junctions, lipophilic dyes associate with cell membranes and do not transfer to neighbors. Due to the relatively large size of the dye droplet, however, this technique also results in the labeling of the partnering muscles (Figure 3A).
- Incubate the sample at RT for 1 h after dye-drop before imaging.
NOTE: The protocol can be paused here before mounting, and the sample can be kept at 4 °C overnight. Lipophilic dyes can also be delivered using iontophoresis if an intracellular direct-coupled (DC) amplifier is readily available.
7. Imaging with a Confocal Microscope
- Remove the double-sided tape and vinyl tape from the glass slide with the help of forceps.
- Prepare a cover slip (22 x 22 mm2 No.1 cover glass) with a small amount of vacuum grease (Table of Materials) at the four corners and carefully place on the sample, avoiding air bubbles. Remove any excess PBS using task wipers.
- Push down the coverslip to adjust the working distance between the objective lens and the sample. Completely seal the edges of the coverslip with nail polish.
- Image at 10x and 100x magnification using a confocal microscope.
Toegang beperkt. Log in of start een proefperiode om deze inhoud te bekijken.
Resultaten
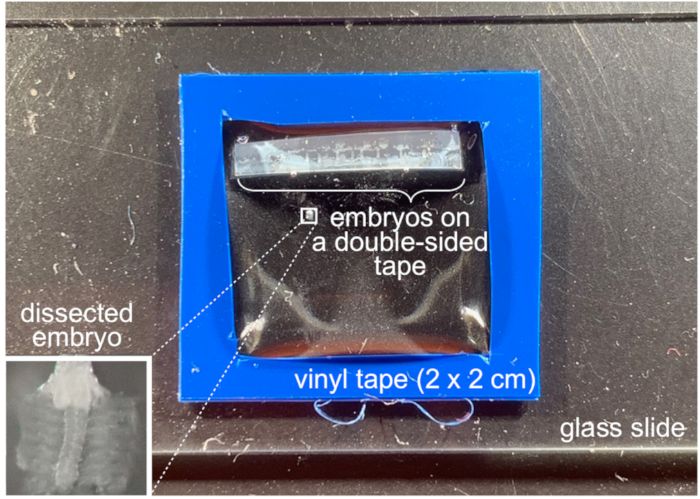
Figure 1: Setup of the dissection pool. The blue chamber seen on the glass slide is created wit...
Toegang beperkt. Log in of start een proefperiode om deze inhoud te bekijken.
Materialen
| Naam | Bedrijf | Catalogusnummer | Opmerkingen |
|---|---|---|---|
| 10x objective lens | Nikon | Plan | |
| 40x water-immersion lens | Nikon | NIR Apo | |
| Capillary tubing | Frederick Haer&Co | 27-31-1 | |
| Confocal microscope | Andor | N/A | Dragonfly Spinning disk confocal unit |
| Cover glass | Corning | 22x22 mm Square #1 | |
| DiD | ThermoFisher | V22886 | |
| DiI | ThermoFisher | V22888 | |
| DiO | ThermoFisher | V22887 | |
| Dissecting microscope | Nikon | N/A | SMZ-U |
| Double sided tape | Scotch | 665 | |
| Dow corning high-vacuum grease | Fisher Sci. | 14-635-5D | |
| Dumont #5 Forceps | Fine Science Tools | 11252-20 | |
| Egg collection cage | FlyStuff | 59-100 | |
| FemtoJet 5247 | Eppendorf | discontinued | FemtoJet 4i (Cat No. 5252000021) |
| Micromanipulator | Sutter | MP-225 | |
| Micropipette beveler | Sutter | BV-10-B | |
| Needle puller | Narishige | PC-100 | |
| Nutri-fly grape agar powder premix packets | FlyStuff | 47-102 | |
| Nylon net filter | Millipore | ||
| Paraformaldehyde 16% solution, EM grade | Electron Microscopy Sciences | 15710 | Any EM grades |
| PBS | Roche | 11666789001 | Sold on sigmaaldrich, boxed 10x solution |
| Photo-Flo 200 | Kodak | 146 4510 | Wetting agent |
| Upright fluorescence microscope | Nikon | N/A | Eclipse Ci with a LED light source |
| Vinyl electrical tape | Scotch | 6143 | |
| VWR Cell strainers | VWR | 10199-659 | |
| Yeast | FlyStuff | 62-103 | Active dry yeast (RED STAR) |
