This video shows a two-photon microscopy procedure for imaging neuronal activity and microglial dynamics in an awake mouse during visual stimulation, highlighting calcium transients and cellular interactions.
Een abonnement op JoVE is vereist om deze inhoud te bekijken. Log in of start vandaag met uw gratis proefperiode.
Methodenartikel
Simultaneous Imaging of Microglial Dynamics and Neuronal Activity in an Awake Mouse
1K weergaven
⸱
29 mei 2025
In dit artikel
Samenvatting
Protocol
All procedures involving animal models have been reviewed by the local institutional animal care committee and the JoVE veterinary review board.
In vivo two-photon imaging of microglia and neuronal calcium dynamics
1. Habituation of mice to the microscope apparatus
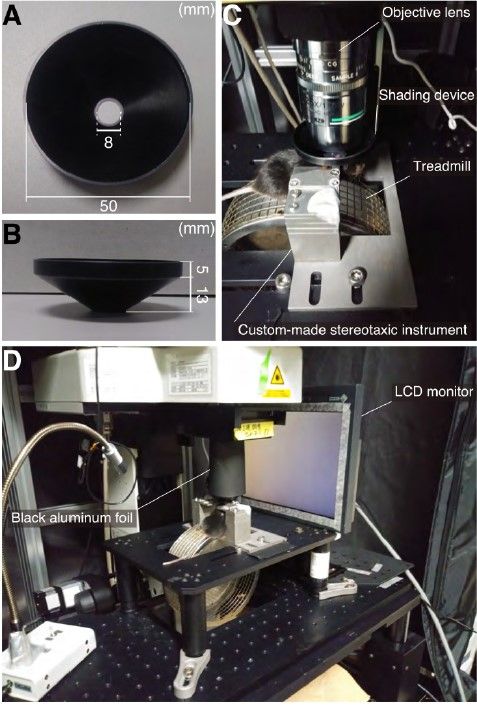
- Three weeks after the surgery, induce anesthesia in the mouse with 3% isoflurane, and set the mouse under the 25x objective lens of a two-photon microscope using a custom-made stereotaxic instrument (Figure 1C). For the setup, the mouse is set on the top of a treadmill and allowed to run freely.
- Approximately 10 min later, remove the mouse from the microscope stage and return it to the home cage. Repeat the habituation at least 3 times every alternate day before two-photon image acquisition.
2. Two-photon image acquisition
NOTE: We recommend performing the image acquisition more than 4 weeks after surgery, as microglial activation gradually returns to the basal level.
- Induce anesthesia in the mouse with 3% isoflurane and set the mouse under the objective lens of the two-photon microscope using a custom-made stereotaxic instrument.
- Install the custom-made shading device (Figure 1A and Figure 1B) and an LCD monitor for visual stimulation as described below (Figure 1D).
- Position the lens to focus on the brain surface, and then set this lens position as the original Z-position. Keep the x-y coordinates constant and elevate the objective lens; remove the mouse and stereotaxic instrument from the objective lens and treadmill.
- Attach a shading device on the top of the head plate using silicone, which is blackened by mixing with charcoal powder, and ensure the space between the head plate and the shading device is well-sealed.
- Fill the shading device with distilled water, and then fix the mouse and the stereotaxic frame again under the objective and on the treadmill. Carefully reset the focal plane at the brain surface, checking the depth of the objective lens.
NOTE: To avoid the risk of damaging the objective lens, set the xyz coordinates first, and then apply the shading device of the objective lens. It is also reasonable to install the cover first, and then adjust the coordinates, but cautious handling is necessary for this option. - Cover the objective lens with black aluminium foil to avoid light contamination from the LCD monitor used for visual stimulation through the objective lens (Figure 1D). Set a 10-inch LCD monitor at 12.5 cm in front of the mouse's eyes to present visual stimuli (Figure 1D).
- Configure the fluorescence emission collection filters to EGFP fluorescence (525/50 nm emission filter) and R-CaMP fluorescence (593/46 nm emission filter) and the excitation wavelength to 1,000 nm. Acquire images with the spatial resolution of 0.25 μm/pixel using a 25x 1.1 NA objective and GaAsP PMTs.
- Find the imaging region in which R-CaMP (+) neurons and EGFP (+) microglia can be simultaneously imaged in layer 2/3. For this setup, data obtained in Figure 2 were at a depth of 100 μm from the pial surface, using a live image preview. Keep the power of the excitation laser as low as possible to avoid photo-bleaching and damage caused by increased local temperature in the imaging region.
- Acquire images at the frame rate of 30 Hz. Simultaneously with the image acquisition, present a drifting-grating visual stimuli at 100% contrast, 1.5 Hz, 0.04 cycles per degree in 12 directions at 6 orientations from 0° to 150° in 30° steps to the mouse.
- After the image acquisition, remove the mouse from the microscope stage, detach the shading device and the stereotaxic instrument from the mouse, and return the mouse to its home cage.
Toegang beperkt. Log in of start een proefperiode om deze inhoud te bekijken.
Resultaten
Toegang beperkt. Log in of start een proefperiode om deze inhoud te bekijken.
Materialen
| Naam | Bedrijf | Catalogusnummer | Opmerkingen |
|---|---|---|---|
| 10-inch LCD monitor | |||
| Black aluminum foil | |||
| CX3CR1-EGFP mouse | |||
| DENT SILICONE-V | |||
| Head-plate | |||
| Isoflurane | |||
| Multi-photon excitation microscope | |||
| Objective lens | |||
| Psychtoolbox | |||
| Shading device | |||
| Stereotaxic instrument | |||
| Treadmill |
