Method Article

Visualizing Protein Kinase A Activity in a Mouse Using Two-Photon Fluorescence Lifetime Imaging Microscopy

May 29th, 2025

In This Article

Abstract

Loading...
$$\rightleftharpoonup{xx}$$ $$\longleftharp{xx}$$, $$\longrightharp{xx}$$,

Source: Jongbloets, B. C., et al. Visualizing Protein Kinase A Activity In Head-fixed Behaving Mice Using In Vivo Two-photon Fluorescence Lifetime Imaging Microscopy. J. Vis. Exp. (2019)

This video demonstrates a two-photon fluorescence lifetime imaging microscopy procedure for visualizing protein kinase A activity in head-fixed, behaving mice during enforced locomotion.

Protocol

Loading...
$$\rightleftharpoonup{xx}$$ $$\longleftharp{xx}$$, $$\longrightharp{xx}$$,

All procedures involving animal models have been reviewed by the local institutional animal care committee and the JoVE veterinary review board.

1. In Vivo Two-photon Fluorescence Lifetime Imaging Microscopy

  1. Commence two-photon fluorescence lifetime imaging microscopy (2pFLIM) imaging at or beyond 2 weeks post-installation of the cranial window. Minimize experimental interference due to stress by frequent handling and scruffing of the mouse prior to the start of the imaging study to habituate the mouse.
  2. Set the two-photon excitation laser wavelength to 960 nm using the software that controls the two-photon laser.
  3. Anesthetize the mouse using 4% isoflurane. Confirm proper anesthetization by tail-pinch and observing breathing rates. That is, there should be no response to the tail-pinch and the breathing rate should be reduced to ~1 breath per second. To minimize unnecessary procedural time and because the anesthesia lasts only for two to three minutes, eye lubricants are not used.
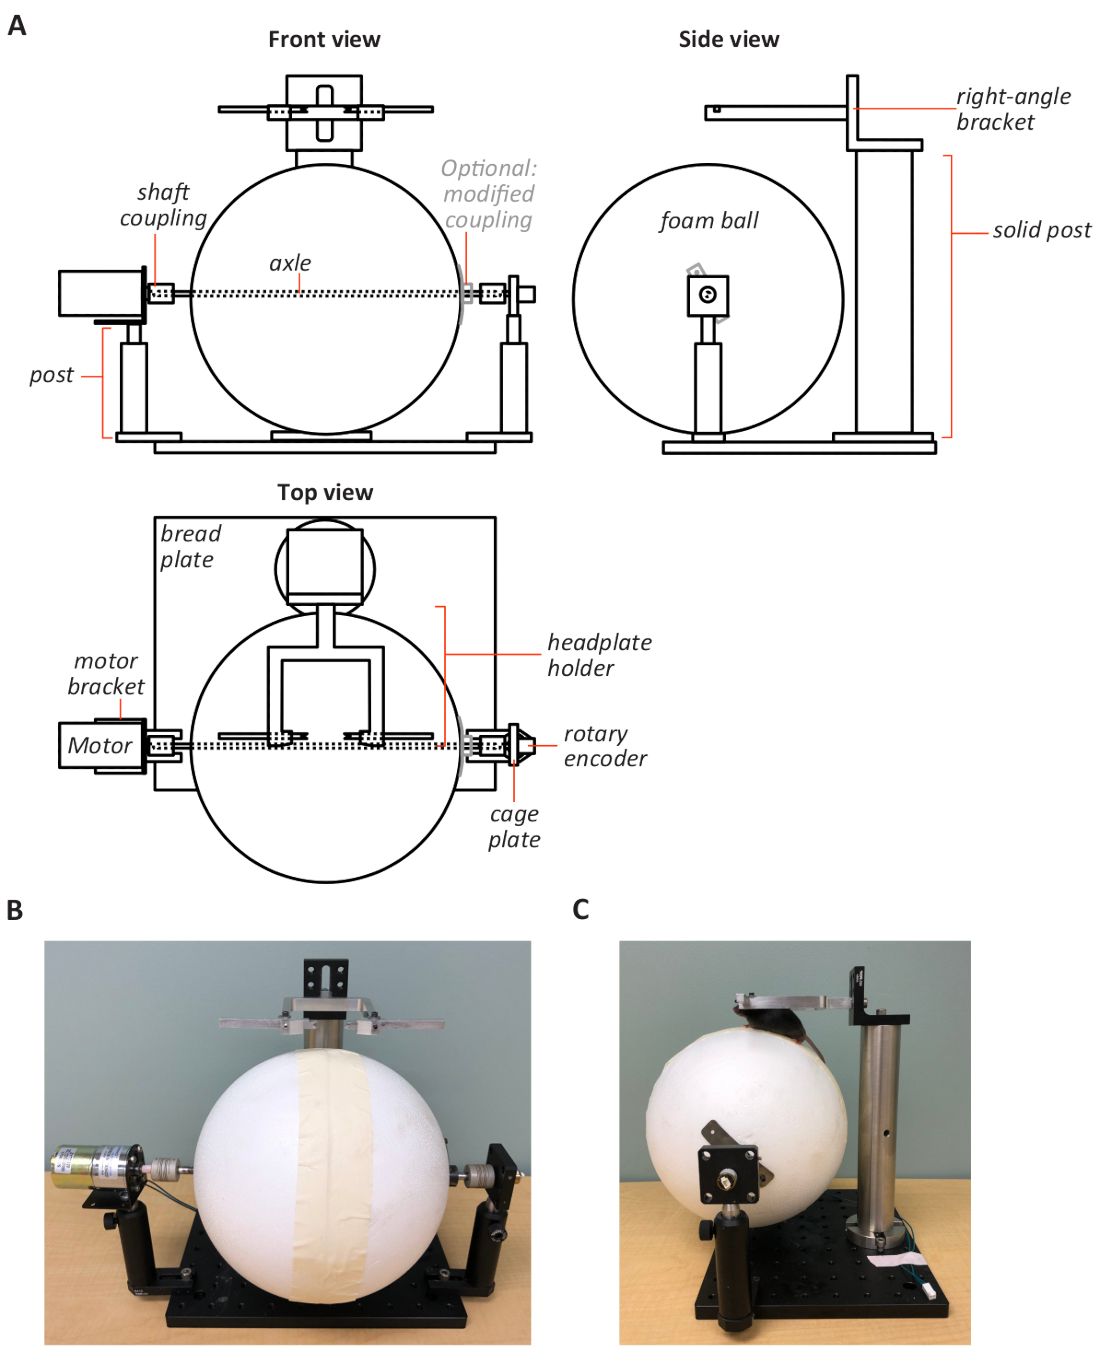
  4. Transfer the anesthetized mouse to the motorized treadmill (Figure 1C) and mount the headplate of the mouse to the headplate holder of the treadmill setup (see Figure 1 for details). Clean the surface of the cranial window coverslip on the mouse with 70% ethanol.
  5. Place the motorized treadmill with the mounted mouse under the 2pFLIM objective. Apply a drop of distilled water between the cranial window coverslip and the objective.
  6. Let the mounted mouse wake up from anesthesia and become acclimated to the treadmill and microscope environment for at least 10 min. Monitor respiration rate of the mouse while the mounted mouse wakes up from anesthesia.
  7. Navigate to the injection location under epi-illumination. Document fiducial features (i.e., blood vessels) under brightfield to aid imaging of the same region of interest (ROI) during subsequent imaging sessions.
  8. Eliminate any incoming light other than the emitted light from the brain tissue. Switch off the epi-illumination light source and close the enclosure of the 2pFLIM rig. Activate the 2pFLIM PMT by switching on the hardware command voltage control.
  9. Acquire a z-stack 2pFLIM image using the 2pFLIM acquisition software FLIMimage with the following recommended settings for imaging tAKARα-positive somata in awake mice. Set frame averaging to 3 frames, scanning speed to 2 ms/line, image size to 128 x 128 pixels, and field of view to 90−100 μm. Adjust imaging settings based on the preparation and hardware configuration.
  10. Inspect the acquired image in FLIM view (in-house developed custom software). Adjust imaging settings following step 1.9 to optimize photon count and minimize photobleaching.

NOTE: A workable integrated photon count in an ROI for lifetime imaging of a tAKARα-positive soma in vivo is ~1,000−10,000 photons depending on the signal amplitude that results from a particular stimulus.

  1. Use a decreased field of view, decreased scanning speed, increased laser power, and increased number of frames to be averaged to increase the integrated photon counts and reduce the lifetime estimation error. At the same time, be sure to use the minimal essential laser power, frame averaging, and scanning speed to minimize photobleaching.
  2. Image at a regular time interval (e.g., every 30−60 s) by repeating the z-stack acquisition using settings determined in step 1.10. Acquire baseline 2pFLIM images for at least 15 min at zero treadmill speed.
  3. Set the treadmill rotation speed to ~15 cm/s for 15 min while acquiring 2pFLIM images. Continue imaging for ≥20 min after switching off the treadmill rotation, to assess the duration of PKA activity after cessation of forced locomotion.

2. Analysis of 2pFLIM Images

1. Open the acquired images in FLIMview and set the following parameters in FLIMview.

1. Click on the single photon counting (SPC) minimum and maximum range fields in FLIMview. Enter the appropriate minimum and maximum SPC range value, typically ranging between 1.2−2 and 10−12 ns, respectively.

2. Click on the t0 value field in FLIMview and enter the t0 value (typically ~2 ns). Click on the lifetime luminance minimum threshold value field in FLIMview and enter the desired threshold value to 5−30 photons.

2. Click on the new group button (N) and assign an experiment group name. This will generate a group that combines data from each added FLIM image.

3. Click on the ROI button in the Roi Controls module of FLIMview and draw an ROI around a tAKARα-positive soma. Reduce the z-stack range, by moving the lower and upper z-limit in the z-stack Control sliders in FLIMview, to minimize signal contamination originating from background photons in other z depths.

4. Click on the + button to add the FLIM image to the group (step 2.2). Click on the Calc button to calculate the mean lifetime (LT, also called mean photon emission time [MPET]), for the ROI and the lifetime estimation error (δτ).

5. Open the next file in the chronological 2pFLIM imaging series. Repeat step 2.4. Be sure to adjust the position of the ROI and z-stack range to measure the same tAKARα-positive soma over time, because there can be tissue drift over time.

6. Select the deltaMPET/MPET0 in the drop-down menu of the Group Controls module. Click on the baseline# field and enter the indexes (e.g., 1 2 3 4 5 for the first five images in the group created in step 2.3). This will define the image(s) used to calculate baseline lifetime (LT0).

7. Click on Plot to generate a graph containing the FLIM response (ΔLT/LT0) of tAKARα during the experiment in the defined ROIs. Normalized changes in lifetime (ΔLT) of individual ROIs by the corresponding baseline lifetime (LT0) allow for comparison of PKA activity during locomotion across different ROIs.

Access restricted. Please log in or start a trial to view this content.

Results

Loading...
$$\rightleftharpoonup{xx}$$ $$\longleftharp{xx}$$, $$\longrightharp{xx}$$,
Rotary motion setup with foam ball, motor, rotary encoder; schematic and photo views.

Access restricted. Please log in or start a trial to view this content.

Materials

List of materials used in this article
NameCompanyCatalog NumberComments
Two-photon microscopeN/AN/A
ScanImage 3.6Svoboda Lab/Vidrio TechnologyN/A
FLIMview MATLAB softwareN/AN/A
16x 0.8 NA water-immersion
objective
NikonMRP07220
AnimalTracker MATLAB softwareN/AN/A
Stereotaxic alignment systsemDavid kopf1900
Virus: tAKARα (AAV2/1 hSyntAKARα-WPRE)Addgene119921
HeadplateN/AN/A
Headplate holderN/AN/A
Circular coverslip (5 mm diameter)r) VWR101413-528

Reprints and Permissions

Request permission to reuse the text or figures of this JoVE article

Request Permission

Tags

Protein Kinase A ActivityTwo Photon FLIMFluorescence Lifetime ImagingHead Fixed MiceCranial Window ImagingEnforced LocomotionFRET Reporter AnalysisZ Stack AcquisitionLifetime Estimation ErrorRegion of Interest Tracking

Related Articles