This video demonstrates the process of preparing and imaging mouse brain tissue infected with the rabies virus (RABV) to evaluate infection progression. It outlines key steps, including tissue staining with fluorescent markers, dehydration, clearing, and mounting for confocal laser scanning microscopy, culminating in the generation of a three-dimensional representation.
Een abonnement op JoVE is vereist om deze inhoud te bekijken. Log in of start vandaag met uw gratis proefperiode.
Methodenartikel
Three-Dimensional Visualization of a Rabies Virus Infection in Mouse Brain Tissue
1.1K weergaven
⸱
29 mei 2025
In dit artikel
Samenvatting
Protocol
All procedures involving animal samples have been reviewed and approved by the appropriate animal ethical review committee.
RABV-infected, paraformaldehyde (PFA)-fixed archived brain material was used.
CAUTION: This protocol uses various toxic and/or harmful substances, including PFA, methanol (MeOH), hydrogen peroxide (H2O2), sodium azide (NaN3), tert-butanol (TBA), benzyl alcohol (BA), benzyl benzoate (BB), and diphenyl ether (DPE). MeOH and TBA are highly flammable. Avoid exposure by wearing appropriate personal protective equipment (a lab coat, gloves, and eye protection) and conducting experiments in a fume hood. Collect waste separately in appropriate containers and dispose of it according to local regulations. Rabies virus is classified as a biosafety level (BSL)-2 pathogen and can, therefore, generally be handled under BSL-2 conditions. Some activities, including procedures that may generate aerosols, work with high virus concentrations, or work with novel lyssaviruses, may require BSL-3 classification. Pre-exposure prophylaxis is recommended for high-risk personnel, including animal caretakers and laboratory workers. Refer to local authority regulations.
1. Fixation of brain tissue and sectioning
- Fix brain samples in an appropriate volume of 4% PFA in phosphate-buffered saline (PBS [pH 7.4]) for at least 48 h at 4 °C (with an approximate tissue-to-fixative ratio of 1:10 [v/v]).
- Wash the tissue samples 3x in PBS for at least 30 min each wash and store them in 0.02% NaN3/PBS at 4 °C until use.
- Section the tissue into 1 mm-thick sections using a vibratome (blade feed rate: 0.3–0.5 mm/s, amplitude: 1 mm, slice thickness: 1,000 µm).
- To retain the correct slice sequence, store each tissue section separately in a well of a multiwell cell culture plate. Add 0.02% NaN3/PBS and store the tissue sections at 4 °C until use.
2. Sample pretreatment with methanol
NOTE: Perform all incubation steps with gentle oscillation and, if not indicated otherwise, at room temperature. Protect the samples from light. The sample pretreatment serves the overall purpose of improving antibody diffusion and reducing tissue autofluorescence by exposure to MeOH and H2O2, respectively.
- Prepare 20% (v/v), 40%, 60%, and 80% MeOH solutions in distilled water. For instance, for 20% MeOH, add 10 mL of 100% MeOH to 40 mL of distilled water in an appropriate sealable vessel and mix by inverting it.
- Transfer the samples to reasonably sized vessels (e.g., 5 mL reaction tubes). Take care to use materials chemically resistant to the reagents used in this protocol. For instance, note that while polypropylene is suitable, polystyrene is not.
NOTE: The volume specifications in this protocol refer to 5 mL reaction tubes. If a different vessel is used, adjust the volumes accordingly. - Incubate the samples in 4 mL of each concentration of the prepared series of MeOH solutions in ascending order for 1 h each.
- Incubate the samples 2x for 1 h each in pure (100%) MeOH.
- Cool the samples to 4°C (e.g., in a laboratory-safe refrigerator).
- Prepare bleaching solution (5% H2O2 in MeOH) by, for instance, diluting a 30% H2O2 stock solution at 1:6 in pure (100%) MeOH, and chill it at 4 °C.
- Remove the 100% MeOH from the refrigerated samples and add 4 mL of prechilled bleaching solution (5% H2O2 in MeOH). Incubate overnight at 4 °C.
- Exchange the bleaching solution for 4 mL of 80% MeOH and incubate for 1 h. Continue using the prepared series of MeOH solutions in descending order for 1 h each until the samples have been incubated for 1 h in 4 mL of 20% MeOH.
- Wash the samples 1x for 1 h with 4 mL of PBS.
3. Immunostaining
NOTE: Perform all incubation steps with gentle oscillation and, if not indicated otherwise, at room temperature. Protect the samples from light. To prevent microbial growth, add NaN3 to a final concentration of 0.02% to the solutions in this section. Tissue samples are further permeabilized by treatment with nonionic detergents Triton X-100 and Tween 20. Normal serum is used to block unspecific antibody binding. Glycine and heparin are added to reduce the immunolabeling background.
- Wash the samples 2x for 1 h each in 4 mL of 0.2% Triton X-100/PBS.
- Permeabilize the samples for 2 days at 37 °C with 4 mL of 0.2% Triton X-100/20% dimethyl sulfoxide (DMSO)/0.3 M glycine/PBS.
- Block the unspecific binding of antibodies by incubating the samples for 2 days at 37 °C in 4 mL of 0.2% Triton X-100/10% DMSO/6% normal serum/PBS.
NOTE: Use normal serum from the same species the secondary antibody was raised in to achieve ideal blocking results. - Incubate the samples in 2 mL of primary antibody solution (3% normal serum/5% DMSO/PTwH [PBS-Tween 20 with heparin] + primary antibody/antibodies) for 5 days at 37 °C. Refresh the primary antibody solution after 2.5 days.
- For PTwH, reconstitute the heparin sodium salt in distilled water to make a 10 mg/mL stock solution (store this solution, aliquoted, at 4 °C). Add the stock solution to 0.2% Tween 20/PBS to a final concentration of 10 µg/mL.
NOTE: Choosing the correct antibody dilution may require optimization. Generally, standard immunohistochemistry concentrations are a good starting point.
- For PTwH, reconstitute the heparin sodium salt in distilled water to make a 10 mg/mL stock solution (store this solution, aliquoted, at 4 °C). Add the stock solution to 0.2% Tween 20/PBS to a final concentration of 10 µg/mL.
- Wash the samples for 1 day in 4 mL of PTwH, exchanging the wash buffer at least 4x–5x during the day and leaving the final wash on overnight.
- Incubate the samples in 2 mL of secondary antibody solution (3% normal serum/PTwH + secondary antibody/antibodies) for 5 days at 37 °C. Refresh the secondary antibody solution after 2.5 days.
- Dilute the secondary antibody/antibodies at 1:500 in secondary antibody solution (i.e., 4 µL in 2 mL).
- Wash the samples for 1 day as described in step 3.5, leaving the final wash overnight.
4. Nuclear staining
NOTE: Perform all incubation steps with gentle oscillation and, if not indicated otherwise, at room temperature. Protect the samples from light. If no nuclear staining is required or the excitation wavelength/emission spectrum of thiazole Red (TO-PRO-3) is required for the excitation or detection of another fluorophore, skip this step.
- Dilute the nucleic acid stain TO-PRO-3 at 1:1,000 in PTwH and incubate the samples in 4 mL of nuclear staining solution for 5 h.
- Wash the samples for 1 day as described in step 3.5, leaving the final wash overnight.
NOTE: Following the washes, the samples can be stored in PBS at 4 °C until optical clearing.
5. Tissue clearing
NOTE: Perform all incubation steps with gentle oscillation and, if not indicated otherwise, at room temperature. Protect the samples from light. The tissue samples are dehydrated in a graded series of TBA solutions. As immunostaining requires aqueous solutions, all staining procedures must be finished prior to tissue clearing. Optical clearance and refractive index matching are achieved by treatment with a mixture of BA, BB, and DPE. The clearing solution is supplemented with DL-α-tocopherol as an antioxidant.
- Prepare 30% (v/v), 50%, 70%, 80%, 90%, and 96% TBA solutions in distilled water. For instance, for 30% TBA, add 15 mL of 100% TBA to 35 mL of distilled water in an appropriate sealable vessel and mix by inverting.
NOTE: TBA has a melting point of 25–26 °C; thus, it tends to be solid at room temperature. To prepare TBA solutions, heat the well-sealed bottle at 37 °C in an incubator or water bath. - Dehydrate the samples with 4 mL of each concentration of the prepared series of TBA solutions in ascending order for 2 h each. Leave the 96% TBA overnight.
- Dehydrate the samples further in pure (100%) TBA for 2 h.
- Prepare clearing solution BABB-D15.
NOTE: BABB-D15 is a combination of BA and BB (BABB) which is mixed with DPE at a ratio of x:1, where x is specified in the solution’s name, in this case 15.- For BABB, mix one-part BA with two parts BB.
- Mix BABB and DPE at a ratio of 15:1.
- Add 0.4 vol% DL-α-tocopherol (vitamin E).
NOTE: For example, for 20 mL of BABB-D15, mix 6.25 mL of BA with 12.5 mL of BB. Add 1.25 mL of DPE and supplement it with 0.08 mL of DL-α-tocopherol.
- Clear the samples in clearing solution until they are optically transparent (2–6 h).
- The samples can be stored at 4 °C in BABB-D15, protected from light, until mounting and imaging.
6. Sample mounting
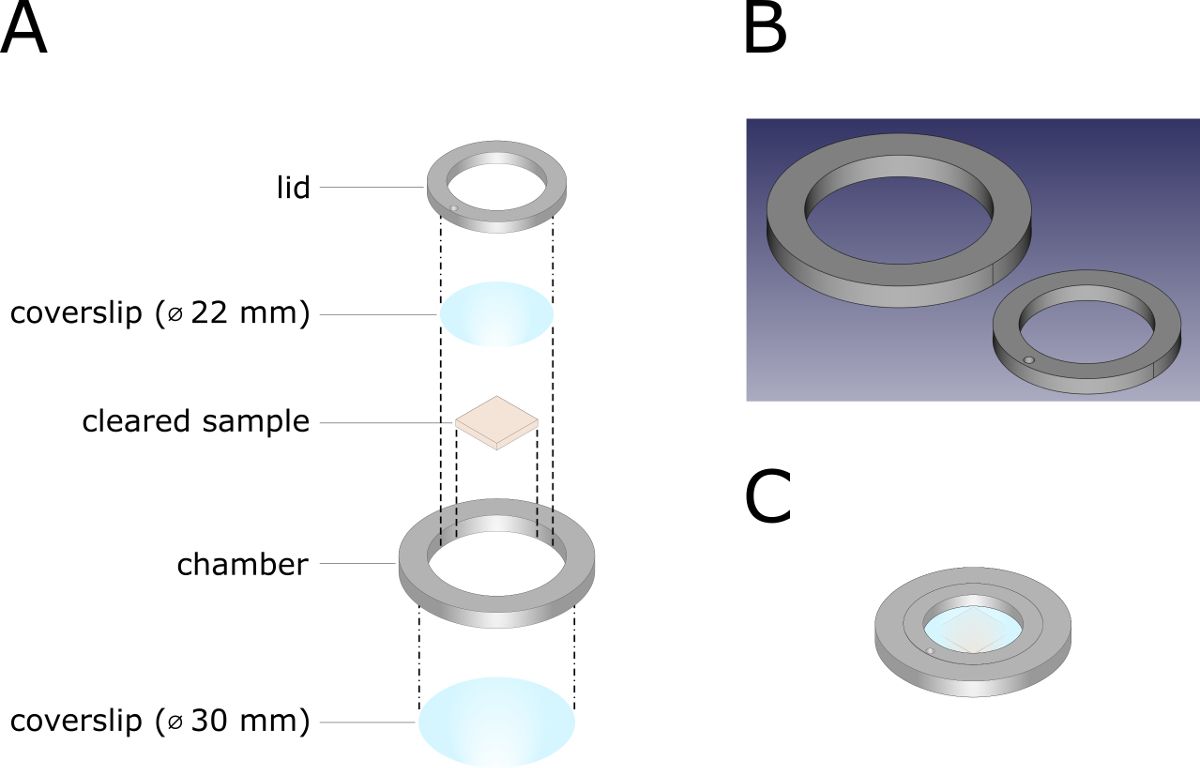
- Using a 3D printer, print the imaging chamber and the lid (material: copolyester [CPE], nozzle: 0.25 mm, layer height: 0.06 mm, wall thickness: 0.88 mm, wall count: 4, infill: 100%, no support structure).
- Assemble the imaging chamber (Figure 1).
- Mount a round coverslip (diameter: 30 mm) on the imaging chamber with RTV-1 (one-component room-temperature-vulcanizing) silicone rubber. Remove the excess silicone rubber with a water-wetted cotton swab and cure overnight.
- Mount a round coverslip (diameter: 22 mm) on the lid with RTV-1 silicone rubber. Remove the excess silicone rubber with a water-wetted cotton swab and cure overnight.
- Place the sample in an imaging chamber, add a small volume of BABB-D15, and insert the lid. Fill the chamber up with BABB-D15 through the inlet, using a hypodermic needle (27 G x 3/4 inch [0.40 mm x 20 mm]).
- Plug the inlet and seal the imaging chamber with RTV-1 silicone rubber. Cure overnight in the dark.
7. Imaging and image processing
- Set up the image acquisition by selecting the respective laser lines to match the fluorophores used. Adjust the detection ranges of each detector to prevent signal overlap between channels.
NOTE: Exemplary detection ranges for Alexa Fluor 488, Alexa Fluor 568, and TO-PRO-3 are 500–550 nm, 590–620 nm, and 645–700 nm, respectively. - Choose the acquisition parameters, define the upper and lower border of the z-stack, and acquire the image stack.
NOTE: Exemplary acquisition parameters are a sequential scan with a pixel size of 60-90 nm, a z-step size of 0.5 µm, a line average of 1, a scan speed of 400 Hz, and a pinhole size of 1 Airy unit. - Process the image stack using appropriate image analysis software (e.g., Fiji) to generate 3D projections or perform in-depth analyses.
NOTE: Because of the large size of the acquired image files, the use of a workstation is usually necessary.- Open the acquisition or image file(s) in Fiji (File | Open | Select files).
- If using, for instance, LIF files, select or deselect the desired options in the Bio-Formats dialog window. View stack with Hyperstack. Other than that, no specific selections or ticks are necessary. Press OK.
- If the file contains multiple image stacks, select the ones to be analyzed and confirm by pressing OK.
- Perform bleach correction by splitting the merged image into individual channels (Image | Color | Channels Tool, then select More | Split Channels). For each channel, select bleach correction (Image | Adjust | Bleach Correction) and choose Simple Ratio (background intensity: 0.0).
NOTE: In some cases, for instance, when there is no linear decay of the signal or the signal is too weak overall, Simple Ratio may fail. Alternatively, try Exponential Fit or skip the bleach correction. - Adjust the brightness and contrast for each channel using the sliders (Image | Adjust | Brightness | Contrast).
- Merge the channels (Image | Color | Merge Channels), make a composite (Image | Color | Channels Tool, then select More | Make Composite), and convert it to RGB format (Image | Color | Channels Tool, then select More | Convert to RGB).
- If necessary, resize the image stack to reduce the computation time and file size (Image | Adjust | Size, both options ticked plus bilinear interpolation).
- Generate a 3D projection (Image | Stacks | 3D Project). Choose Brightest Point as a projection method and set the slice spacing to match the z-step size of the acquired image stack. For maximum quality, set the rotation angle increment to 1 and enable interpolation. Modify the total rotation, transparency thresholds, and opacity as needed.
- If necessary, readjust the contrast and brightness by converting the 3D projection back to 8-bit format (Image | Type | 8-bit). Use the respective sliders (Image | Adjust | Brightness | Contrast) and reconvert the image stack to RGB format as described in step 7.3.4.
- Save the 3D projection as .TIF file (image file format) and .AVI file (video file format).
- Open the acquisition or image file(s) in Fiji (File | Open | Select files).
Toegang beperkt. Log in of start een proefperiode om deze inhoud te bekijken.
Resultaten
Toegang beperkt. Log in of start een proefperiode om deze inhoud te bekijken.
Materialen
| Naam | Bedrijf | Catalogusnummer | Opmerkingen |
|---|---|---|---|
| Reagents | |||
| Benzyl alcohol | |||
| Benzyl benzoate | |||
| Dimethyl sulfoxide | |||
| Diphenyl ether | |||
| DL-α-Tocopherol | |||
| Donkey serum | |||
| Glycine | |||
| Goat serum | |||
| Heparin sodium salt | |||
| Hydrogen peroxide solution (30 %) | |||
| Methanol | |||
| Paraformaldehyde | |||
| Sodium azide | |||
| tert-Butanol | |||
| TO-PRO-3 | |||
| Triton X-100 | |||
| Tween 20 | |||
| Miscellaneous | |||
| 5 mL reaction tubes | |||
| Coverslip, circular (diameter: 22 mm) | |||
| Coverslip, circular (diameter: 30 mm) | |||
| Hypodermic needle (27 G x ¾” [0.40 mm x 20 mm]) | |||
| RTV-1 silicone rubber | |||
| Ultimaker CPE 2.85 mm transparent | |||
| Technical equipment and software | |||
| 3D printer | |||
| Automated water immersion system | |||
| Benchtop orbital shaker | |||
| Benchtop orbital shaker, heated | |||
| Confocal laser scanning microscope | |||
| Fiji | |||
| Long working distance water immersion objective | |||
| Vibratome | |||
| Workstation | |||
| Primary antibodies | |||
| Goat anti-RABV N | |||
| Rabbit anti-GFAP | |||
| Rabbit anti-MAP2 | |||
| Rabbit anti-RABV P 160-5 | |||
| Secondary antibodies | |||
| Donkey anti-goat IgG | |||
| Donkey anti-mouse IgG | |||
| Donkey anti-rabbit IgG | |||
| Goat anti-mouse IgG | |||
| Goat anti-rabbit IgG | |||
