Caution: To avoid any RNA degradation of the samples, prepare all buffers using DEPC-treated water to minimize RNase contamination.
1. Preparation of Polysomes from Whole Brains
- Gathering brain tissues (15 min)
- Euthanize wild-type mouse strain C57BL/6 with CO2 asphyxiation for 5 min. Carefully dissect the brain out from the skull, place the tissue into a 1.5 ml tube, and immediately place it in liquid nitrogen. Store at -80 °C until use.
- Preparation of lysate (30 min)
- Pulverize the whole brain tissue using a mortar and pestle under liquid nitrogen.
- Transfer about 25 mg powder to a cold microcentrifuge tube and immediately (to avoid the thawing of the pulverized tissue) add 0.8 ml of Lysis Buffer (see Table 1) and disrupt the cell by pipetting up and down 25 times quickly.
- Centrifuge the tube at 12,000 x g for 1 min at 4 °C to pellet cellular debris.
- Transfer the supernatant to a new microcentrifuge tube and keep the tube on ice for 15 min.
- Centrifuge the tube at 12,000 x g for 5 min at 4 °C to pellet nuclei and mitochondria.
- Transfer the supernatant to a new microcentrifuge tube.
- Store the supernatant at –80 °C for a maximum of 6 months or use it immediately.
- Sucrose gradient preparation and centrifugation (2 hr and 30 min)
- Wash ultracentrifuge tubes extensively with RNase-free water (diethylpyrocarbonate treated water (DEPC-water) or commercial) and 3% H2O2/DEPC H2O solution.
- Put the tubes on ice and add 5.5 ml of cold 50% sucrose solution at the bottom of each tube (see Table 1 for sucrose solutions). Carefully add the 15% sucrose solution drop by drop, staying close to the interphase in order to preserve a sharp interphase until the tube is completely filled. When the tube is completely filled, close it with a rubber stopper to avoid air bubble formation.
- In a cold room gently lay down the tubes horizontally and keep it in this position for 2 hr. After this time, slowly straighten the tubes back into the vertical position and put them on ice. The gradients are now ready to be used. Alternatively, prepare the 15-50% sucrose gradient using a conventional gradient former.
- In a cold room, carefully remove 1.0 ml from the top of the gradient and overlay the sucrose drop by drop with the cytosolic lysate (i.e., the supernatant obtained in step 1.2).
- Carefully lower the tubes into the buckets of the swinging bucket rotor. Centrifuge the gradients for 100 min at 180,000 x g at 4 °C using an ultracentrifuge.
- After the centrifugation, leave the tubes in their buckets for 20 min at 4 °C to stabilize the gradients.
- Sucrose gradient fractionation (2 hr)
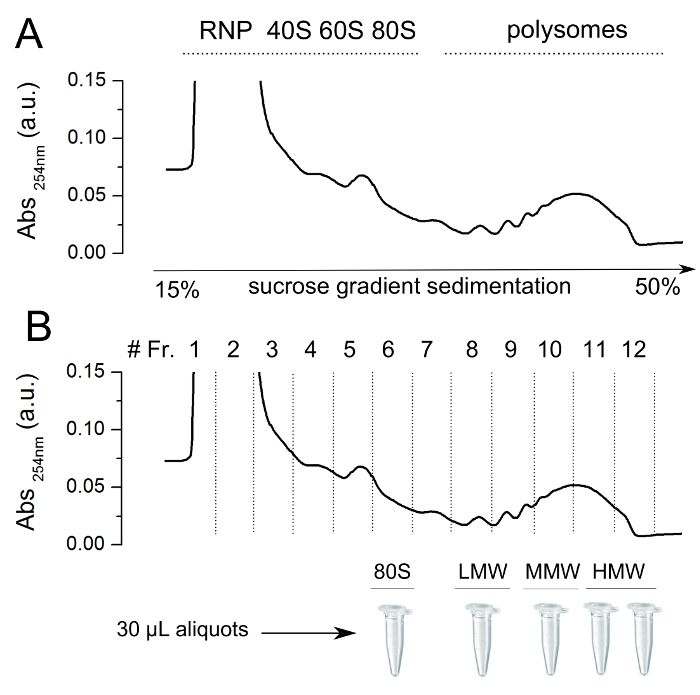
- Carefully remove one ultracentrifuge tube from the ultracentrifuge rotor and mount it on the collector device of a Density Gradient Fractionation System. Collect 1 ml fractions to monitor the absorbance at 260 nm with a UV/VIS detector (See Figure 1 upper panel). Keep the collected fractions on ice.
- Prepare aliquots of 30-40 μl of the fractions of interest. Keep them on ice before storing them at -80 °C until use. Do not use aliquots or sucrose fractions that underwent more than two freezing-thawing cycles (see Figure 1 lower panel).
2. Sample Preparation for Atomic Force Microscopy (3 hr)
- Using tape, peel off the mica sheets.
- Wash the mica sheets 3-4 times with DEPC-water and place it into a small Petri dish. Then dry the surface using air.
- Cover the mica with 200 μl of 1 mM NiSO4 and incubate for 3 min at RT.
- Remove the nickel solution and then dry the surface using air. Carry out all future steps at 4 °C by placing the Petri dish with the mica on ice.
- Thaw an aliquot obtained in 1.4.2 on ice and gently add all of the sample drop by drop to the mica. Using a 100-200 μl tip, spread the sample on the entire surface of the mica. Incubate the sample on ice for 3 min.
- Cover the mica sheet drop by drop with 200 μl cold Buffer-AFM (see Table 1) and incubate for 1 hr on ice.
- Imaging in liquid
- Remove carefully the Buffer-Atomic Force Microscope (AFM) and wash the mica sheets 3-4 times with 200 μl cold Buffer-AFM to remove excess sucrose. Then, wash the mica sheets 3 times with a cold Washing Solution (see Table 1), leaving the mica surface covered by some microliters of solution.
- Go to point 3 (Image acquisition).
- Imaging in air
- Carefully remove the Buffer-AFM and wash the mica 3-4 times with 200 μl cold Buffer-AFM to remove the excess sucrose. Then, wash the mica 3 times with cold Washing Solution (see Table 1) and drain the excess water using paper.
- Leave the sample to dry under the chemical hood with the top of the Petri dish partially open. After 2 hours, close the Petri dish and store it at room temperature (RT). Measure the sample after 2-3 hours, as they are stable for years.
3. Image Acquisition (15 min per image after thermal stabilization)
Note: Polysomes immobilized on mica can be imaged in air or in liquid using AC mode.
- Attach the mica to the sample holder using double-sided tape.
- Insert the sample holder in the AFM stage following the manufacturer's directions. When imaging in liquid, if possible, try to maintain the sample at a temperature lower than 25 °C to increase polysome stability in time.
- Select a cantilever suitable for AC imaging and mount it on the tip holder following the manufacturer's directions. Here, use cantilevers with a force constant between 2-20 N/m for air imaging and around 0.1 N/m for liquid imaging.
- Adjust the laser spot on the cantilever and zero the quadrant detector signals.
- Select an opportune driving frequency and drive the cantilever with an amplitude of 10-20 nm.
- Approach the sample until the tip engages the surface.
- Select a scan area of 2x2 μm, acquire at least 512x512 pixel images (pixel width < 4 nm), and select a live background subtraction mode and a Z scale of 20-25 nm.
- Inspect the image looking for the presence of round objects characterized by the height between 10 and 15 nm when acquiring in air and 25 and 30 nm when in liquid and the width in the range 25-30 nm. Adjust the setpoint and feedback parameters until sharp objects are visualized. The background should appear relatively flat in good samples, with some 2-4 nm height objects (see Figure 2A and B).
- If the image looks good (as indicated at point 3.8), acquire several (at least ten) 2x2 micron scans at different sample areas.
- (optional). If necessary, acquire high-resolution images of selected polysomes (see Figure 2C).
- Apply software corrections (plane subtraction and line-by-line correction algorithms) to correct the AFM images, removing arbitrary tilt and drift effects.
4. Data Analysis (30 min per image)
- Export images in ImageJ (optional: apply a scale factor) preferentially using a lossless compression format, e.g., the TIFF format (see Figure 3A).
- Use the ImageJ macro toolset RiboPick.ijm (to be copied in the ImageJ macro/toolset subdirectory) to count ribosomes in polysomes (see Figure 3B) and compute statistical properties of the sample (see Figure 3C).
- Start loading an image using the <Read image> tool that initializes the program.
- Pick the ribosome centers with the standard ImageJ <Point selection> tool (shift + left click allows the multi-selection of ribosomes). Mark the selected ribosomes with the <Mark ribosomes> tool. Ribosome coordinates will appear in a custom text window.
- Add more ribosomes to the same polysome, repeating the procedure indicated at point 4.2.2.
- Remove wrongly marked ribosomes using the <Undo last pick> tool (start removing from the last added ribosome to the first one — in the current polysome only).
- When the polysome is completed, use the <New polysome> tool. As the polysome number is added as an overlay to the image, the text window is updated.
- Use the <Save results and close> to write the ribosome coordinates file (the default units of the image are used) and a PNG image that summarizes the picked ribosomes and polysomes. The original image is closed without being saved.
Table 1. Buffers.
Buffer | Composition | Application |
Lysis Buffer | 10 mM Tris–HCl, pH 7.5 | Preparation of lysate (1.1) |
| | 10 mM NaCl | |
| | 10 mM MgCl2 | |
| | 1% Triton-X100 | |
| | 1% Na-deoxycholate | |
| | 0.4 U/ml RNase Inhibitor | |
| | 1 mM DTT | |
| | 0.2 mg/ml cycloheximide | |
| | 5 U/ml Dnase I | |
50% sucrose solution | 50% (w/v) sucrose in | Sucrose gradient preparation (1.2) |
| | 100 mM NaCl | |
| | 10 mM MgCl2 | |
| | 10 mM Tris/HCl pH 7.5 | |
15% sucrose solution | 15% (w/v) sucrose in | Sucrose gradient preparation (1.2) |
| | 100 mM NaCl | |
| | 10 mM MgCl2 | |
| | 10 mM Tris/HCl pH 7.5 | |
Nickel Solution | 1 mM NiSO4 | Sample preparation for AFM (2) |
Buffer-AFM | 100 mM NaCl | Sample preparation for AFM (2) |
| | 10 mM MgCl2 | |
| | 100 µg/ml cycloheximide | |
| | 10 mM Hepes | |
| | 3% (w/v) sucrose pH = 7.4 | |
Washing Solution | DEPC-Water | Sample preparation for AFM (2) |
| | 100 µg/ml cycloheximide | |