This video showcases two-photon microscopy being used to image neurons in the brain of an anesthetized transgenic mouse pup. The two-photon laser allows for deeper imaging with high spatial resolution and minimal light scattering, enabling the detailed capture of neuronal morphology, including dendritic projections.
Een abonnement op JoVE is vereist om deze inhoud te bekijken. Log in of start vandaag met uw gratis proefperiode.
Methodenartikel
Two-Photon Microscopy for Imaging Neuronal Morphology in a Mouse Pup
1.1K weergaven
⸱
29 mei 2025
In dit artikel
Samenvatting
Protocol
All procedures involving animal models have been reviewed by the local institutional animal care committee and the JoVE veterinary review board.
1. Cranial Window Preparation
- Anesthetize the pup using isoflurane (1.0% - 2.0%) and check the anesthesia level by a tail-pinch test.
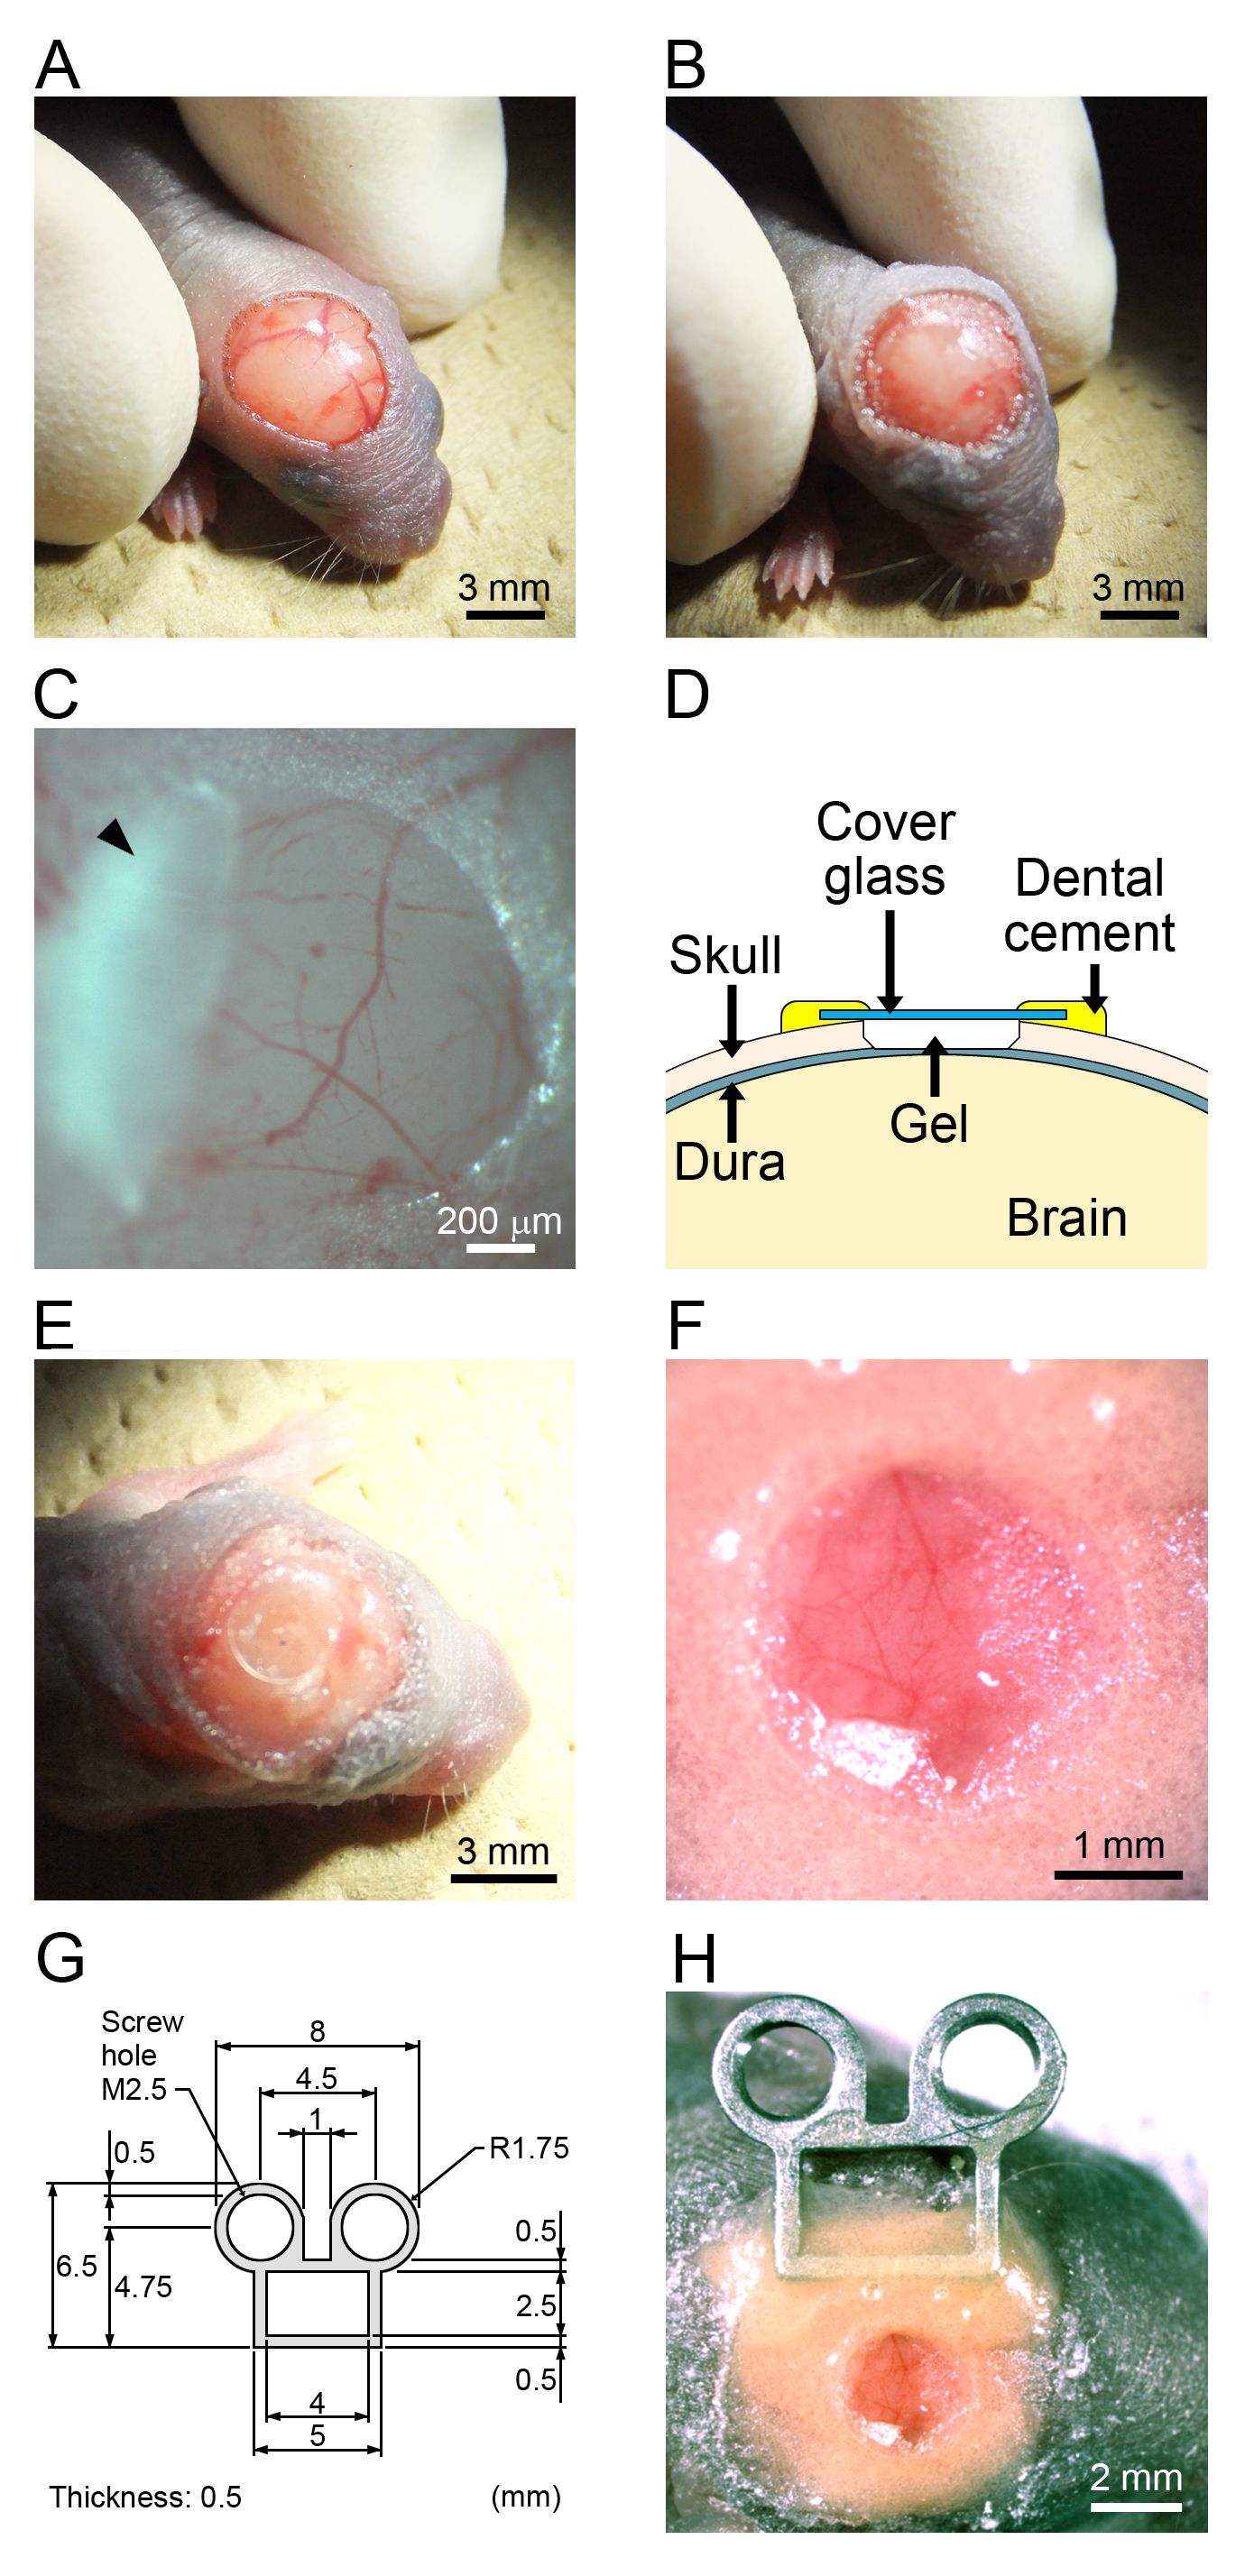
- Carefully open the skull with a sterilized razor blade leaving the dura intact (1 mm in diameter) (Figure 1C). Use a gelatin sponge (cut into small pieces, approximately < 2 mm3, using sterilized scissors, and apply them using tweezers) soaked in cortex buffer (125 mmol/L NaCl, 5 mmol/L KCl, 10 mmol/L glucose, 10 mmol/L HEPES (4-(2-hydroxyethyl)piperazine-1-ethanesulfonic acid), 2 mmol/L CaCl2, and 2 mmol/L MgSO4; pH 7.4; 300 mOsm/L; room temperature) to stop the bleeding. When opening the skull, apply a cortex buffer to keep the brain surface moist.
- Using a gelatin sponge, remove any buffer and blood from the dural surface. Using yellow tips, apply a thin layer of 1.0% low-melting-point agarose (dissolved in cortex buffer). Using a heat block machine, maintain the temperature of the agarose solution at 42°C until application.
NOTE: The draining of buffer and blood must be performed from the side of the craniotomy while taking care that the dry gelatin sponge does not come in contact with the dura. Failure to do so may damage the dura. - Apply a round glass coverslip (No. 1, 3 mm in diameter) onto the agarose gel layer. Remove all bubbles between the coverslip and the agarose gel layer by pouring an excess of agarose gel between them. Remove the excess gel protruding from under the coverslip using tweezers (Figure 1D and 1E).
- Secure the coverslip using dental cement (Figure 1F).
- Mix the cement powder and the cement liquid. Apply the mixture using yellow tips before it becomes solidified. Do not apply dental cement onto the dura, because this may damage the brain.
- Attach a sterile titanium bar (custom made, approximately 30 mg, see Figure 1G) on the cranial bone using dental cement. Align the titanium bar and the coverslip (on the surface of the dura) in parallel to easily capture images.
- Cover the exposed skull with dental cement (Figure 1H).
- Recover the pup from anesthesia. Keep it on a heater (37 °C) until the dental cement has solidified (1 h).
2. Two-photon Imaging
- Set the two-photon laser wavelength. For RFP (Red fluorescent protein) excitation, use 1,000 nm (450 mW/mm2 at 400 µm of depth).
NOTE: The laser power should be reduced as the z-position moves up. - Wipe the surface of the coverslip with 70% ethanol.
- Anesthetize the pup using isoflurane (1.5% - 2.0%) and check the anesthesia level using a tail-pinch test.
- Attach the pup to the titanium plate on the imaging stage using a titanium bar on the pup's head (Figure 2A and 2B). Adjust the head such that the coverslip is parallel to the objective lens using the goniometer stage (Figure 2B). Maintain body temperature of the pup using a heating pad (37 °C).
- Set the isoflurane concentration to 0.7% - 1.0%.
NOTE: A very high isoflurane concentration may cause accidental death of the pup during imaging. - Place the imaging stage under the objective lens (20X, NA 1.0) of the two-photon microscope (Figure 2B and 2C).
- Apply one drop of water onto the coverslip. Use epi-fluorescence to locate the fluorescent protein-labeled neurons in the area where the dura has been exposed.
- Acquire z-stack images at 1.4-µm intervals. For layer 4 neuron imaging, set the z-width to 150 - 300 µm to image the entire dendritic morphology (Figure 2D and 2E). Use slow scanning and averaging to get clear images showing the neuronal morphology (it usually takes > 20 min to acquire the entire dendritic morphology).
NOTE: The following parameters are recommended for imaging. Excitation wavelength: 1,000 nm, scanner: galvanometer type, dichroic mirror: 690 nm, emission filter: 575 - 620 nm bandpass, detector: GaAsP type, gain setting > 100, image size > 512 x 512 µm, field of view > 600 x 600 µm, pixel resolution < 1.2 µm.
Toegang beperkt. Log in of start een proefperiode om deze inhoud te bekijken.
Resultaten
Toegang beperkt. Log in of start een proefperiode om deze inhoud te bekijken.
Materialen
| Naam | Bedrijf | Catalogusnummer | Opmerkingen |
|---|---|---|---|
| pK031. TRE-Cre | |||
| pK029. CAG-loxP-STOP-loxP-RFP-ires-tTA-WPRE | |||
| pK273. CAG-loxP-STOP-loxP-CyRFP-ires-tTA-WPRE | |||
| Isoflurane | |||
| 410 Anaesthesia Unit (isoflurane gas machine) | |||
| Vetbond (tissue adhesive) | |||
| MµltiFlex Round (loading tip) | |||
| Gelfoam (gelatin sponge) | |||
| Agarose | |||
| Round-shaped coverslip | |||
| Unifast 2 (dental cement) | |||
| Titanium bar | |||
| Rimadyl (carprofen) | |||
| 2-photon microscope | |||
| Titanium-sapphire laser | |||
| Titanium plate | |||
| IMARIS, FilamentTracer, MeasurementPro | |||
| Goniometer stage |
