This video demonstrates visualization of cerebral thrombus in mice using micro-computed tomography (micro-CT) imaging. A cerebral thrombus mouse model is injected with fibrin-targeted gold nanoparticles acting as a contrasting agent. The mouse is placed on the bed of a micro-CT machine, and images are acquired from multiple angles. Using appropriate software, images are reconstructed and processed.
Een abonnement op JoVE is vereist om deze inhoud te bekijken. Log in of start vandaag met uw gratis proefperiode.
Methodenartikel
Visualization of a Cerebral Thrombus in a Mouse Using Micro-Computed Tomography Imaging
703 weergaven
⸱
17 juni 2025
In dit artikel
Samenvatting
Protocol
All procedures involving animal models have been reviewed by the local institutional animal care committee and the JoVE veterinary review board.
1. Preparation of Exogenously Formed Clot Labeled with Fluorescence Marker (Figure 1)
- Anesthetize a mouse in an induction chamber using 3% isoflurane mixed with 30% oxygen (1.5 L/min 100% oxygen). Ensure adequate depth of anesthesia by observing muscle tone and confirming the absence of the toe pinch reflex.
- Place the animal on a sterile drape in a prone position and keep it under anesthesia using an inhalation mask and 2% isoflurane mixed with 30% oxygen. Perform the following procedures using aseptic techniques and sterile gowns/masks/gloves/instruments. Maintain sterile conditions by cleaning and sanitizing the experimental area with 70% alcohol before and after the procedures.
- Collect about 300 ~ 1,000 µl of arterial blood after cardiac puncture. Mix 70 µl whole blood with 30 µl C15 probe (20 µmol/L concentration), a Cy5.5 fluorescent probe sensitive to the fibrin-crosslinking activity of activated factor XIII (FXIIIa) coagulation enzyme, to fluorescently mark the clot (Figure 1A). Inject the mixed blood using a 3 ml syringe (23 gauge needle) into a 20 cm long polyethylene tube (PE-50, I.D. 0.58 mm). PE tubing must be sterilized (or certified sterile by the manufacturer), and the clots must be prepared aseptically in a tissue culture hood.
- Verify the animal's death by observing the lack of respiration and cardiac pulse.
- Leave the blood-loaded tube at room temperature for 2 hr, then at 4 °C for 22 hr, and perform the following procedures, as previously reported.
- Cut the thrombus-containing tube into 1.5 cm-long pieces. Using a 3 ml syringe filled with phosphate-buffered saline (PBS), expel thrombus onto a PBS-containing 6-well plate by gently injecting PBS into each piece of tube. Wash the thrombi three times with PBS (Figure 1B).
- Load the distal end portion of a 15 cm-long PE-10 tube (I.D. 0.28 mm) with a 1.5 cm-long thrombus by carefully drawing the washed thrombus, while avoiding air bubbles, using a saline-filled 1 ml syringe with a 30 gauge needle that is inserted into the proximal end of the tube.
- Connect the thrombus-loaded PE-10 tube with a 3 cm long PE-50 tube (I.D. 0.58 mm) modified to have a tapered end (I.D. 200 µm), which will be placed on the middle cerebral artery (MCA) – anterior cerebral artery (ACA) bifurcation area of the internal carotid artery (ICA) in a mouse model of embolic stroke (Figure 1C).
2. Modeling a Mouse Model of Thromboembolic Stroke (Figure 2)
- Anesthetize a different mouse to be stroked in an induction chamber using 3% isoflurane mixed with 30% oxygen (1.5 L/min). Inject meloxicam (5 mg/kg) subcutaneously to relieve post-surgical pain. Ensure adequate depth of anesthesia by observing muscle tone and confirming the absence of the toe pinch reflex.
- Apply a small amount of veterinary ointment to each eye to prevent dryness during anesthesia. Perform the following surgical procedures using aseptic techniques and sterile gowns/masks/gloves/instruments. Maintain sterile conditions by cleaning and sanitizing the surgical area with 70% alcohol before, during, and after the surgery.
- Move the mouse to an operating table. Place the animal on a sterile drape in the prone position and keep it under anesthesia using an inhalation mask and 2% isoflurane. Then, clamp the body temperature at 36.5 °C using a homeothermic blanket with feedback from a rectal thermometer.
- After surgical prep with betadine and 70% alcohol, make a 1 cm vertical incision by using a scalpel on the scalp between the left ear and eye. Glue the distal end of the optical fiber of a laser Doppler flowmeter onto the exposed left temporal bone surface (1 mm left and 4 mm below the bregma). Then, start Doppler flow monitoring (Figure 2A).
- Lay down the animal. Straighten the neck by pulling on the upper front tooth with a string attached to a pin, and shave the neck area. Then, make a 3 cm vertical midline incision, spread it open, and expose the left carotid bulb area by dissecting peri-vascular soft tissues. Be careful not to injure the vagus nerve.
- Ligate the left proximal common carotid artery (CCA) using a sterile 6-0 black silk suture, and ligate the left ICA and the left pterygopalatine artery (PPA) using sterile 7-0 black silk sutures.
- Cauterize the left superior thyroid artery, which is a branch of the left external carotid artery, using a monopolar electrical cautery, and ligate the left proximal external carotid artery (ECA) loosely and the more distal site tightly using sterile 7-0 black silk sutures.
- Using a micro-scissor, make a small hole (about 0.2 ~ 0.25 µm diameter) between the ligated sites of the ECA.
- Insert the thrombus-containing catheter into the hole in the ECA while loosening the proximal ECA ligation. Tighten the proximal ECA ligation again after advancing the catheter into the CCA in order to cinch the catheter in place.
- Cauterize to cut the ECA distal part, which is distal to the distal ligation site, and rotate the free proximal ECA clockwise to align it to the direction of the ICA while withdrawing the catheter from the CCA. Then, advance the catheter about 9 mm into the MCA-ACA bifurcation area of the distal ICA immediately after loosening the ICA ligation. Then, tighten the ICA ligation.
- Place the thrombus into the bifurcation area by gently pressing the syringe 1 ml to inject the thrombus. Check the decrease of Doppler cerebral blood flow (CBF), which should be lowered by 30% or lower compared to baseline, if the thrombus successfully occluded the vessel (Figure 2B).
- Remove the catheter, and ligate the ECA proximal site immediately and tightly. In addition, unligate the CCA and the PPA.
- Close the incision site using 6-0 silk sutures. Stop anesthesia after continuing the Doppler monitoring over a required time span (here, for 30 min after thrombus injection). Return the mouse in an empty cage, and keep it warm with a heating lamp. Do not leave the mouse unattended until it has gained sufficient consciousness to maintain sternal recumbency.
3. In Vivo MicroCT Imaging of Cerebral Thrombus (Figure 3)
- Re-anesthetize the mouse with 2% isoflurane as described in step 2.1 at a pre-specified time-point (here, 1 hr) following the onset of embolic stroke due to the placement of the thrombus in the cerebral artery. Ensure adequate depth of anesthesia by confirming the absence of the toe pinch reflex. Apply a small amount of veterinary ointment to each eye to prevent dryness during anesthesia.
- Resuspend fibrin-targeted gold nanoparticles (fib-GC-AuNP4) at a concentration of 10 mg Au/ml in 10 mM PBS, and sonicate the thrombus imaging agent for 30 min to ensure dissolution and dispersion of the nanoparticles. Inject 300 µl fib-GC-AuNP (10 mg/ml) into the penile vein.
- Place the animal on the bed of a microCT machine, and straighten the neck by pulling the upper front tooth with a string attached to a pin to reduce motion artifacts.
- At 5 min after the injection of fib-GC-AuNP, begin to obtain micro-CT images of the brain. For the experiments described here, use the following imaging parameters: 65 kVp, 60 µA, 26.7 x 26.7 x 27.9 mm3 field of view, 0.053 x 0.053 x 0.054 mm3 voxel size, 100 milliseconds per frame, one averaging, 360 views, 512 x 512 reconstruction matrix, 600 slices, 64 sec scan time.
- Return the mouse to an empty cage, and keep it warm with a heating lamp. Do not leave the mouse unattended until it has gained sufficient consciousness to maintain sternal recumbency.
- Transform the raw image data into Digital Imaging and Communications in Medicine (DICOM) format using the 'Start' command of the 'Reconstruction' panel in a software package installed on the micro-CT scanner.
- For quantitative analyses of the images (in step 6), transform the DICOM data into TIFF format by using a commercially available software package according to the manufacturer's instructions.
- For qualitative analyses as well as quantitative analyses in a simpler and more rapid way, use the software package and the original 0.054 mm thick images in DICOM format for generating a new set of axial and coronal images rendered to have 1 or 2 mm (here, 2 mm) thickness, as follows.
- Select the DICOM folder on the 'Data Source' tree, click the right mouse button, and import the folder to 'MasterDB' or 'PrivateDB.'
- Click the 'MasterDB' or 'PrivateDB' in the 'Data Source' tree, and select the imported folder. After clicking the '3D' tab on the leftmost panel, when the 'Loading Options' window pops up, press 'OK' to import a sequence of images in the folder as a stack.
- Change the image representation to maximum intensity projection (MIP) format by clicking the word 'MRP' in the axial and coronal image windows and choosing 'MIP' on the pop-up menu. Then, change the image thickness to 2 mm after clicking 'TH : 0 [mm]' in the same window.
- Using the 2 mm width 3D navigator bar that allows for exploring an image stack and slicing it at an appropriate angle and location, prepare a 2 mm thick axial section image with full coverage of the circle of Willis (COW), which harbors thrombi. Click the capture button (camera icon) on the 'Output' panel. Save the image in TIFF format.
- Then, prepare five 2 mm thick coronal section images that cover contiguously from the frontal lobe to the cerebellum.
- First, prepare the second slice by carefully aligning the navigator bar on the axial image so that the coronal image can best visualize the MCA-ACA thrombi.
Next, prepare the other four slices in a contiguous way. Click the capture button (camera icon) on the 'Output' panel. Save the images in TIFF format.
Toegang beperkt. Log in of start een proefperiode om deze inhoud te bekijken.
Resultaten
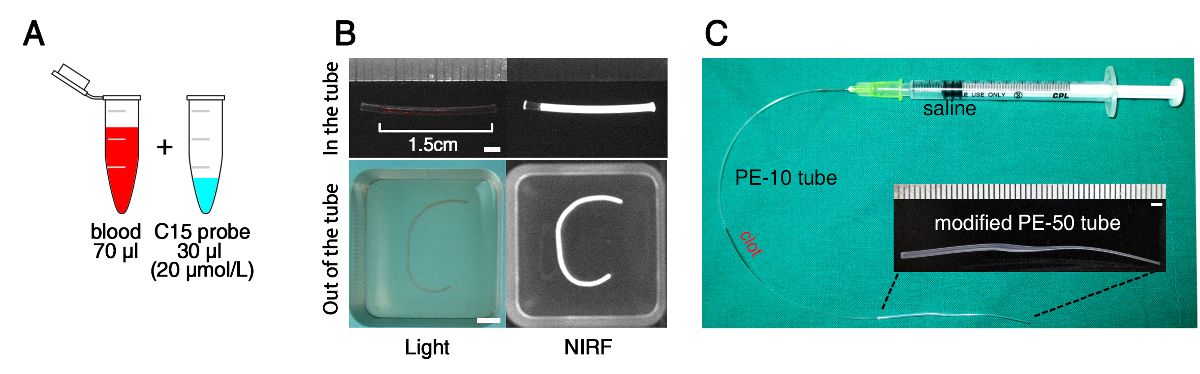
Figure 1: Overview of the Preparation of Fluorescently Labeled Blood Clot. (A) Mixing of fresh...
Toegang beperkt. Log in of start een proefperiode om deze inhoud te bekijken.
Materialen
| Naam | Bedrijf | Catalogusnummer | Opmerkingen |
|---|---|---|---|
| Machines | |||
| microCT | NanoFocusRay, JeonJu, Korea | NFR Polaris-G90 | |
| Laser Doppler flowmeter | Perimed, Stockholm, Sweden | PeriFlux System 5000 | |
| Surgical microscope | Leica Microsystems, Seoul, Korea | EZ4HD | |
| Inhalation anesthesia machine | PerkinElmer, Massachusetts, USA | XGI-8 | |
| Software | |||
| NFR control | NanoFocusRay, JeonJu, Korea | NFR Polaris-G90 | microCT control software |
| Lucion | Infinitt, Seoul, Korea | Lucion | 3D render imaging software |
| Lab chart 7 | ADInstruments, Colorado, USA | Lab chart 7 | rCBF |
| Image J software | Wanye Rasband, NIH, USA | 1.49d | imaging analysis |
| Devices/Instruments | |||
| Infusion pump | Harvard, Massachusetts, USA | pump 22(55-2226) | |
| Homeothermic blanket | Panlab, Barcelona, Spain | HB101 | |
| Pocket cautery | Daejong, Seoul, Korea | DJE-39 | |
| Brain matrice | Ted pella, CA, USA | 15003 | coronal section |
| PE-50 tubing | Natsume, Tokyo, Japan | SP-45(PE-50) | I.D. 0.58 mm O.D. 0.96 mm |
| PE-10 tubing | Natsume, Tokyo, Japan | SP-10(PE-10) | I.D. 0.28mm O.D. 0.61 mm |
| 30 gauge needle | sungshim-medical, Seoul, Korea | ||
| Syringe | CPL-medical, Ansan, Korea | 1 & 3 cc | |
| Gauze | Panamedic, Cheonan, Korea | ||
| Tape | Scotch, Seoul, Korea | 3M-810 | |
| Micro forceps | Fine Science Tools, Vancouver, Canada | 11253-27 | Dumont #L5 |
| Micro scissor | Fine Science Tools, Vancouver, Canada | 15000-03 | Vannas spring |
| Scissor | Fine Science Tools, Vancouver, Canada | 14084-08 | 8.5 cm |
| Black silk suture | Ailee, Busan, Korea | SK6071, SK728 | 6-0 and 7-0 |
| Reagents | |||
| Meloxicam | Yuhan, Seoul, Korea | ||
| Vet ointment | Novartis, Basel, Swiss | ||
| 10% Povidone-iodine (betadine) | Firson, Cheon-an, Korea | ||
| Ferric chloride | Sigma, Missouri, United States | 157740-5G | |
| TTC | Amresco, Ohio, USA | 0765-100g | |
| Isoflurane | Hana-Pham, Gyeonggi, Korea | Ifran | 100 mL |
| PBS | Welgene, Daegu, Korea | LB001-02 | 500 mL |
| Gold nanoparticles | Synthesis | ||
| Normal saline | Daihan Pham, Seoul, Korea | 48N3AF3 | 20 mL |
