In this video, we demonstrate the use of high-frequency ultrasound and photoacoustic imaging to study the vasculature and hemoglobin content in the rat brain. This method provides detailed insights into cerebral perfusion and blood oxygenation, enabling non-invasive analysis of brain vascular structures and oxygen distribution.
Een abonnement op JoVE is vereist om deze inhoud te bekijken. Log in of start vandaag met uw gratis proefperiode.
Methodenartikel
Non-Invasive High-Frequency Ultrasound and Doppler Imaging of Rat Brain Hemodynamics
974 weergaven
⸱
17 juni 2025
In dit artikel
Samenvatting
Protocol
All procedures involving animal models have been reviewed by the local institutional animal care committee and the JoVE veterinary review board.
1. Preparation
- Anesthesia
- Place the animal inside the appropriate isoflurane chamber to anesthetize it.
- Fill the chamber with mixed O2 and isoflurane gas for veterinary use at a concentration of 2.5% in a 2 L gas chamber and wait for about 3 min for the rat to fall asleep. Check for the effect of anesthesia by a toe pinch.
- Once the anesthesia takes effect, remove the rat and weigh it.
- Spread a thin layer of water soluble ophthalmic gel on the animal’s eyes to protect them and to maintain the ocular physiological hydration.
- Lay the rat down on a ultrasound and photoacoustic imaging station worktop. In order to maintain the anesthesia effect, quickly position the nose inside the appropriate mask providing a constant anesthesia flow (isoflurane 2%-2.5% in oxygen 1 L/min).
- Shaving the animal
- Spread a consistent layer of hair-removing cream on the head surface, with attention to cover areas surrounding the ears and neck. Allow the cream to act for several minutes and gently take it out with a spatula. Softly remove all cream remnants with a wet sponge to accurately clean the skin.
NOTE: The animal fur entraps air that negatively affects ultrasound based imaging acquisition, thus it has to be necessarily removed as much as possible.
- Spread a consistent layer of hair-removing cream on the head surface, with attention to cover areas surrounding the ears and neck. Allow the cream to act for several minutes and gently take it out with a spatula. Softly remove all cream remnants with a wet sponge to accurately clean the skin.
- Positioning the animal
- Arrange the animal in a spread-eagled position. Monitor the vital signs by means of appropriate vital parameter sensors on the worktop (if they are present). Lean the paws on the sensors after applying some drops of electrode cream for professional use.
NOTE: During anesthesia, ensure that vital parameters have values as follows: rat body temperature ≈ 37.5 °C, cardiac beats per minutes (BPM) varies between 250 and 350 and the respiratory rate is comprised in the range of 40-80 breaths per minute. - Finally fasten the limbs with hypoallergenic artificial silk patch. If necessary, spread again a thin layer of water soluble ophthalmic gel to protect animal’s eyes.
- Arrange the animal in a spread-eagled position. Monitor the vital signs by means of appropriate vital parameter sensors on the worktop (if they are present). Lean the paws on the sensors after applying some drops of electrode cream for professional use.
2. Image Acquisition from Temporal Point of View
- Positioning the animal
- Keeping the animal in a prone position, rotate its body slightly on the side, with a tilt angle of about 45° with respect to the sagittal body axis. Use small cotton gauze rolls as stands to correctly arrange the disposal (Figure 1a).
- Raise the animal's head and rotate it slightly on one side (Figure 1a). Use a cotton roll as stand keeping the snout well inserted into the anesthesia mask.
- Incline the worktop at an angle of about 30° with respect to the horizontal plane.
- Turn the imaging transducer at an angle of about 30° with respect to the vertical plane.
- Ultrasonic and photoacoustic anatomic and vascular image acquisition
- Turn the imaging scan on, enter the B Mode image acquisition, and properly set all image acquisition parameters to respect possible given requirements of the experiment (Figure 2a).
NOTE: Set the transmit center frequency as low as possible (16 MHz, Figure 2b), in order to have the maximum penetration depth possible for the transducer. - Dispose a consistent layer (about 1 cm thick) of hypoallergenic water-soluble ultrasound transmission gel on the animal’s head (Figure 1b). Cover the transducer head with a thin layer of the same gel and put it into contact with the layer on the rat. Use warm gel to minimize localized hypothermia.
- Start image acquisition in B Mode and adjust the transducer positioning in real time, by identifying anatomical references and by centering the region of interest to the monitor middle point. Make sure to eliminate air bubbles at any level entrapped into the gel layer, because they negatively affect the acquisition.
- Place the transducer to align it to the virtual axis connecting the ear to the eye (Figure 3a) to obtain an optimal beam focalization. Acquire different views of the internal brain volume, by clockwise or counterclockwise rotation (Figure 3b and c).
- Eventually fasten the transducer on a mechanical stand to stably secure the position and to tune the orientation in a fine way.
- Ensure that the cerebral region of interest localizes at 10 mm of depth with respect to the US-LASER transducer source in order to receive an optimal photoacoustic response signal (Figure 4). Then, place the indicator of the US wave focalization exactly in the center of the analyzed area.
NOTE: During research of areas of interest, avoid activation of the respiration gate option, in order to accelerate the positioning procedure. - Enter Color Doppler Mode to visualize internal brain blood vessels in a high sensitive way.
- Once the positioning has been set in an appropriate way to visualize the wanted regions, activate the respiration gate option to avoid undesired effects related to the movement (Figure 5a).
- Choose the wanted acquisition parameter set in Color Doppler Mode (Figure 5b) and acquire images in this modality to distinguish blood stream velocities and directions, until several millimeters of penetration depth.
- Turn the imaging scan on, enter the B Mode image acquisition, and properly set all image acquisition parameters to respect possible given requirements of the experiment (Figure 2a).
Toegang beperkt. Log in of start een proefperiode om deze inhoud te bekijken.
Resultaten
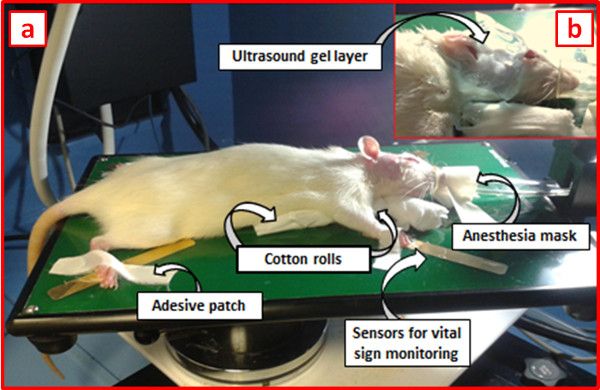
Figure 1: Animal disposal for temporal image acquisition. (a) The arrangement of the animal on the worktop...
Toegang beperkt. Log in of start een proefperiode om deze inhoud te bekijken.
Materialen
| Naam | Bedrijf | Catalogusnummer | Opmerkingen |
|---|---|---|---|
| High frequency ultrasound and photoacoustic imaging station (VEVO LAZR 2100 system) | FUJIFILM VisualSonics Inc. | ||
| Vevo Compact Dual Anesthesia System (Tabletop Version) | FUJIFILM VisualSonics Inc. | http://www.visualsonics.com/anesthesiasystem#sthash.opODtSht.dpuf | |
| Ultrasound Transmission Gel (Aquasonic 100) | PARKER LABORATORIES INC. | 01-08 | http://www.parkerlabs.com/aquasonic-100.asp |
| Sprague-Dawley rats | Charles River Laboratories | Three helathy 6-weeks old Sprague-Dawley rats were purchased by Charles River Laboratories and kept in standard housing (12 h light-dark cycles) with a standard rodent chow and water available ad libitum. Provided by: http://www.criver.com/ |
