This video demonstrates the delivery of a test compound into the cerebrospinal fluid (CSF) through a catheter implanted in the lumbar spinal column of a rat model. The compound circulates along the CSF to the brain and spinal cord, enters neurons, and offers therapeutic potential.
Een abonnement op JoVE is vereist om deze inhoud te bekijken. Log in of start vandaag met uw gratis proefperiode.
Methodenartikel
Intrathecal Delivery of a Test Compound to the Rat Central Nervous System
2.1K weergaven
⸱
17 juni 2025
In dit artikel
Samenvatting
Protocol
All procedures involving animal models have been reviewed by the local institutional animal care committee and the JoVE veterinary review board.
1. Surgery
- With the rat supported by the 50 mL conical tube, identify the two natural pits between muscles above the pelvis (arrows in Figure 1A). With one hand holding those pits, use the other hand to gently press and feel the spine from caudal to rostral direction and find the first major indentation between vertebrae, and this is the intervertebral space between sacral 1 (S1) and lumbar 6 (L6) vertebrae (Figure 1B).
- Move slightly rostrally to identify the next indentation, the intervertebral space between the lumbar 5 (L5) and L6 vertebrae, and the injection site (* in Figure 1A). Use a scalpel to make an incision no more than 2 cm long in the skin along the midline from rostral to caudal so that the injection site is at the center of the incision (dotted line in Figure 1A).
- Use dissection scissors to dissect away the connective tissue to visualize the muscle layer. Then, make a 1 cm incision in the muscle capsule immediately lateral to the dorsal spinal process of the L6 lumbar vertebra.
NOTE: The bones of the L6 lumbar vertebra could be visualized at this point. - Position the guide cannula-needle assembly near the anterior aspect of the 6th lumbar vertebra and push it into the intervertebral space along the anterior aspect of the 6th vertebra so that the end of the needle penetrates the spinal canal. Push the guide cannula in place along the needle and remove the 23-G needle, leaving only the guide cannula in place.
NOTE: It is helpful to use blunt forceps to locate the dorsal process of the L6 lumbar vertebra before inserting the needle. Generally, cerebrospinal fluid (CSF) fluid can be seen entering the needle hub (this fluid may be tinged with a hint of blood, but this does not indicate that harm has been done or that the needle is not placed correctly). The authors have not seen a large amount of blood or severe bleeding during this procedure. If either occurs, a veterinarian should be contacted to determine the appropriate treatment and whether animals should be euthanized. - Insert the catheter-wire assembly into the guide cannula. Angle down the catheter-wire assembly at approximately a 45° angle to the spinal canal and force the end approximately 0.3 cm into the spinal canal.
- Remove the guide cannula, leaving the catheter with the stylet wire in place. Remove the stylet wire approximately 2.5 cm from the intrathecal tip of the catheter and advance the catheter into the spinal canal until the 2 cm mark is at the entrance of the canal (just visible below the muscle), as shown in Figure 2Bvi.
NOTE: The inserted catheter should extend rostrally into the subarachnoid space. A successful placement should allow the catheter to move freely in that space. - Completely withdraw the stylet wire, and CSF may be seen entering the implanted catheter.
- Connect the delivery catheter assembly to the distal end of the implanted catheter via the 30 G needle end (Figure 2Bv, vi).
- Load 60 µL of sterile saline into a 100 µL syringe (flushing syringe). Load a bolus of 30 µL of the test compound (e.g., antisense oligonucleotide or ASO solution) into a second syringe (injection syringe).
- Connect the flushing syringe (loaded with saline) to the tubing adaptor end of the delivery catheter assembly (Figure 2Bv). Inject 20 µL of sterile saline into the intrathecal space (pre-injection flushing).
- Connect the injection syringe (loaded with test compound) to the tubing adaptor end of the delivery catheter assembly (Figure 2Bv). Inject 30 µL of test compound into the intrathecal space over 30 s.
NOTE: The routine injection volume of ASO is 30 µL to achieve good knockdown in the spinal cord and in the cortex. It has been reported that the injection volumes may impact compound distribution, though different injection volumes have not been tested. If another compound or volume is used, the safety and effectiveness need to be empirically determined. - Repeat step 1.10 and flush the catheter with another 40 µL of sterile saline (post-injection flushing). Then detach the delivery catheter assembly from the implanted catheter.
NOTE: The pre- and post-injection flush is thought to reduce the compounds' local sequestration and improve their distribution to the rostral structures. - To aseptically cut and heat seal the implanted catheter, place a pair of sterile dissection forceps in a bead sterilizer until they are very hot, then clamp down on the tubing with the hot end of the forceps.
NOTE: This action melts the catheter. Thus, the hole in the tube collapses, and all sides stick to each other, sealing the tubing in an aseptic fashion. Then, it is placed into the subcutaneous space. - Use absorbable monofilament sutures to secure the remaining heat-sealed catheter to the connective tissue. Then, use non-absorbable monofilament sutures to close the skin over the secured heat-sealed catheter.
NOTE: Wound clips can also be used as approved by the institutional animal care and use committee (IACUC) protocol. The technique is compatible with repeated injections, though it has only been used for one-time injections in our hands. The feasibility of repeated injections should be empirically evaluated with the approval of the IACUC. - Use gauze and saline to wash any blood from the skin and allow the animal to recover from the anesthesia in a heated incubator until mobile, at which point it is returned to its home cage (two rats per cage).
NOTE: When performing surgeries on multiple rats on the same day, clean tools using water to remove the blood and re-sterilize using a heated dry bead sterilizer (for at least 20 s, with time to cool) between animals. A new set of instruments is used for every 5 animals. - Monitor the animals daily for at least 3 days after surgery and continue to monitor them weekly after surgery, according to the IACUC protocol.
Toegang beperkt. Log in of start een proefperiode om deze inhoud te bekijken.
Resultaten
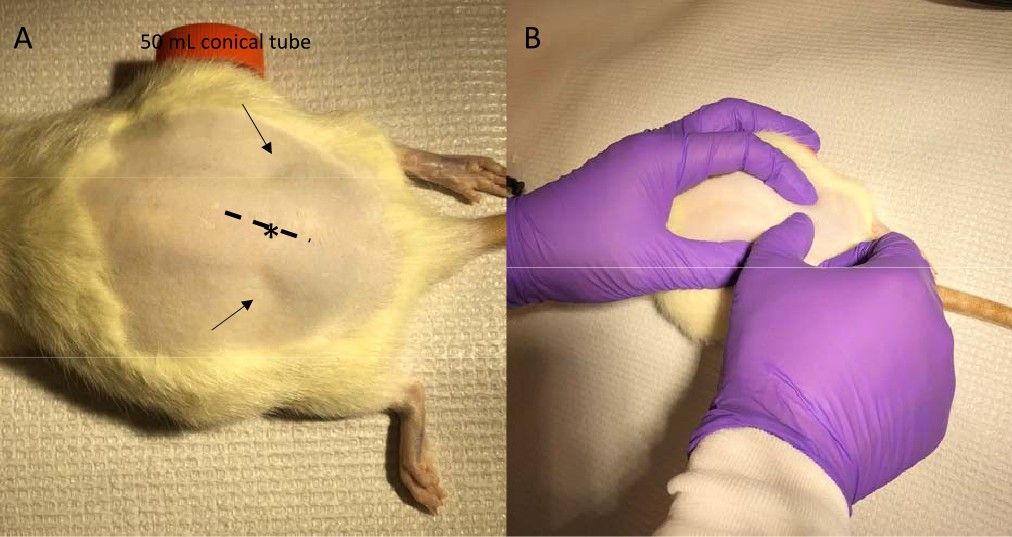
Figure 1: Identification of injection site and incision line. (A) With the abdomen of the rat supported by a 50 mL ...
Toegang beperkt. Log in of start een proefperiode om deze inhoud te bekijken.
Materialen
| Naam | Bedrijf | Catalogusnummer | Opmerkingen |
|---|---|---|---|
| BD intramedic PE tubing | BD | Polyethylene tubing PE50, diameter 0.023 in | BD 427400 (10 ft, Fischer Scientific 22-204008) or 427401 (100 ft, Fischer Scientific 14-170-12P) |
| BD intramedic PE tubing | BD | Polyethylene tubing PE10, diameter 0.011 in | BD 427410 (10 ft, Fischer Scientific 14-170-11B) or 4274011 (100 ft, Fischer Scientific 14-170-12B) |
| BD PrecisionGlide single-use needles 30G | BD | BD 305128 | |
| Guide cannula | BD | 19G x 1 WT (1.1 mm x 25 mm) needle | BD 305186 |
| Hamilton syringe 100 ul | Hamilton company | Hamilton syringe 100 ul | |
| Hot bead sterilizer | Fine Science Tools | Sterilizer model no. FST 250 | |
| Povidone scrub | PDI | S48050 | |
| Saline | Baxter | Sodium chloride 0.9% intravenous infusion BP 50 ml | FE1306G |
| Scalpel | Feather | Disposable scalpel | No. 10 |
| Small animal heating pad | K&H Manufacturing | Model no. 1060 | |
| Stylet wire | McMaster-Carr | 1749T14 | LH-36233780 |
| Surgery towel drape | Dynarex | 4410 | |
| Surgical scissors and forceps | FST and Fisher Scientific | ||
| Sutures | Ethicon | 4-0 or 5-0 | |
| Alternative source for pre-made and sterilized materials for this procedure | |||
| Dosing catheter system | SAI Infusion Systems | RIDC-01 | |
| Guide cannula | SAI Infusion Systems | RIDC-GCA | |
| Internal catheters | SAI Infusion Systems | RIDC-INC | |
| Stylet wire | SAI Infusion Systems | RIDC-STY |
