This video demonstrates the intracranial injection of short-chain fatty acids (SCFAs) in a freely moving mouse to study their effects on brain-mediated behavior. An injector cannula is inserted into a guide cannula implanted in the mouse brain. After recovery, the mouse acclimates in a novel cage. SCFAs are then administered, and locomotor behavior is recorded.
Een abonnement op JoVE is vereist om deze inhoud te bekijken. Log in of start vandaag met uw gratis proefperiode.
Methodenartikel
Intracranial Injection of Gut-Derived Microbial Metabolites in a Mouse Model
782 weergaven
⸱
7 augustus 2025
In dit artikel
Samenvatting
Protocol
All procedures involving animal models have been reviewed by the local institutional animal care committee and the JoVE veterinary review board.
1. Preparation for the experimental animal
- Obtain 6-8-week-old wild-type C57BL/6JNarl male mice from a vendor.
- House the mice in a standard mouse cage with standard mouse chow and sterilized water ad libitum.
NOTE: The housing conditions for the Laboratory Animal Center are 22 ± 1 °C temperature, 55% ± 10% humidity, and a 13 h/11 h light/dark cycle.
2. Stereotaxic surgery
- Prepare and sterilize the stereotaxic instrument, surgical instruments, and related items.
NOTE: All items that will directly contact the surgical site should be sterilized to avoid infection. - Anesthetize the mouse by placing it in the Plexiglas cage with 1%-5% isoflurane in oxygen.
NOTE: Closely observe the mouse to ensure the breathing rate is maintained at around one breath per second. - Take the mouse out of the anesthesia chamber. Shave the surgical site (mouse head) with a pet trimmer. Place the mouse onto the stereotaxic frame by fixing the mouse incisors on the incisor bar in the stereotaxic incisor holder. Cover the nose with the nosecone mask.
- Anesthetize the mouse with 1%-2.5% isoflurane in oxygen throughout the stereotaxic surgery. Evaluate the nociception of the mouse via the toe pinch reflex and ensure a constant breathing rate before incising the surgical site.
- Place a heating pad (37.0 °C) underneath the mouse on the stereotaxic frame to maintain body temperature during surgery. Alternatively, maintain the core temperature with the aid of a rectal thermal probe connecting the programmed warmer and the heating pad.
- Remove the trimmed fur on the head using adhesive tape. Inject the mouse with analgesic Ketoprofen (5 mg/kg) subcutaneously to relieve pain. Apply eye ointment to avoid dry eyes.
- Insert the pointed ear bar in the ear canal to fix the head.
- Center the head by adjusting the scale of the ear bar.
- Tighten the nose clamp on the incisor holder to avoid vertical movement. Press the head gently to check that the head is fixed and avoid the head becoming loose during subsequent surgery.
- Disinfect the scalp with three alternating scrubs of chlorhexidine using a cotton swab. Start each scrub from the middle toward the outer side (from the most disinfected central area to the least disinfected area).
NOTE: The usage of scrubs from the middle to the outside could help scientists minimize infection and contamination from the fur. The outer area is close to the unshaved head region, which still has a great amount of fur and is not easy to disinfect thoroughly. - Incise the scalp in an anterior/posterior manner (<1 cm) using a surgical blade. Open the incision and wipe the skull with a cotton swab held by microdissecting forceps.
NOTE: The microdissecting forceps, surgical blade, and cotton swabs must be sterilized by autoclaving before surgery. During the surgical process, sterilize all the surgical equipment using a glass bead sterilizer (150 °C) for at least 5 s before and after each animal. Prepare a sterilized beaker to hold the surgical blade and forceps during the surgical process and between animals. - Identify the Bregma and Lambda on the skull. Use the Bregma as the reference to locate the region of interest.
- Optional: Mount the stereotaxic drill on the stereotaxic drill holder, and use the tip of the drill to point Bregma as the reference. Sterilize the stereotaxic drill using the glass bead sterilizer (150 °C) for at least 5 s.
- Calibrate and align the flat skull horizontal plane in the left/right and anterior/posterior planes by Bregma/Lambda.
NOTE: If not in a correct horizontal plane, remount the mouse on the stereotaxic instrument.
3. Commercial customized guide cannula implantation
- Identify and label the position of the right lateral ventricle based on the stereotaxic coordinates: Distance to Bregma, anterior/posterior (A/P): 0.26 mm, medial/lateral (M/L): -1.0 mm, dorsal/ventral (D/V): -2.0 mm.
NOTE: The coordinates can be modified based on the region of interest. The coordinates for the lateral ventricle were based on adult C57BL/6J mice with a weight range of 26-30 g. - Drill a hole (diameter = 1.5 mm) through the skull at the labeled site using a stereotaxic drill for the implantation of a commercial guide cannula.
- Drill two to four more holes (diameter = 1.5 mm) on the skull using a stereotaxic drill for the mounting of stainless steel screws.
NOTE: Sterilize the stereotaxic drill using a glass bead sterilizer (150 °C) for at least 5 s before and after each animal. - Wipe the bone scraps and stop bleeding with a cotton swab.
- Wipe the skull with Lidocaine (1 mg/kg) using a cotton swab for local anesthetic, antipruritic, and pain-relieving effects. If bleeding does not stop after drilling, gently place a cotton swab on the hole for hemostasis.
- Mount two to four stainless screws on the holes to provide anchors for dental acrylic.
- Place the commercial guide cannula on the stereotaxic cannula holder and disinfect it with the glass bead sterilizer (150 °C).
NOTE: The commercial guide cannula, commercial dummy, and commercial injector (Figure 1A) were customized with the specifications shown in the Table of Materials. - Move the stereotaxic cannula holder to the hole drilled for the lateral ventricle and slowly insert the commercial guide cannula into the hole until the desired depth (2.5 mm).
NOTE: The dorsal/ventral coordinate can be defined by setting the tip of the commercial guide cannula as the reference when the tip is barely inserted into the hole. - Apply 10 µL of n-butyl cyanoacrylate adhesive (tissue adhesive glue) to fix the commercial guide cannula in the drilled hole and wait for 3-4 min. Release the commercial guide cannula gently from the stereotaxic cannula holder and move the holder away.
- Apply the dental acrylic to the incised scalp to fix the commercial guide cannula and wait for at least 5 min. Implant the commercial dummy into the commercial guide cannula to avoid cannula clogging by blood or body fluid (Figure 1B).
- Release the ear bar from the ear canal and remove the mouse from the stereotaxic frame.
- Place the mouse into a new cage with a heating pad underneath for recovery from anesthesia and continuously observe until the mouse fully awakens.
NOTE: Do not leave the animal unattended until it has regained sufficient consciousness to maintain sternal recumbency. An animal that has undergone surgery should not return to the company of other animals until fully recovered. - Return the mouse to single housing or group housing, depending on the Institutional Animal Care and Use Committee (IACUC) protocol and the experimental design. For group housing, ensure that fewer mice are housed in a cage to minimize unwanted injuries or the detachment of the cannula.
- Administer Ibuprofen (0.2 mg/mL) in the drinking water for at least 3 days for postoperative care, and monitor twice a day for signs of pain and distress for at least 3 days.
- During postoperative care, apply roxithromycin ointment around the skin to prevent inflammation and infection in the mice.
- Keep monitoring the animal's state and give a timely intraperitoneal injection of 5% glucose and/or 0.9% sodium chloride to provide enough energy.
- If the state of pain, distress, or infection steadily deteriorates, euthanize the mouse by CO2 inhalation.
- Wait for 1 week post-operation for the mouse to be ready for the intracerebroventricular delivery of short-chain fatty acids (SCFAs) and behavioral testing.
4. Preparation of SCFAs
- Dissolve the sodium acetate, sodium butyrate, and sodium propionate in artificial cerebrospinal fluid (ACSF) (see the Table of Materials).
- Ensure the chemicals are fully dissolved, then adjust the pH to 7.4, and filter the SCFAs mixture through a 0.22 μm filter for sterilization.
5. Set up the infusion system for intracerebroventricular delivery of SCFAs during behavioral testing
- Mount a ceiling camera to record the behavior. Connect the camera with a computer to control the video recording software (Figure 2).
- Fill a 10 μL syringe with distilled water.
NOTE: Avoid air bubbles in the microliter syringe. - Connect a microinjection pump with the microinjection controller.
- Mount the microliter syringe on the microinjection pump. To install the syringe, press the button to loosen the clamp and install the syringe onto the corresponding position. Close the clamp and tighten the plunger-retaining screw on the microinjection pump (Figure 3A).
- Insert the commercial injector into the polyethylene tube (Figure 1A).
- Hang the polyethylene tube on the ceiling camera above the testing arena.
- Fill the polyethylene tube with distilled water using an insulin syringe. Connect the microliter syringe to the hanging polyethylene tube.
NOTE: Ensure the polyethylene tube is long enough to allow the mouse to move freely throughout the testing arena.
6. System settings of the microinjection controller
- Turn on the microinjection controller and press Display All Channels to access the Command screen (Figure 3C). Press Configuration and set Volume Target to 9,800 nL with Delivery Rate to 100 nL/s. Infuse 9,800 nL of distilled water from the polyethylene tube connected to the microliter syringe (press Direction to switch to the Infuse mode and press RUN) (see red squares in the Command screen of Figure 3C).
- Press Configuration and set Volume Target to 3,000 nL with Delivery Rate to 100 nL/s. Withdraw 3,000 nL of mineral oil (press Direction to switch to the Withdraw mode and press RUN) (see red squares in the Command screen of Figure 3C).
NOTE: A clear oil-water phase separation should be observed on the polyethylene tube. - Disassemble the polyethylene tube from the microliter syringe needle. Spit out 3,000 nL of distilled water from the microliter syringe needle (press Direction to switch to the Infuse mode and press RUN).
- Insert the microliter syringe back into the polyethylene tube. Press Configuration and set the Volume Target to 9,500 nL with a Delivery Rate of 100 nL/s. Withdraw 9,500 nL of SCFAs (press Direction to switch to the Withdraw mode and press RUN). Label the oil-SCFAs phase to validate whether the SCFAs are successfully infused.
- Press Configuration and set the desired Volume Target with Delivery Rate to 7 nL/s. Press Direction to switch to the Infuse mode (see red squares in the Command screen of Figure 3C).
NOTE: Determine the volume based on the infusion time. For example, if the infusion time is 3 min for the delivery rate of 7 nL/s, target volume = 1,260 nL. - Press RUN to infuse the microliter syringe forward until the liquid comes out at the front end of the commercial injector before inserting the injector into the cannula for SCFAs injection.
7. Infusion of SCFAs into the lateral ventricle through the commercial guide cannula in a freely moving mouse
- Anesthetize the mouse by placing it in the Plexiglas cage with 1%-5% isoflurane in oxygen.
NOTE: Closely observe the mouse to ensure the breathing rate is maintained at around one breath per second. - Scruff the mouse and insert the commercial injector into the commercial guide cannula (Figure 3B).
NOTE: If the commercial guide cannula is plugged by blood or body fluid, gently unclog it with tweezers. - Allow the mouse to recover from anesthesia for 15 min in a cage prior to behavioral testing.
- For the basic locomotion test, place the mouse in a novel cage and allow it to freely explore for 35 min. Infuse SCFAs using a Delivery Rate of 7 nL/s for a target volume of 2,100 nL in the first 5 min (press Direction to the Infuse mode and press RUN).
NOTE: The locomotion in the novel cage can be analyzed using animal behavior video tracking software. - Anesthetize the mouse (repeating step 7.1) and remove the commercial injector from the commercial guide cannula.
NOTE: The mouse can be repeatedly injected with different controls/metabolites after giving the appropriate length of time to wash out the previous injection. As long as the cannula is fixed on the mouse's head, the mouse can be repeatedly tested with different metabolites.
8. Restoration of the microinjection system
- Disassemble the polyethylene tube from the microliter syringe.
- Inject air into the tube using the insulin syringe to discard the distilled water in the polyethylene tube. Empty the microliter syringe.
- Press Reset Pos on the Configuration screen to open the Syringe Stop Figure Definition screen (Figure 3C).
- Press Withdraw until a beeping sound occurs to reset the microinjection pump to the fully withdrawn position (Figure 3C).
- Return to the Command screen and turn off the microinjection controller if there is an **END REACHED** sign on this screen (Figure 3C).
Toegang beperkt. Log in of start een proefperiode om deze inhoud te bekijken.
Resultaten
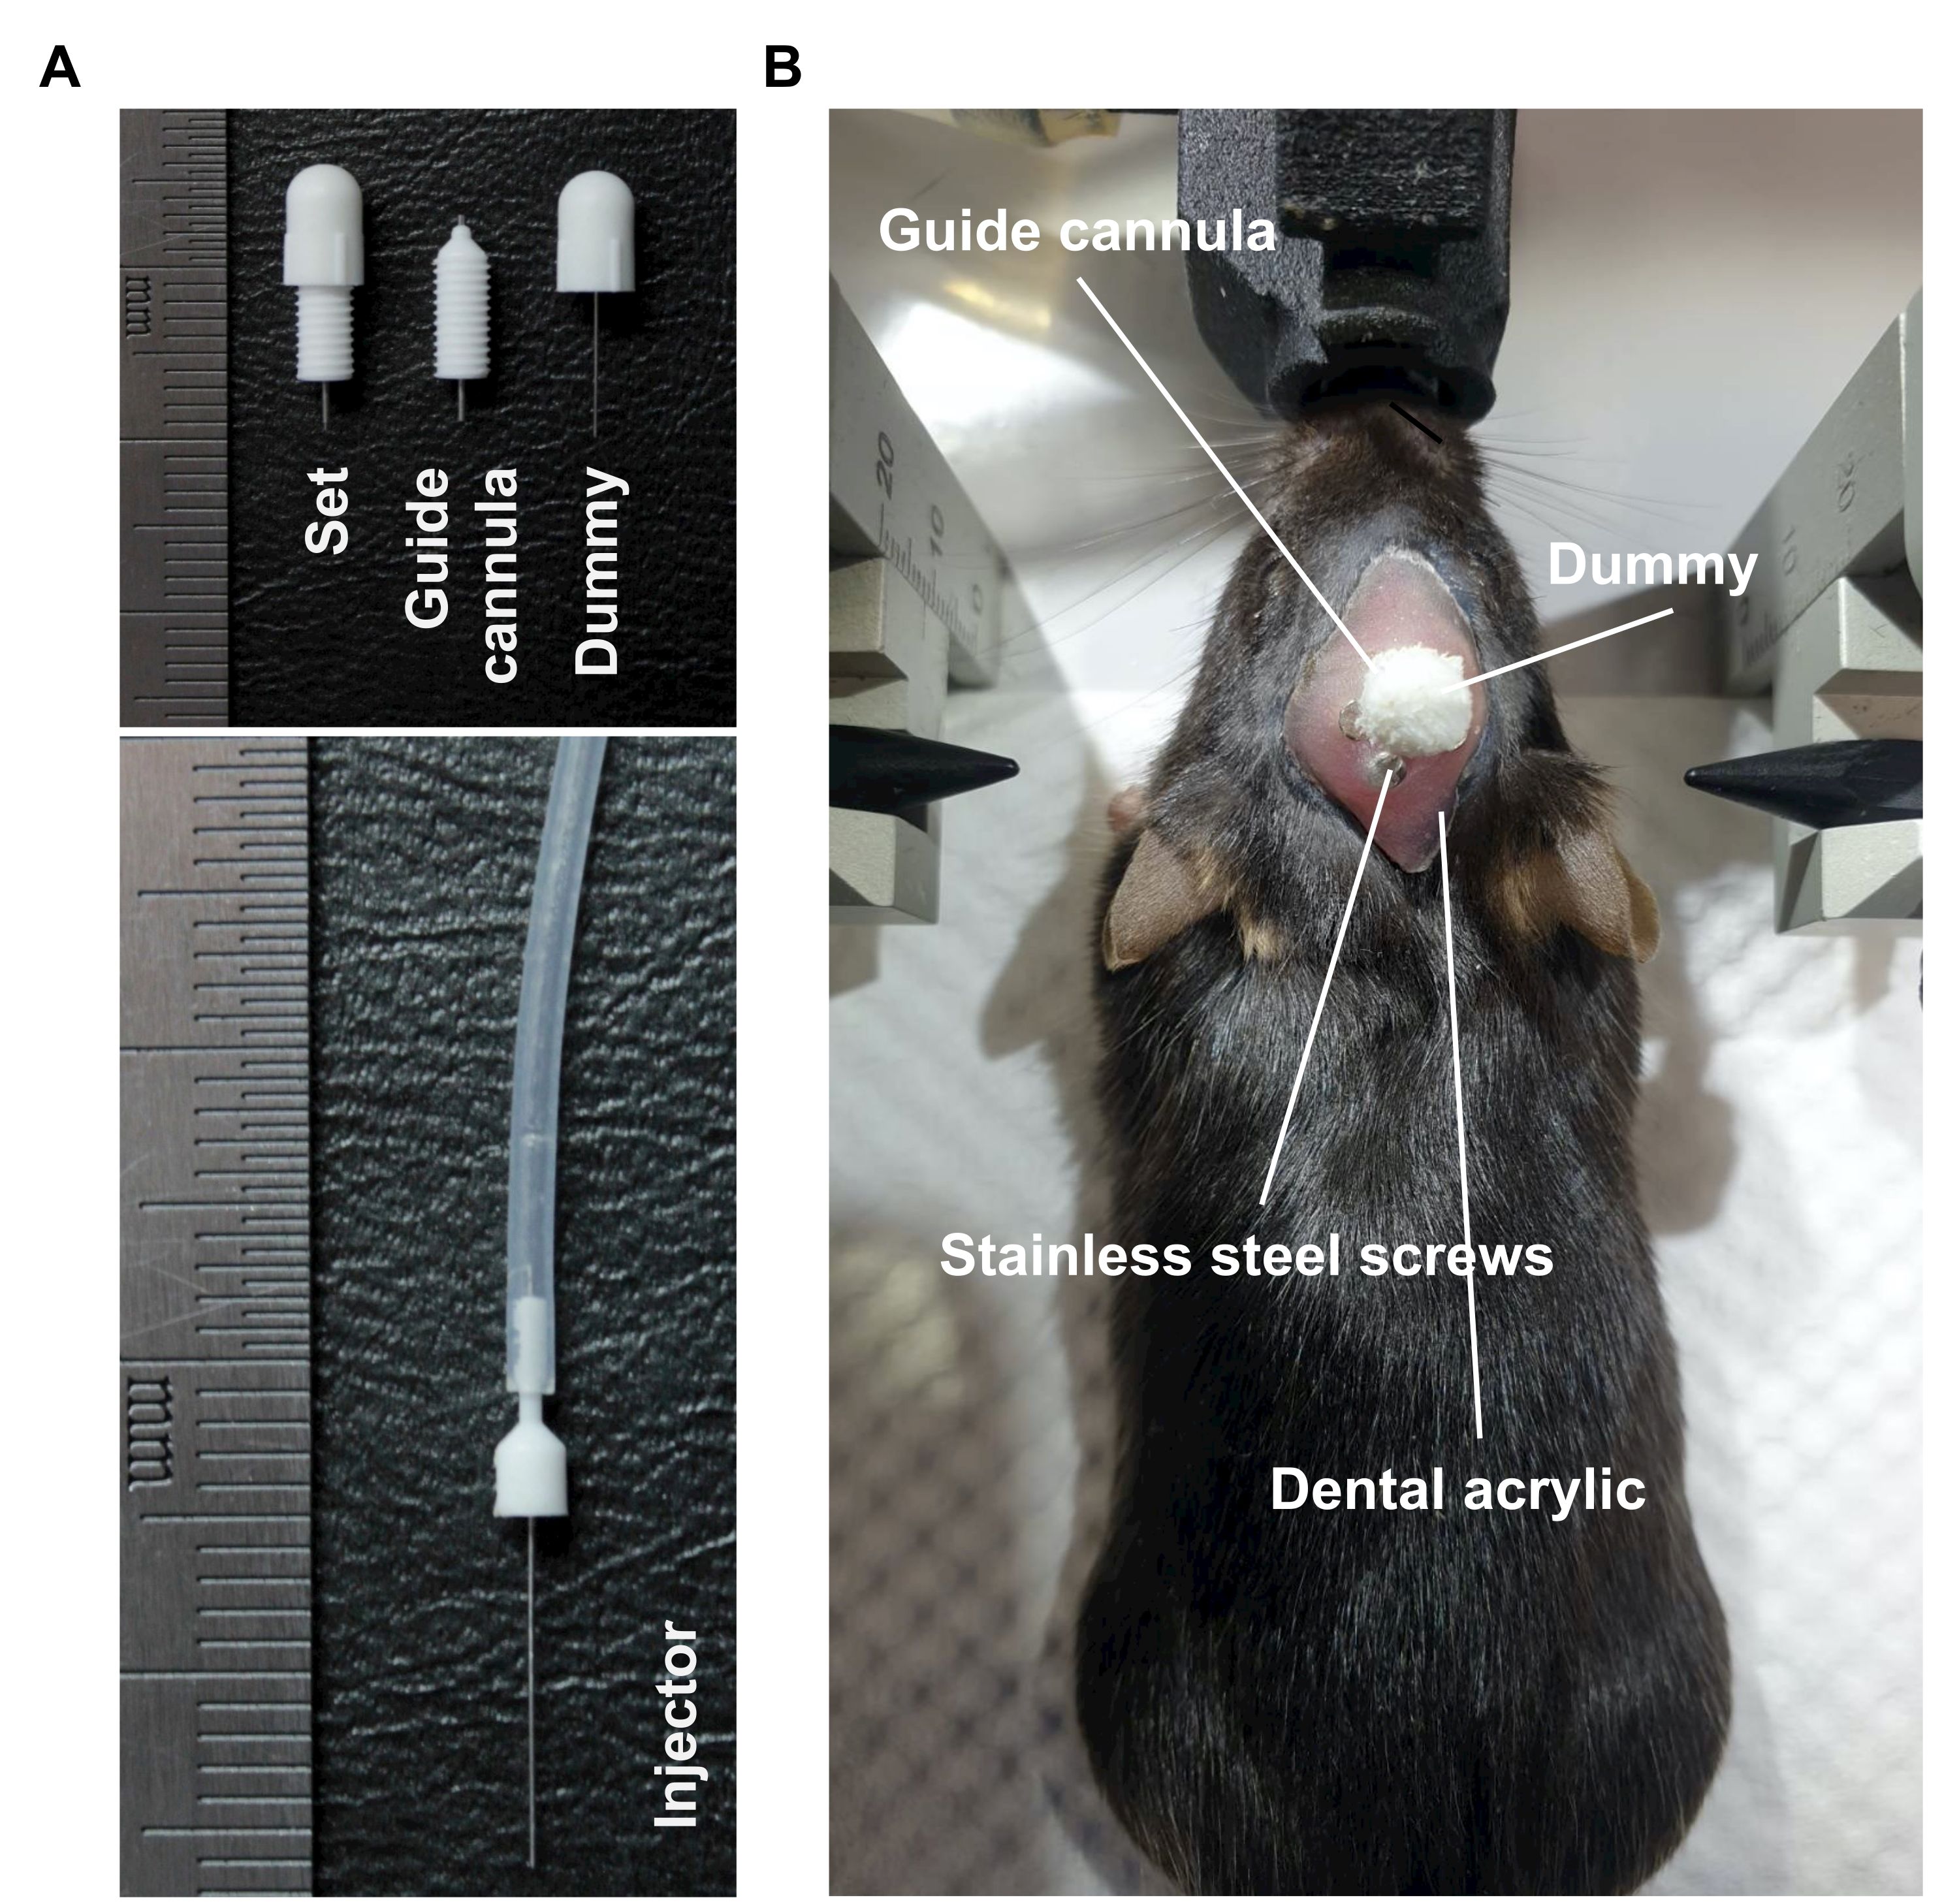
Figure 1: Implantation of the commercial guide cannula in mice. (A) The representative image of a commercial guide...
Toegang beperkt. Log in of start een proefperiode om deze inhoud te bekijken.
Materialen
| Naam | Bedrijf | Catalogusnummer | Opmerkingen |
|---|---|---|---|
| Material | |||
| Advil Liqui-Gels Solubilized Ibuprofen A2:D41 | Pfizer | n/a | |
| Bottle Top Vacuum Filter, 500 mL, 0.22 μm, PES, Sterile | NEST | 121921LA01 | |
| CaCl₂ | Sigma-Aldrich | C1016 | ACSF: 0.14 g/L |
| Chlorhexidine scrub 2% | Phoenix | NDC 57319-611-09 | |
| Chlorhexidine solution | Phoenix | NDC 57319-599-09 | |
| Commercial dummy | RWD Life Science | 62004 | Single_OD 0.20 mm/ M3.5/G = 0.5 mm |
| Commercial guide cannul | RWD Life Science | 62104 | Single_OD 0.41 mm-27G/ M3.5/C = 2.5 mm |
| Commercial injector | RWD Life Science | 62204 | Single_OD 0.21 mm-33G/ Mates with M3.5/C = 3.5 mm/G = 0.5 mm |
| D-(+)-Glucose | Sigma-Aldrich | G8270 | ACSF: 0.61 g/L |
| Dental acrylic | HYGENIC | n/a | |
| Fixing screws | RWD Life Science | 62521 | |
| Horse serum | ThermoFisher Scientific | 16050130 | |
| Insulin syringes | BBraun | XG-LBB-9151133S-1BX | 1 mL |
| Isoflurane | Panion & BF biotech | DG-4900-250D | |
| KCl | Sigma-Aldrich | P3911 | ACSF: 0.19 g/L |
| Ketoprofen | Swiss Pharmaceutical | n/a | |
| Lidocaine | AstraZeneca | n/a | |
| Low melting point agarose | Invitrogen | 16520 | |
| MgCl₂ | Sigma-Aldrich | M8266 | ACSF: 0.19 g/L |
| Microscope slides | ThermoFisher Scientific | 4951PLUS-001E | |
| Mineral oil light, white NF | Macron Fine Chemicals | MA-6358-04 | |
| NaCl | Sigma-Aldrich | S9888 | ACSF: 7.46 g/L |
| NaH₂PO₄ | Sigma-Aldrich | S8282 | ACSF: 0.18 g/L |
| NaHCO₃ | Sigma-Aldrich | S5761 | ACSF: 1.76 g/L |
| n-butyl cyanoacrylate adhesive (tissue adhesive glue) | 3M | 1469SB | 3M Vetbond |
| Neural tracer | Santa Cruz | SC-358883 | FluoroGold |
| Paraformaldehyde | Sigma-Aldrich | P6148 | |
| Polyethylene tube | RWD Life Science | 62329 | OD 1.50, I.D 0.50 mm and OD 1.09, I.D 0.38 mm |
| Puralube Vet (eye) Ointment | Dechra | 12920060 | |
| Sodium acetate | Sigma-Aldrich | S2889 | SCFAs: 13.5 mM |
| Sodium azide | Sigma-Aldrich | S2002 | |
| Sodium butyrate | Sigma-Aldrich | B5887 | SCFAs: 8 mM |
| Sodium propionate | Sigma-Aldrich | P1880 | SCFAs: 5.18 mM |
| Stainless guide cannula | Chun Ta stainless steel enterprise CO., LTD. | n/a | OD 0.63 mm; Local vendor |
| Stainless injector | Chun Ta stainless steel enterprise CO., LTD. | n/a | OD 0.3 mm; dummy is made from injector; local vendor |
| Superglue | Krazy Glue | KG94548R | |
| Triton X-100 | Merck | 1.08603.1000 | |
| Equipment | |||
| Cannula holder | RWD Life Science | B485-68217 | |
| Ceiling camera | FOSCAM | R2 | |
| Digital stereotaxic instruments | Stoelting | 51730D | |
| Dissecting microscope | INNOVIEW | SEM-HT/TW | |
| Glass Bead Sterilizer | RWD Life Science | RS1501 | |
| Heating pad | Stoelting | 53800M | |
| Micro Dissecting Forceps | ROBOZ | RS-5136 | Serrated, Slight Curve; Extra Delicate; 0.5mm Tip Width; 4" Length |
| Micro Dissecting Scissors | ROBOZ | RS-5918 | 4.5" Angled Sharp |
| Microinjection controller | World Precision Instruments (WPI) | MICRO2T | SMARTouch Controller |
| Microinjection syringe pump | World Precision Instruments (WPI) | UMP3T-1 | UltraMicroPump3 |
| Microliter syringe | Hamilton | 80014 | 10 µL |
| Optical Fiber Cold Light with double Fiber | Step | LGY-150 | Local vendor |
| Pet trimmer | WAHL | 09962-2018 | |
| Software | |||
| Animal behavior video tracking software | Noldus | EthoVision | Version: 15.0.1416 |
