This video demonstrates the process of visualizing cerebrospinal fluid (CSF) flow in a mouse brain using fluorescence imaging. A fluorescent tracer is injected into the cisterna magna (CM), allowing its movement with CSF to be tracked through the subarachnoid and perivascular spaces. Time-lapse imaging captures the tracer's journey, highlighting its distribution into the brain tissue via arterioles.
Een abonnement op JoVE is vereist om deze inhoud te bekijken. Log in of start vandaag met uw gratis proefperiode.
Methodenartikel
In Vivo Imaging of Cerebrospinal Fluid Transport in a Mouse Brain Using Fluorescence Macroscopy
1.2K weergaven
⸱
17 juni 2025
In dit artikel
Samenvatting
Protocol
All procedures involving animal models have been reviewed by the local institutional animal care committee and the JoVE veterinary review board.
1. Preparing the cisterna magna cannula, head plate, and head holder
- Sterilize all surgical instruments and head plates before surgery.
NOTE: Fluorescent tracers are delivered directly into CSF via a cisterna magna cannulation. - Briefly, using a needle driver, break the tip of a 30G x 12.7 mm (½ inch) needle, ¾ of the way down, and place the blunt end of the needle into one end of polyethylene 10 (PE10) tubing (about 45 cm long). Make sure that only the bevel is protruding out of the border of the PE10 tubing.
- Break off ¼ of the beveled end of another 30G needle and place the blunt end of the remaining needle into the other end of the PE10 tubing, with the plastic Luer-lock still attached.
- Fill a 100 µL glass syringe with sterile, artificial CSF (aCSF: 126 mM NaCl, 2.5 mM KCl, 1.25 mM NaH2PO4, 2 mM MgSO4, 2 mM CaCl2, 10 mM glucose, and 26 mM NaHCO3).
- Attach the syringe to the end of the line and fill it with aCSF until it reaches the tip of the beveled needle. It is important that the syringe is backfilled with aCSF and not air, as an air column is more prone to variable infusion volumes.
- For chronic experiments, leave the line filled with aCSF and skip Step 1.7.
- For acute experiments, place the syringe on an infusion pump and withdraw approximately 5 mm of air, which will prevent mixing. Afterwards, withdraw the total volume of tracer(s) that is desired for the experiment (20% extra is recommended due to dead space losses).
NOTE: The PE10 tubing should be long enough so that the air bubble does not enter the plastic cuff of the glass syringe when loading the tracer. For a typical experiment, the protocol uses 10 µL of bovine serum albumin conjugated to Alexa Fluor 647 (BSA-647) diluted in aCSF at 0.5%. - Confirm that the head plate fits into the head holder and that it is the right size for the mouse being used. Anatomical markers to ensure this are: the top border of the window aligns with the interocular line and the posterior border falls rostral to the occipital crest.
NOTE: Stainless-steel head plates can be sterilized and reused. Most cyanoacrylate mixtures can be removed with an acetone solution.
2. Surgical procedure
- Weigh and anesthetize the mouse (e.g. ketamine/xylazine; 100 mg/kg ketamine, 10 mg/kg xylazine; i.p.).
- Once the mouse no longer responds to a toe pinch, moisten the neck and head with sterile water and shave using clippers. Once the area is shaved, wipe the area with an alcohol swab again to remove any residual hair.
NOTE: Moistening the fur before clipping dramatically reduces the amount of hair in the imaging window after the incision. - Place the mouse in a stereotactic frame on top of a temperature-controlled pad and apply petroleum ophthalmic ointment to the mouse’s eyes to ensure they do not dry out.
- Clean the exposed skin with a chlorhexidine swab. After 2 min, remove the chlorhexidine with an alcohol wipe. Finally, apply an iodine solution which can be left to dry.
- Inject subcutaneous analgesia (0.25% Bupivacaine HCl) to the top of the skull and the neck.
- Starting on the part of the neck that covers the occipital crest, make a midline cut in the overlying skin and continue rostrally towards the interorbital line. Incise laterally to the border where the temporal muscle inserts into the skull. Remove all of the skin of the fusiform incision to expose both the frontal and parietal bones.
CAUTION: The retroorbital sinus lies caudal to the eyes and large branches of the posterior facial vein lie rostral to the pinna. Be careful when making the incision to spare these structures. If this occurs, stop bleeding by maintaining hemostasis with a sterile cotton swab for several minutes and continue. - Irrigate the skull with sterile saline and clean the surface using cotton swabs so that it is free of debris and hair since these will interfere with the image quality. Skull transparency is best preserved by leaving the periosteum and overlying fascia intact.
NOTE: If these structures are accidentally removed, the skull can become dry and opaque over time. Re-moisten with aCSF or use a mixture of paraffin oil and glycerol to reduce skull reflectance in acute experiments. - Proceed to inserting the cisterna magna cannula.
- After inserting the CM cannula, apply a mixture of dental cement with cyanoacrylate glue to the ventral side of the head plate around the border and place it on the skull so that the anterior border of the head plate aligns with the posterior tip of the nasal bone and the posterior border aligns with the anterior aspect of the interparietal bone, making sure that the sagittal suture (midline) is centered and straight relative to the window (Figure 1B).
- Fix the position of the head plate using a couple drops of glue accelerator. Fill any remaining gaps with the cement mixture and cure it with accelerator.
CAUTION: Make sure the cyanoacrylate does not come in contact with the mouse’s eyes or block the imaging window. - Glue the CM cannula to the head plate to ensure that these do not become detached during transport or when the mouse wakes up.
- For acute experiments, skip to Step 2.16.
- For chronic experiments, apply a thin layer of clear-drying cyanoacrylate glue to the exposed skull, being careful not to create bubbles as these will interfere with the imaging. The glue provides protection for the skull and will not interfere with the imaging. Make sure that the glue covers the exposed skull all the way to the skin at the incision border.
- Use a hemostat clamp to hold the aCSF-filled PE10 tubing 2-3 cm from the CM and cut the line with a high-temperature cautery tip. Once it is separated, flatten the melted PE10 tubing to seal the cannula.
CAUTION: Make sure not to release the clamp until after the cannula has been sealed and confirm there are no leaks in the tubing to prevent a CSF fistula. - Administer carprofen (5 mg/kg every 24 h for 3 days; intraperitoneal [i.p.] or subcutaneous [s.c.]) and return the mouse to a temperature-controlled, single-housed cage and allow it to recover for at least 24 h prior to imaging. Do not leave the mouse unattended until it regains sufficient consciousness to maintain sternal recumbency. Intact cranial windows remain stable for several weeks.NOTE: The chronic experiment can be paused here.
CAUTION: Some postoperative complications are: cephalohematoma/subgaleal hematomas, CSF fistula, and infection. - For acute experiments, place the mouse into the head holder using the head plate so the skull is in a fixed position. Make sure to check the anesthesia level and place a heating pad under the mouse. The mouse is now ready to be taken to the macroscope.
CAUTION: Carefully transport the mouse together with the infusion pump on a cart. If the CM cannulation becomes dislodged, it will cause a drop in intracranial pressure and any CSF leaks will alter the experimental results.
3. Preparing the mouse for imaging
NOTE: The protocol varies depending on whether the imaging experiment will be performed on an anesthetized (start at Step 3.1) or awake (start at Step 3.2) mouse.
- Anesthetized Mice
- Place the head holder on the stage of the macroscope, making sure there are no kinks in the line from the syringe pump to the CM cannula and that it is not taut since this could affect the tracer infusion.
- Observe respiratory rate and pink coloration of the mucous membranes, indicating good oxygenation. Inject saline subcutaneously to secure hydration level if necessary. Check to make sure the animal is sufficiently anesthetized and re-dose if needed.
- Turn on the macroscope camera and light-emitting diode (LED) and start LIVE mode.
- Confirm the magnification of the imaging field so that the nasofrontal suture at the top of the field and the lambdoid suture at the bottom can clearly be visualized, with the sagittal suture parallel and centered to the middle of the image (Figure 1C). Once in place, secure the head holder to the macroscope stage with tape.
- Focus the macroscope on the exposed skull. Despite macroscopes having a relatively large depth of field, the curvature of the mouse’s skull only allows for a specific area to be in focus. Best results are obtained when the focal plane is located on the lateral sides of the parietal bones posterior to the coronal sutures.
NOTE: This is the location of the middle cerebral arteries (MCA), where most CSF inflow occurs (Figure 1D, E).
- Awake Mice
- Prior to the imaging session, let the animals recover for at least 24 h from the head plate surgery. Longer recovery periods (5-7 days) are also recommended. During this time, train the mouse to be head fixed on the stage in the restraint tube for 0.5-1 h per day for the duration of the recovery period.
NOTE: Habituation allows the mouse to be attached to the head holder without anesthesia and reduces stress and anxiety during the actual experiment. If this is not feasible and anesthesia does not interfere with the experiment, an induction dose of an inhaled anesthetic (e.g., isoflurane 2% at 1-2 L/min O2 flow rate) can be used to quickly attach the mouse to the head stage. - Once the mouse is fixed to the head holder and in the restraint tube, follow Steps 3.1.1-3.1.5.
- Prior to the imaging session, let the animals recover for at least 24 h from the head plate surgery. Longer recovery periods (5-7 days) are also recommended. During this time, train the mouse to be head fixed on the stage in the restraint tube for 0.5-1 h per day for the duration of the recovery period.
4. Infusion of fluorescent CSF tracers
- Acute CM Cannulation
- Since the tracer was already loaded into the cannula before being placed in the cisterna magna in Step 1.6, set the infusion pump to the desired rate and volume. Infusion paradigms routinely used are 5-10 µL at 1-2 µL/min, but these parameters can be adjusted depending on the particular experiment, or the size and age of the animal.
- Chronic CM Cannulation
- Prior to beginning the imaging session, follow Steps 1.2-1.7 for acute experiments to prepare the infusion line to deliver the tracers.
- Once the line is prepared, using a hemostat clamp cut the sealed end of the chronic CM cannula. Take the needle from the line prepared in Step 4.2.1 and gently insert it into the cannula. Release the clamp and using the syringe pump, advance the CSF tracer at the desired infusion rate (e.g., 2 µL/min) for the experiment until the tracer reaches the implanted needle in the CM.
CAUTION: If the needle pierces through the tubing when connecting the line, remove the needle, cut the pierced segment and repeat this step. Any tear in the PE10 tubing will cause a leak and affect the results of the experiment.
5. Setting up the Imaging Session
- Based on the fluorescent tracer being infused, determine the excitation wavelength and the exposure time for each channel. Choose the shortest exposure time necessary to visualize the tracer in order to maximize the temporal resolution of the time-lapse imaging. This exposure time will be used for all subsequent experiments aiming to compare CSF transport between different animals.
NOTE: One tip is to use the tracer in the CM line to adjust the exposure time. Although this is a useful first approach, this should be optimized over time. - Choose the duration of the experiment and the intervals at which the images will be acquired. Experiments normally last between 30-60 min depending on what phase of glymphatic transport is of interest. Frame rates of 1 frame/min and faster are sufficient for most experiments.
- Set the file name and the saving directory.
- If the imaging will be collected in addition to simultaneous acquisition of other variables (e.g., electrocardiogram, arterial blood pressure, electrophysiology), the macroscope and pump can be programmed to be triggered with data acquisition software. Check that the triggering function on the macroscope is correct before moving to the next step.
6. Transcranial optical imaging experiment
- Start the tracer infusion and the imaging at the same time.
- Routinely check the CM cannula and the PE10 tubing for any signs of a leak. If there is any tracer leaking at the CM, the results from this experiment must be excluded.
NOTE: If the tracer starts to accumulate in the cerebellum and does not travel the glymphatic pathway of the middle cerebral arteries (MCA), it is likely that the CM cannula was injected into the cerebellum. This data should not be included. - For acute experiments, after completion of the experiment, remove the mouse from the microscope and check that it is still adequately anesthetized. Quickly decapitate the mouse and harvest the brain tissue. Immersion-fix the brain in 4% paraformaldehyde (PFA) overnight at 4 °C.
- For chronic experiments, once the imaging is completed, remove the CM line from the cannula, flush with sterile aCSF and reseal the CM cannula with a high-temperature cautery tip. Remove the mouse from the head stand and return it to its cage. Repeat this process until further imaging is not required and then follow Step 6.3.
Toegang beperkt. Log in of start een proefperiode om deze inhoud te bekijken.
Resultaten
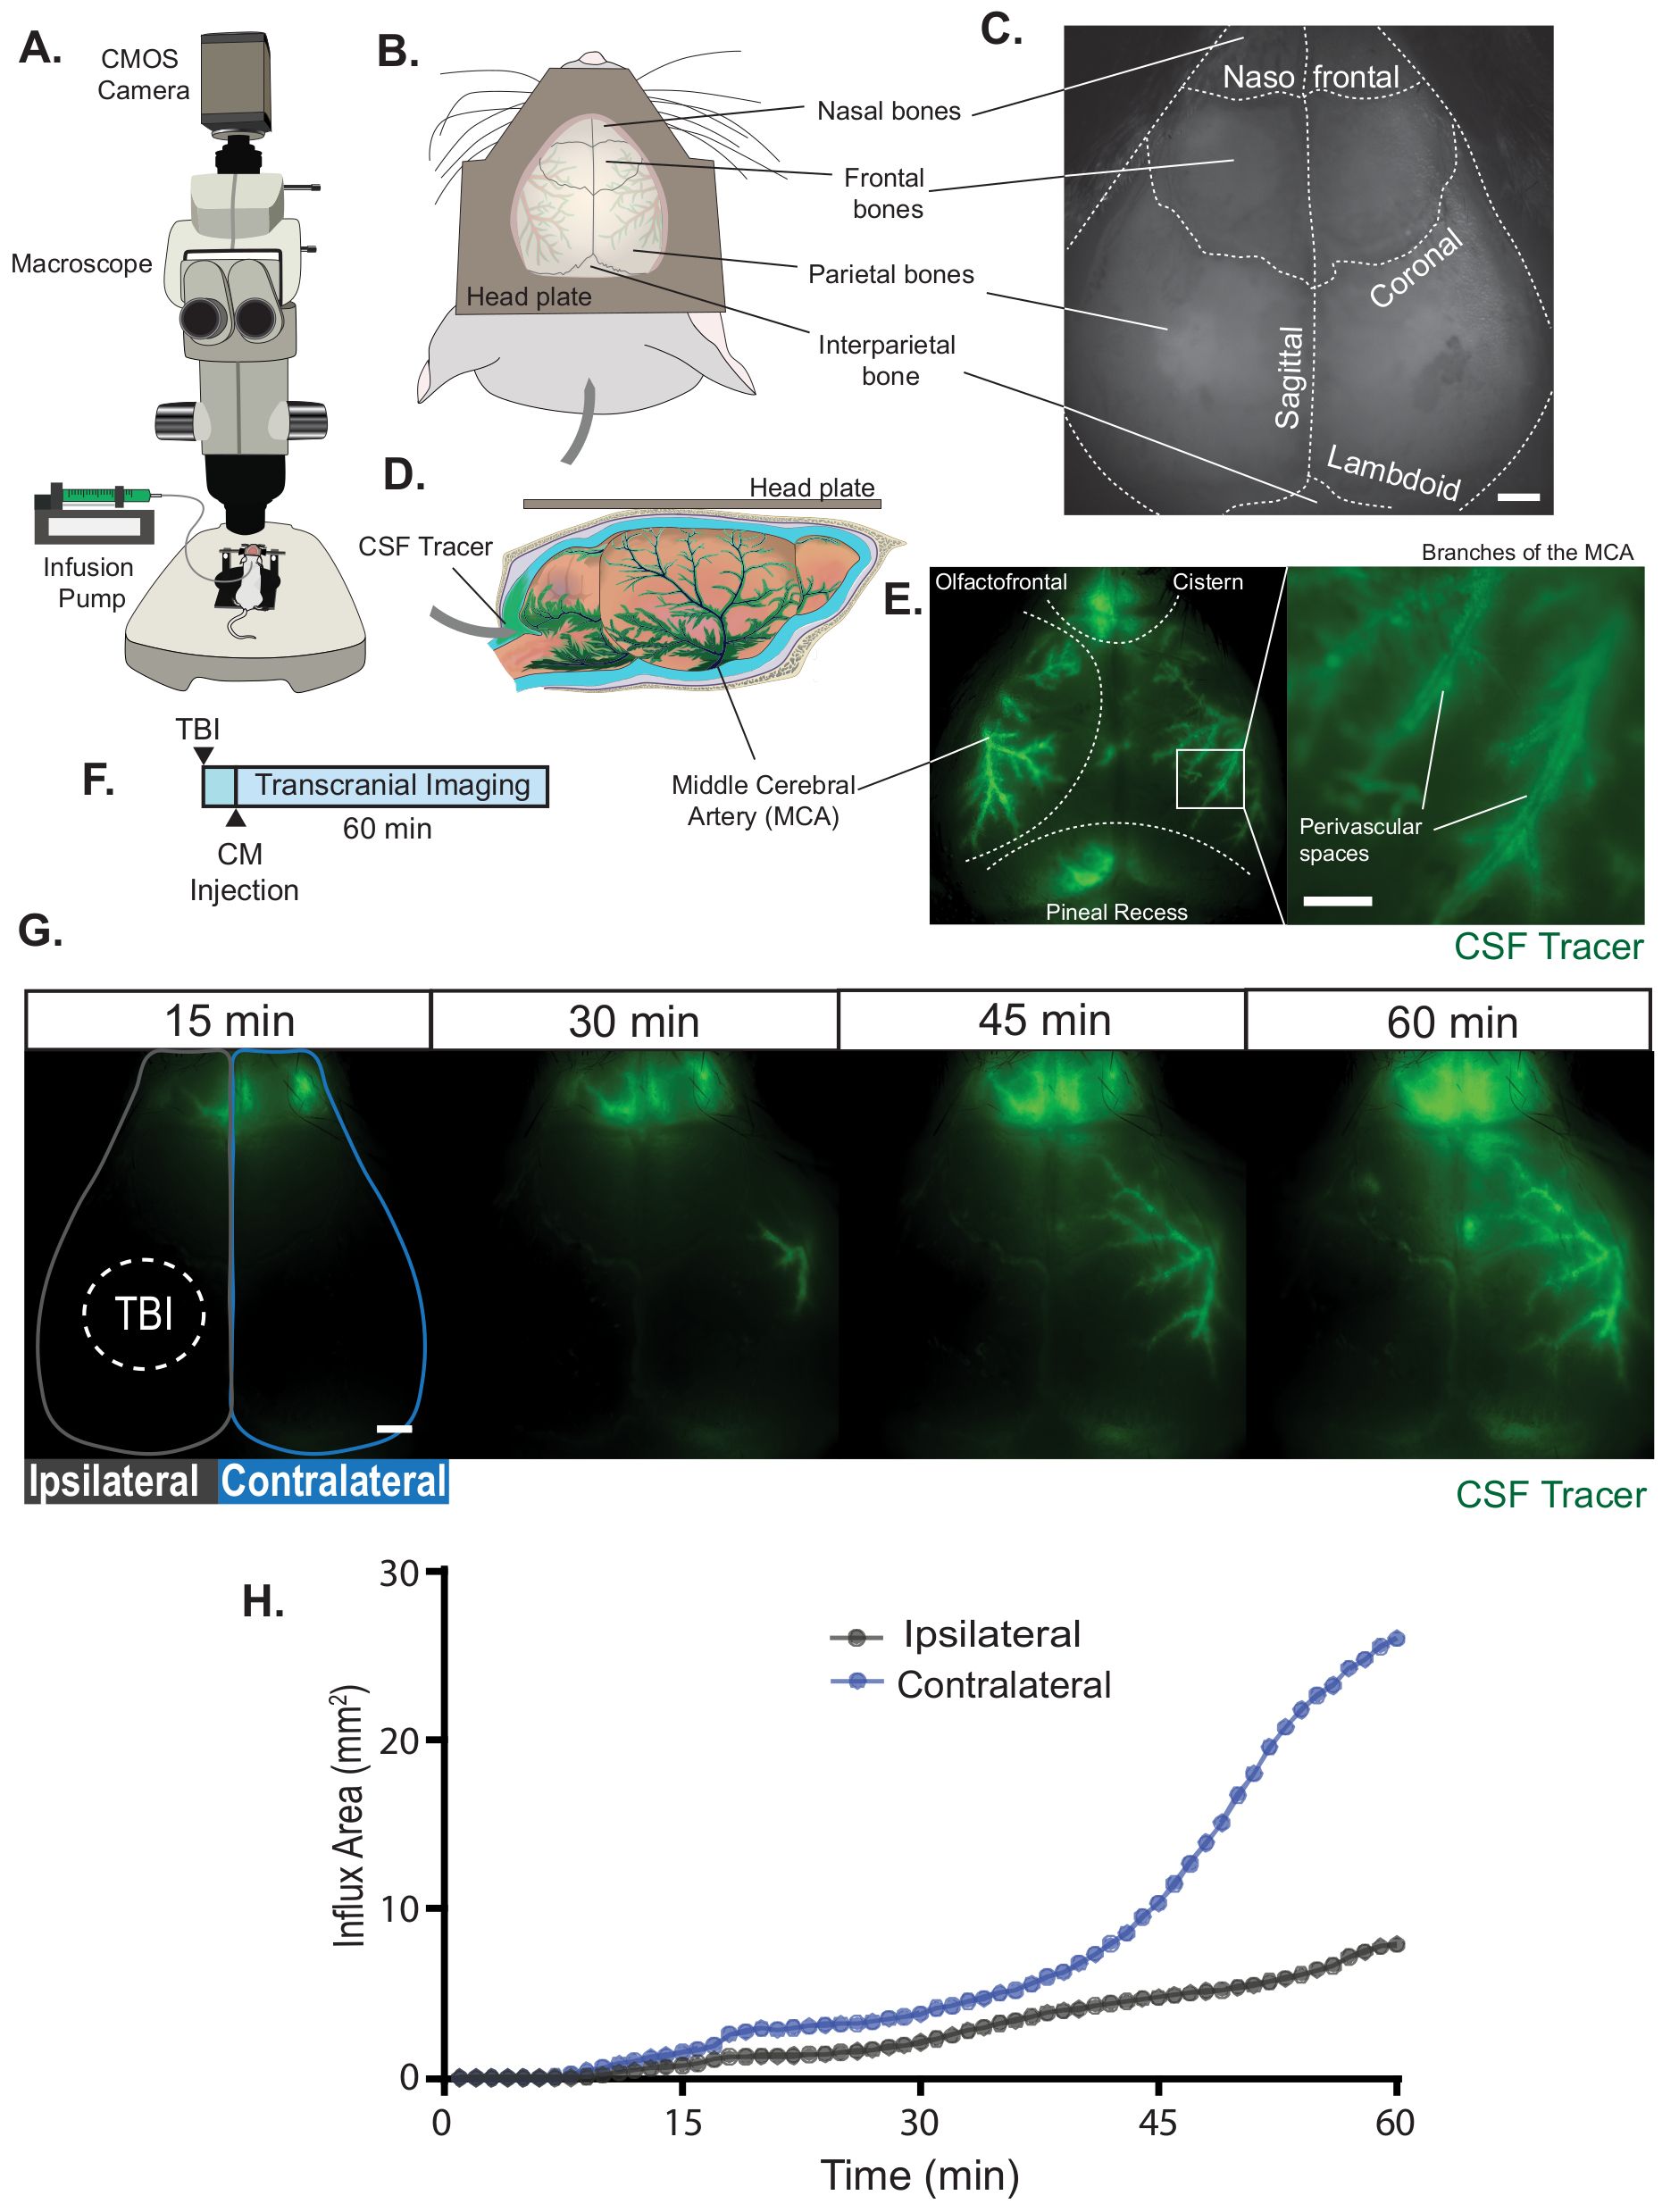
Figure 1. Transcranial macroscopic imaging. (A) Schematic of the macrosco...
Toegang beperkt. Log in of start een proefperiode om deze inhoud te bekijken.
Materialen
| Naam | Bedrijf | Catalogusnummer | Opmerkingen |
|---|---|---|---|
| 0.25% Bupivacaine HCl | University of Rochester Vivarium | ||
| 100 µL Gastight Syringe Model 1710 TLL, PTFE Luer Lock | Hamilton Company | 81020 | |
| A-M Systems Dental Cement Powder | Fisher Scientific | NC9991371 | |
| Carprofen | University of Rochester Vivarium | ||
| Chlorhexidine | Prevantics | B10800 | |
| CMOS Camera | Hammamatsu | ORCA Flash 4.0 | |
| Head Plate | University of Rochester | No catalog # | Custom made at the machine shop at the University of Rochester |
| High-Temperature Cautery | Bovie Medical Corporation | AA01 | |
| Insta-set Accelerator | Bob Smith Industries | BSI-151 | |
| Isoflurane - Fluriso | Vet One | 502017 | University of Rochester Vivarium |
| Ketamine | Strong Memorial Hospital Pharmacy | ||
| Krazy Glue | Elmer's Products, Inc | No catalog #, see link in comments | https://www.amazon.com/Krazy-Glue-KG48348MR-Advance-Multicolor/dp/B000BKO6DG |
| Micropore Surgical tape | Fisher Scientific | 19-027-761 | |
| Paraformaldehyde | Sigma-aldrich | P6148 | |
| PE10 - Polyethylene .011" x .024" per ft., 100 ft. continuous | Braintree Scientific | PE10 100 FT | |
| Pump 11 Elite Infusion Only Dual Syringe | Harvard Apparatus | 70-4501 | |
| PURALUBE VET OINTMENT | Dechra | ||
| Puritan PurSwab Cotton Tipped Cleaning Sticks | Fisher Scientific | 22-029-553 | |
| Research Macro Zoom Microscope | Olympus | MVX10 | |
| Simple Head Holder Plate (for mice) | Narishige International USA Inc | MAG-1 | |
| Single-use Needles, BD Medical | VWR | BD305106 | |
| Sterile Alcohol Prep Pads | Fisher Scientific | 22-363-750 | |
| Tunable LED | PRIOR Lumen 1600-LED | ||
| Xylazine | University of Rochester Vivarium |
