This video demonstrates the screening of cyclic di-GMP modulators using genetically modified bacteria that express green fluorescent protein (GFP) under the control of a c-di-GMP-sensitive promoter. Fluorescence is measured in a multi-well plate containing different test compounds. Compounds that inhibit c-di-GMP production lead to reduced fluorescence. The data is then analyzed to identify potential modulators of c-di-GMP signaling in bacteria.
A subscription to JoVE is required to view this content. Sign in or start your free trial.
Method Article
Screening of Cyclic di-GMP Modulators Using Bacteria Expressing a Fluorescent Reporter Protein
472 views
⸱
October 30th, 2025
In This Article
Abstract
Protocol
1. Generation of Green Fluorescent Protein (GFP) Tagged cyclic di-GMP (c-di-GMP) Reporter Pseudomonas aeruginosa Strain
- Inoculate 5 ml of lysogeny broth (LB) medium with a single colony of P. aeruginosa and incubate overnight at 37 °C with shaking at 200 rpm.
- Transfer 2 ml of the overnight culture into 200 ml of fresh LB medium in a 1 L flask and incubate at 37 °C with shaking at 200 rpm.
- Monitor optical density at 600 nm (OD600) every 30 min by taking a 1 ml sample from the flask and examining it using a spectrophotometer.
- When the OD600 reaches between 0.3 - 0.5, place 40 ml of the culture into a 50 ml conical centrifuge tube.
- Pellet the cells by centrifuging at 8,000 rpm for 10 min at 4 °C, discard the supernatant, and resuspend the cells in 40 ml of ice-cold, sterile, 300 mM sucrose solution.
- Pellet the cells a second time by centrifuging as described in step 1.5 and resuspend in 20 ml of ice-cold, sterile, 300 mM sucrose solution.
- Pellet the cells a final time by centrifuging as described in step 1.5 and resuspend in 400 µl of ice-cold, sterile, 300 mM sucrose solution.
Note: The cell density at this point should be approximately 1 x 10¹¹ colony-forming units per milliliter (CFU/ml). - Chill the cells on ice for 30 min, after which they are ready for electroporation.
- Add 1 µl of a 0.2 µg/µl pCdrA::gfpC plasmid solution to 40 µl of P. aeruginosa electro-competent cells prepared above in a 1.5 ml microcentrifuge tube that has been pre-chilled on ice. Mix the suspension and transfer it into a pre-chilled, 2 mm electrode gap, electroporation cuvette.
- Remove moisture on the outside of the cuvette with tissue paper and place the cuvette into the sample chamber of the electroporator. Pulse with a voltage of 2.5 kV, capacitance of 25 µF, and resistance of 200 Ω.
- Remove the cuvette and add 1 ml of LB medium. Then, transfer the cells to a sterile 1.5 ml microcentrifuge tube and incubate for 2 hr at 37 °C with shaking at 200 rpm.
- Spread 10 µl, 50 µl, and 100 µl aliquots of the culture onto sterile LB-agar plates supplemented with ampicillin (at a concentration of 100 µg/ml), and incubate the plates at 37 °C overnight.
- Confirm the GFP expression (excitation at 485 nm, emission at 520 nm) by examining the plate under a fluorescence microscope with a standard GFP channel, and pick a single colony to inoculate 5 mL LB. Incubate overnight as described in step 1.1. Mix 0.5 ml of the overnight culture with 0.5 ml 50% glycerol in a 2 ml screw top tube and store at -80 °C.
2. Preparation of the Starter Culture for Inoculation
- Two days before the screen, plate the P. aeruginosa strain (containing the pCdrA::gfpC plasmid) from the -80 °C stock onto an LB-agar plate (supplemented with ampicillin at a concentration of 100 µg/ml) by gently spreading the bacteria over the plate using a sterile inoculation loop. Incubate the plate overnight at 37 °C.
- The evening before the screening, inoculate a single colony of P. aeruginosa from the plate into 10 ml of LB medium (supplemented with ampicillin at a concentration of 100 µg/ml) in a tube and incubate the pre-culture overnight at 37 °C with shaking at 200 rpm.
- On the day of the screen, prepare a subculture from the overnight pre-culture by diluting it first with fresh LB medium to an OD600 of 1.0 and then further diluting with 5% LB to an OD600 of 0.04 (1:25 ratio).
Note: The total volume of the inoculated medium depends on the number of plates to be tested. 5% LB is made by diluting 100% LB with phosphate-buffered saline (PBS) to the required concentration. Importantly, the media (5% LB) allows constitutive activation of pCdrA::gfpC in P. aeruginosa. - Add a sterile magnetic stirrer bar into the container and stir the culture at minimal speed on a magnetic stirrer for 30 min at room temperature, allowing the bacteria to acclimate to the media before they are dispensed into 384-well plates.
3. Inoculation and Incubation of the 384-well Plates Containing Small Molecules
Note: Sterility and good aseptic techniques are paramount to the following steps.
- To prepare the positive control (100% inhibition), add 20 µl tobramycin sulfate (25 mg/ml) to 10 ml (adequate for up to 12 plates) of the subculture prepared in Step 2.3 and mix gently. Pipette 40 µl of the positive control culture into wells A23-P23 (Figure 1).
- To prepare the negative control (0% inhibition), add 30 µl dimethyl sulfoxide (DMSO) to 10 ml (adequate for up to 12 plates) of the subculture prepared in Step 2.3 and mix gently. Pipette 40 µl of the negative control culture into wells A24-P24 (Figure 1).
- For each of the plates stamped with the small molecules, inoculate a volume of 40 µl of the diluted overnight cultures (described in Step 2.3) into the wells A1-P22 (Figure 1).
Note: This can be achieved using a liquid handler robot. Due to the heterogeneous properties of bacterial cultures, it is important to maintain a continuous and moderate agitation to keep bacteria consistently distributed in the media while dispensing. To do this, keep stirring the acclimatized culture from step 2.4 magnetically during dispensing. - Seal the plates with an air-permeable cover seal and incubate for 6 hr at 37 °C.
Note: The air-permeable seal is critical to maintain unchanging conditions across all 384 wells and to circumvent the potential development of oxygen gradients across the plate.
4. Measurement of Growth (OD600) and Intracellular c-di-GMP Level (GFP)
- Approximately 30 minutes before spectrophotometric measurement, pre-warm the plate reader to 37 °C to avoid condensation.
- Gently remove the air-permeable cover seal before reading. Measure the optical density at a wavelength of 600 nm with a setting of 10 flashes per well and a settling time of 0.2 sec.
- Prior to measuring fluorescence, make an automatic gain and focal adjustment based on well A24 (negative control) and set the gain target value at 75% (Figure 1).
- From the plate reader control software, click on start measurement and click on the ''Focus and Gain Adjustment/Plate IDs'' tab.
- Select ''Focus Adjustment'' and ''Channel A'' on the right on the window.
- Select ''Gain Adjustment'' and ''Selected well'', and type in ''75'' as the ''Target value''. Finally, pick well A24 in the plate layout before clicking on ''Start Adjustment''. Once the adjustment is carried out, click on ''Start measurement''.
- Measure the fluorescence from the GFP reporter at an excitation/emission maxima of 485/520 nm with a setting of 10 flashes per well and a settling time of 0.2 sec.
- Collect data from all plates examined.
Note: Data readings are automatically saved as the default by the plate reader control software.- View readings by clicking on the "Mars" icon within the control software to open the statistical analysis package.
- Retrieve data by "double-clicking" on the plate number of interest to access the data for analysis.
Access restricted. Please log in or start a trial to view this content.
Results
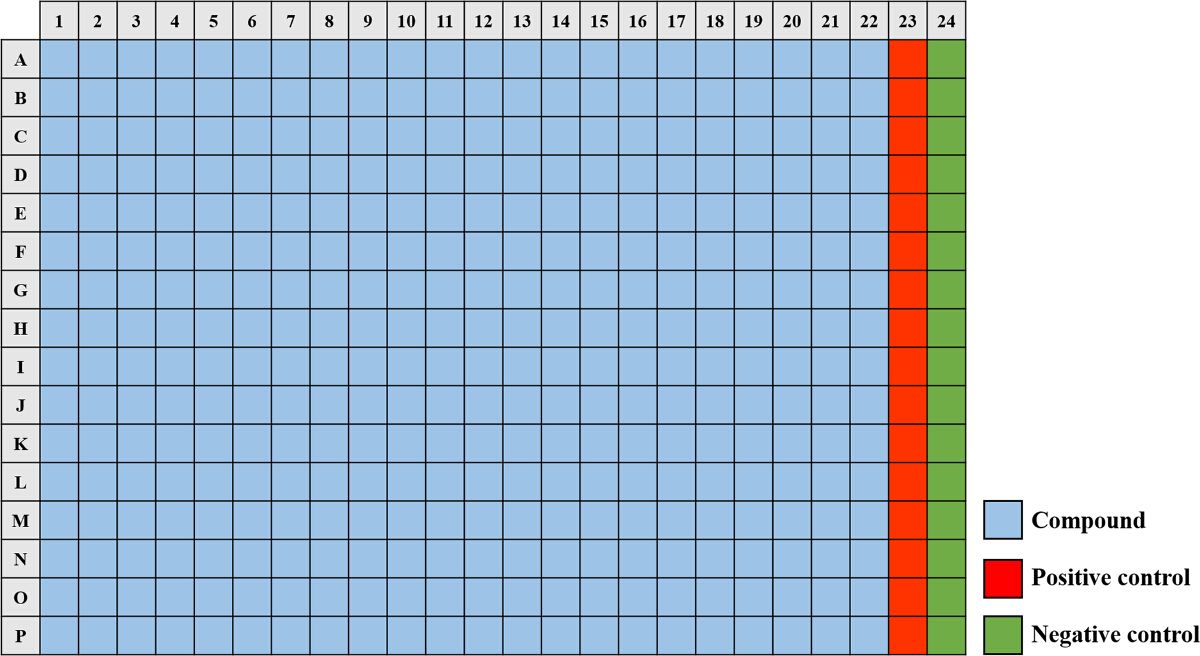
Figure 1. A 384-well Plate Map Used for the Small Molecule Screening Assay. The compounds from t...
Access restricted. Please log in or start a trial to view this content.
Materials
| Name | Company | Catalog Number | Comments |
|---|---|---|---|
| Lysogeny Broth (Lennox) | Sigma Aldrich | L3022-1KG | |
| Sucrose | Sigma Aldrich | S0389-1KG | |
| Lysogeny Broth with Agar (Lennox) | Sigma Aldrich | L2897-1KG | |
| Ampicillin sodium | Sigma Aldrich | A0166-25G | |
| Glycerol | Sigma Aldrich | G5516-1L | |
| Phosphate Buffered Saline, pH 7.4 | Life technologies | 10010-056 | |
| Tobramycin sulfate | Sigma Aldrich | T1783-100MG | |
| Dimethyl Sulfoxide (DMSO) | Sigma Aldrich | 276855-250ML | |
| Genesys 10S UV-Vis spectrophotometer | Thermoscientific | 840-208100 | |
| 2 mm gap electroporator cuvette | Bio-Rad | 1652092 | |
| BioRad GenePulser XCell electroporator | Bio-Rad | 1652662 | |
| Leica Fluorescent Stereomicroscope | Leica Microsystems | MZ16FA | |
| BRAND magnetic stirring bar, PTFE, cylindrical with pivot ring (sterilize by autoclaving before use) | Sigma Aldrich | Z328952-10EA | |
| 384-well, white-walled, clear-bottom plates | Greiner | 781098 | |
| Multidrop Combi reagent dispenser | Thermo Scientific | 5840300 | |
| Multidrop Combi tubing | Thermo Scientific | 24073290 | |
| VIAFLO II 16-channel electronic pipette | Integra Biosciences | 4642 | |
| 100 ml sterile disposable reagent reservoirs | Fisher Scientific | 12399175 | |
| AeraSeal air-permeable membranes | Sigma Aldrich | MKBQ1886 | |
| Pherastar plate reader (Software version: 4.00 R4, Firmware version: 1.13) | BMG Labtech | Pherastar FS |
