Method Article

Quantification of Colony-Forming Units of Gut-Associated Bacteria in Drosophila Flies

October 30th, 2025

In This Article

Abstract

Loading...
$$\rightleftharpoonup{xx}$$ $$\longleftharp{xx}$$, $$\longrightharp{xx}$$,

Source: Dodge, R., et al. Fast Colony Forming Unit Counting in 96-Well Plate Format Applied to the Drosophila Microbiome. J. Vis. Exp. (2023)

This video demonstrates the quantification of colony-forming units (CFUs) of gut-associated bacteria in Drosophila flies using a serial dilution and plating approach. Homogenized fly samples containing gut bacteria are serially diluted, plated on agar, and incubated to allow colony growth. Images of the plates are then analyzed using software to align, segment, and count colonies in each spot, enabling accurate CFU quantification.

Protocol

Loading...
$$\rightleftharpoonup{xx}$$ $$\longleftharp{xx}$$, $$\longrightharp{xx}$$,

1. Homogenizing flies individually in a 96-well PCR plate

  1. Prepare bead-beater plates in advance.
    1. Pour 0.5 µm glass beads (see Table of Materials) onto the bead measuring tray. Spread the beads on the tray so that all the wells are full and level, and then brush off excess beads into a conical tube to recover them.
    2. Place a semi-skirted polymerase chain reaction (PCR) plate (see Table of Materials) upside down on the measuring tray and align it with the wells by fitting it into the indentation on the tray. Then, quickly flip it over to transfer the beads.
    3. Remove excess beads from the PCR plate surface and cover it with foil. Inspect the PCR plate to ensure that all the wells contain beads. Use a weigh scoop if required to add beads to a single well. If static electricity is causing beads to stick on the plate surfaces, wipe or spray the back of the measuring tray and PCR plate with 70% ethanol.
    4. Cover with aluminum foil. Many plates can be prepared in this way and then autoclaved and stored for later use. When ready for use, add 100 µL of phosphate-buffered saline (PBS) to each well using the 96-channel pipettor (see Table of Materials).
  2. Surface-sterilize the microbe-colonized flies with 70% ethanol before homogenization.
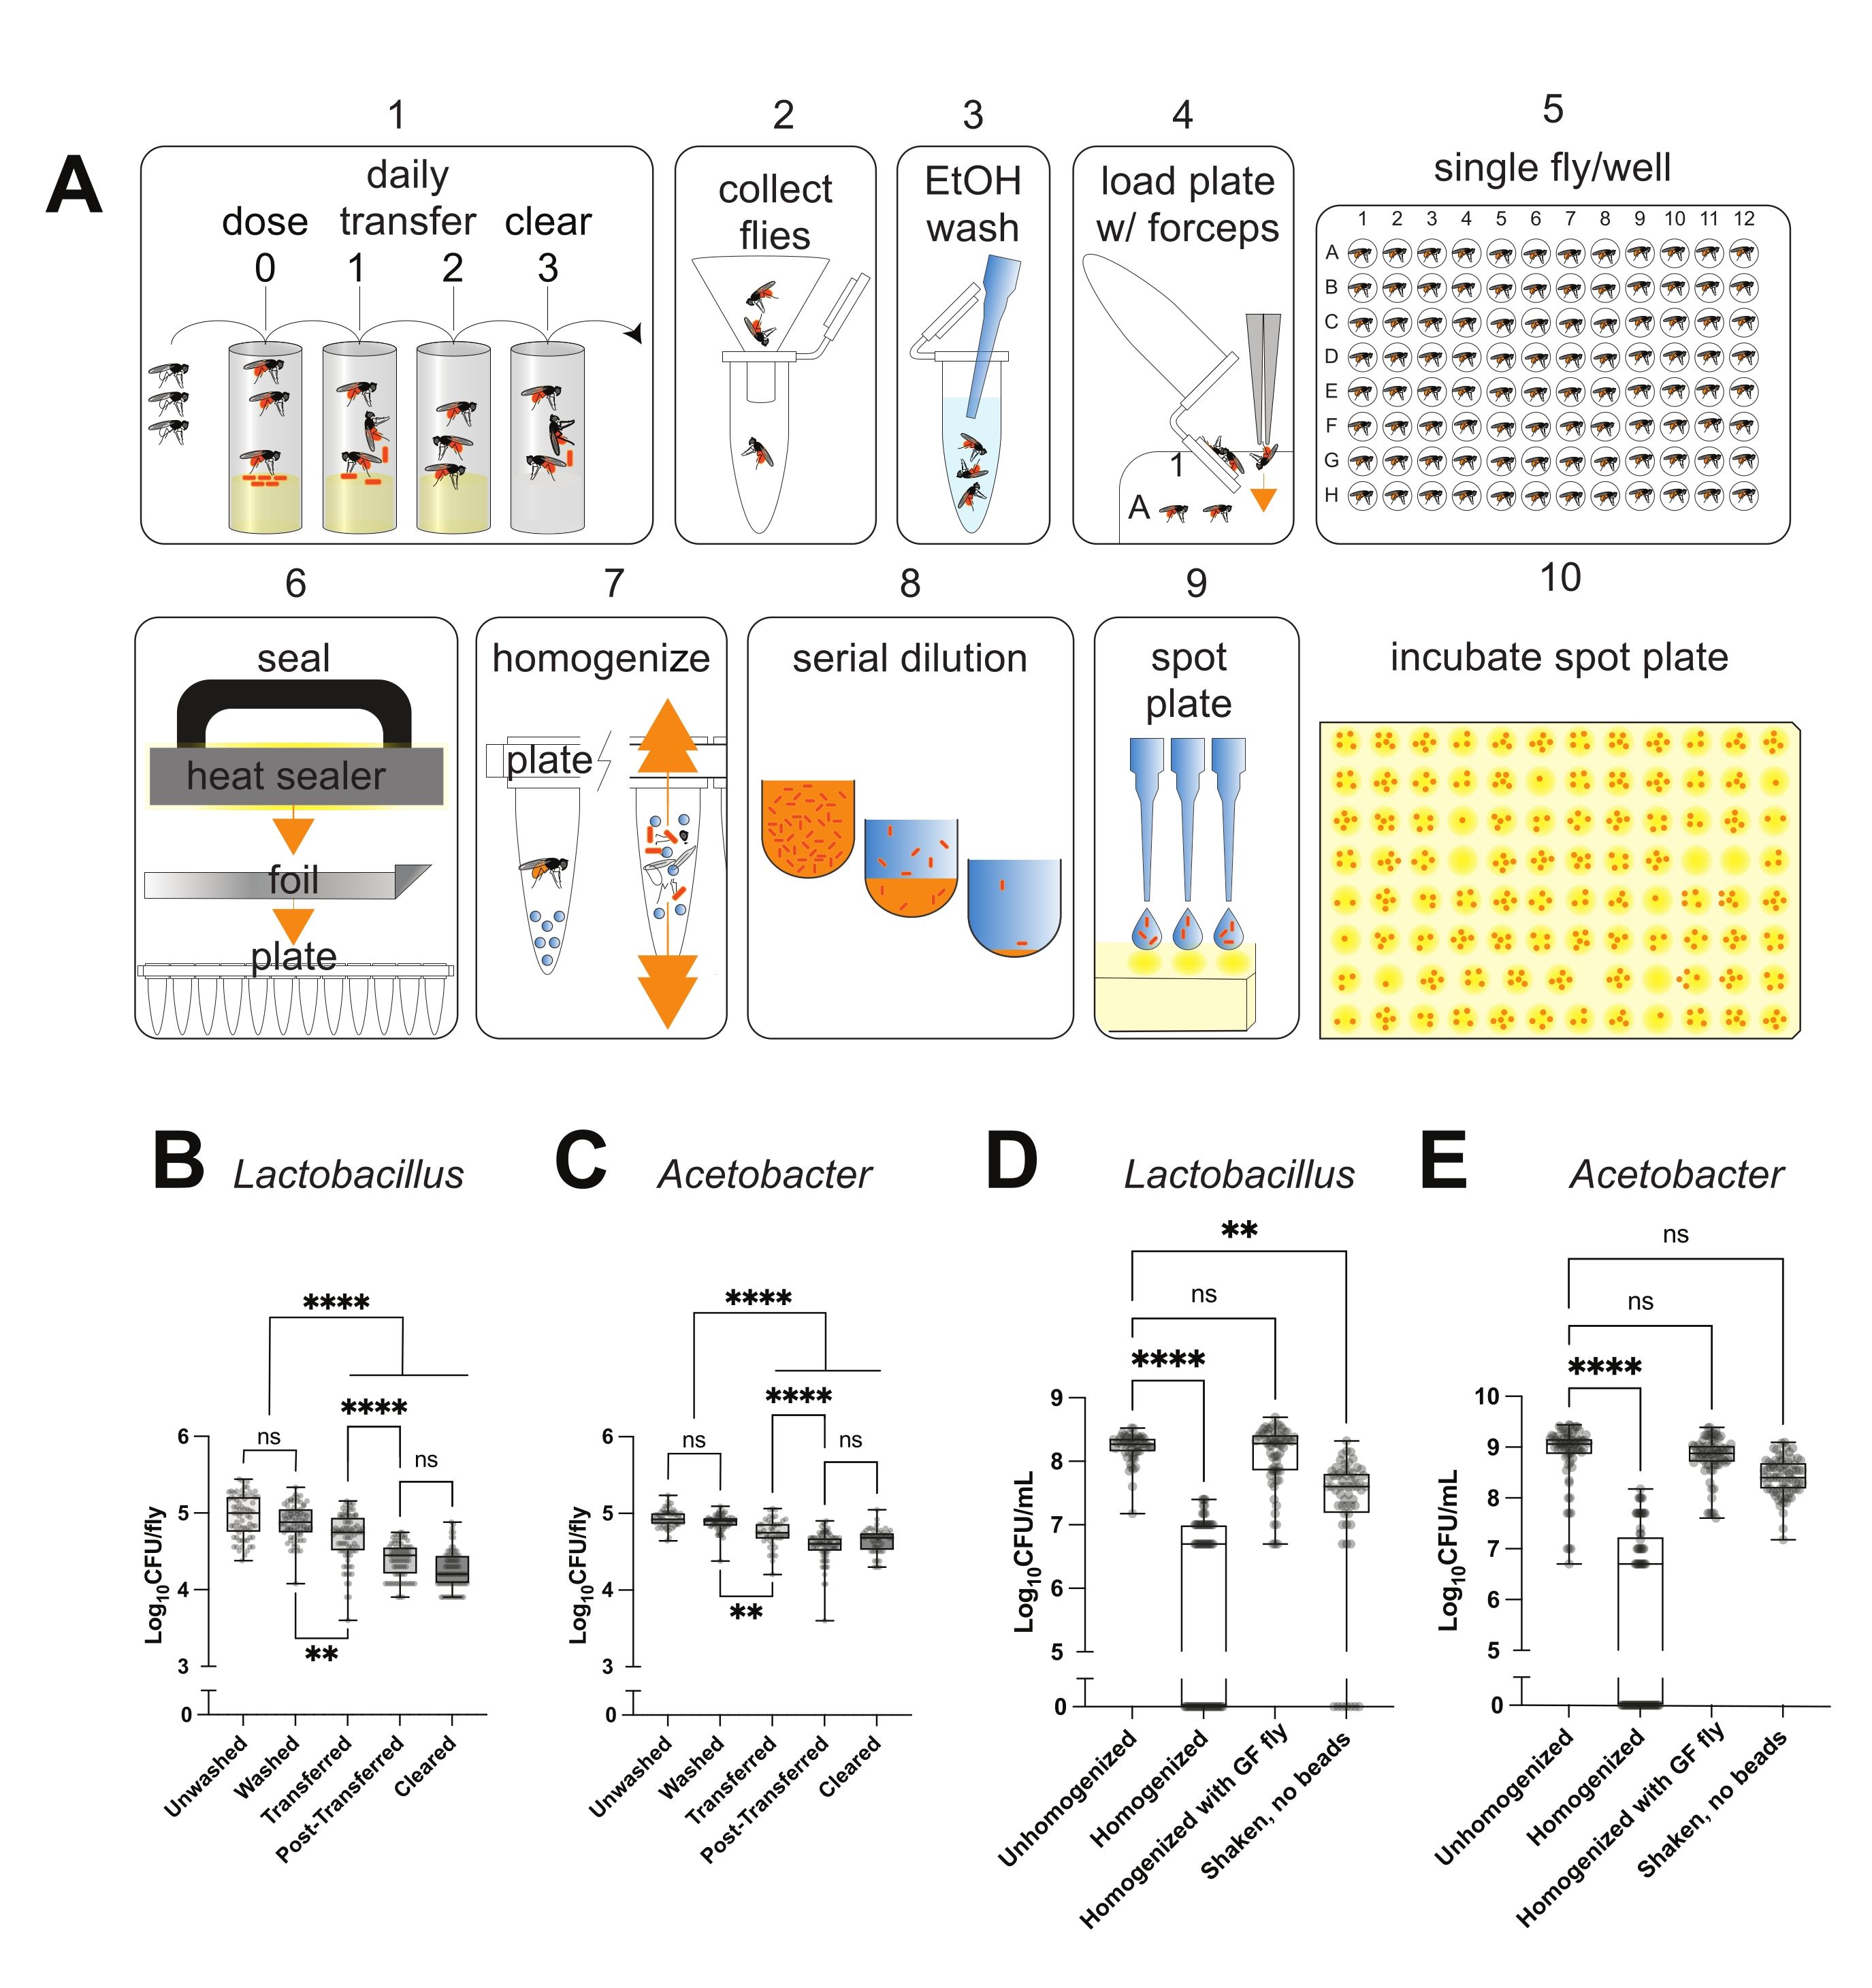
    1. Anesthetize the flies with 100% CO2 for 5 s. Transfer anesthetized flies from the vial into a 1.5 mL microcentrifuge tube using a small funnel (Figure 1A-2). In this study, 25 flies were typically added per tube.
    2. Immediately spray ~1 mL of 70% ethanol into the tube, close the tube, and mix by inversion for 10 s. Then, aspirate the ethanol with a P1000 pipette, being careful not to aspirate any flies. Repeat once again with ethanol, then twice with sterile PBS (Figure 1A-3).
  3. After the final PBS wash, close the tube and, with the cap side down, tap it hard a few times on the bench so the flies go into the cap.
  4. Open the tube and dispense flies into the wells using forceps (Figure 1A-4). Place one fly in each well (Figure 1A-5). Keep the plate on ice while loading to keep the flies anesthetized.
  5. Seal the plate using Thermal Bond heat-sealing foil (see Table of Materials).
    1. First, remove any stray beads that are close to the wells, as these can cause leakage in the foil seal. Make sure the dull side of the foil is oriented down on the plate and the shiny side up toward the heat sealer. Press the heat sealer (see Table of Materials) down firmly for 5 s (Figure 1A-6). Burnish with the hand applicator (see Table of Materials) to secure the foil.
      NOTE: Poor sealing is a cause of sample loss.
  6. Secure the plate in the plate shaker. Homogenize for 5 min (Figure 1A-7). Spin down the bead plate for 30 s in a mini-plate spinner (see Table of Materials) at 350 x g to remove liquid from the sealing foil.
  7. Remove the foil while holding the plate so as not to splash droplets of fly homogenate out of the wells.

2. Serial dilution of fly homogenate and spotting onto CFU plates

  1. Place four rectangular de Man, Rogosa, and Sharpe (MRS) agar growth plates (see Table of Materials) in the biosafety cabinet and remove their lids. In this protocol, MRS agar was used for the growth of L. plantarum. Leave these plates to dry for at least 10 min (20 min if they are freshly poured or cold from storage).
    NOTE: If the plates are wet, the droplets from the 96-well plate will run together and ruin the counts.
  2. Prepare three dilution plates by adding 100 µL of PBS to each well of a sterile 96-well plate using a 96-channel pipettor. Load a rack of P20 tips onto the 96-channel pipettor.
  3. Make a 1:10 dilution by aspirating 11.1 µL of homogenate from the sample plate prepared in section 1 (Figure 1A-8). Be sure to draw from the middle of the wells rather than the bottom of the wells because the fly homogenate and glass beads will clog the pipettes. The beads sink, and the fly particulates float, leaving the middle layer mostly clear.
  4. Dispense the 11.1 µL into the first dilution plate, which already contains 100 µL of sterile PBS per well. Keep the dilution plate on the plate shaker for 10 s at 600 revolutions per minute (rpm). Mix again by pipetting up and down for five cycles. Transfer 11.1 µL from the first dilution plate to the second dilution plate, and repeat the mixing steps for the next two dilution plates.
  5. Perform dilution series plating as described below.
    1. Retrieve the growth plates from the biosafety cabinet.
    2. Starting with the most dilute plate, spot 2 µL from each well onto the agar plates using the 96-well pipettor (Figure 1A-9).
      1. Lower the pipettor head slowly onto the plate, taking care not to stab into the agar. Examine the plate carefully and ensure all the spots have been dispensed; if not, manually add 2 µL to the appropriate position. Check that the liquid spots quickly soak into the agar and do not run together.
      2. If the spots run together, dry a new set of fresh agar plates for a longer period and redo the spotting. If there are multiple plate types (e.g., different media or with antibiotics), spot those too. Dispense any remaining solution back into the dilution plate and proceed to the next higher concentration.
        NOTE: When spotting dilutions, mix the next dilution five times to ensure that the contents of the pipette tips are cleared of the previous dilution. The dilution plates can be stored for >8 h at 4 °C without affecting the colony counts.
  6. Repeat the plating process as described in step 2.5 for the remaining dilution plates, progressing from the most dilute to the most concentrated until the plate with the original homogenate.
  7. When all the liquid has been absorbed into the agar, invert the plates and place them in the incubator (Figure 1A-10). For Lactiplantibacillus and Acetobacter from Drosophila, the optimal temperature is 30 °C on MRS media. Incubate until the colonies have reached optimal size: colonies are large enough to clearly see them but not so large that they merge or interfere with one another's growth (see the representative results for quantification of the optimal size).
    NOTE: Optimal growth conditions are strain-dependent and must be determined empirically. For Lactiplantibacillus from Drosophila, the optimal time of incubation is 26 h to 30 h on MRS agar. For Acetobacter from Drosophila, the optimal time of incubation is 30 h to 48 h on MRS, depending on the strain.
  8. After incubation, store the plates at 4 °C if required until ready for counting.

3. Quantification of colony-forming units (CFUs)

  1. Quantify CFUs by photographing the plates and then counting the colonies using automated software, as detailed below. If the plates were stored at 4 °C, first allow them to reach room temperature so there is no condensation on the plates, which produces glare.
  2. Organize the plates in a logical sequence and keep them in that order while photographing — it makes it easier to name the files. Orient all the plates so that A1 is in the upper left corner for all the plates. It is recommended to label the A1 corner with a unique ID to ensure no mix-up of the photos. Stack each dilution series in order.
  3. Remove the plate lid and place the plate on the stage with A1 oriented in the correct corner. The plate photo box is optimized for photographing these tray plates and includes lighting and filter options to image fluorescent colonies.
  4. Image the plates. Use the camera (see Table of Materials) with manual settings to achieve a consistent exposure level between plates. A long focal length setting is recommended to minimize perspective distortion. Capture the photo using a remote shutter to minimize blur from camera shake.
  5. Transfer the images to a computer and rename them, including the experiment name, the type of media, the dilution factor, and any other pertinent details. Some operating systems (see Table of Materials) have a useful batch renaming feature in Finder by right-clicking on a selection of files.

4. Automated colony counting using the Count-On-It suite

  1. Crop the images using the provided Croptacular plugin for ImageJ. This plugin helps to divide the image into an orderly array of subregions (e.g., 8 x 12 for a 96-well plate). The subregions will be counted individually.
    1. Organize the images to be processed for quantification into a folder. Choose filenames that distinguish the plates, as these filenames become column titles for each set of counts. Within this folder, make subfolders named "cropped" and "receipts".
    2. Launch Croptacular, and click OK to start cropping.
      NOTE: The default settings are displayed and are usually sufficient. Depending on the resolution of the image, the lighting, the spot size, etc., it can be helpful to adjust the base parameters.
    3. If the image is already straight, simply press Space. Otherwise, straighten the image by drawing a line along an edge that should become horizontal. Redraw the line as many times as needed if the image still does not appear straightened.
    4. Next, draw a boundary box of the area for which counting is to be done. Adjust the size and proportion until all the spots are within their cells. Drag the cursor outside the boundary box to refresh the grid. When the grid looks good, press Space.
    5. Ensure that the next image automatically rotates to the same angle as the first one; the plugin assumes all the photos are aligned the same. If this is accurate, press Space to continue. Otherwise, straighten the image as before. The grid also recalls the same position as the previous image; adjust if necessary, and then press Space.
  2. Enumerate the colonies on the plates using the provided Count-On-It: Gridiron plugin for ImageJ.
    1. Launch Count-On-It > Gridiron. Use the same grid settings as with Croptacular. Users can batch an entire folder, analyze a single image, or start from the current image.
    2. Set the threshold based on an upper and a lower pixel intensity value. Make the threshold as stringent as possible while still selecting all the colonies. Ideally, there will be some space between the selected colonies, but the software is capable of segmenting the blobs to a degree. Click OK on the "Action Required" dialogue box when the threshold is satisfactory.
    3. To inspect the results, zoom in and look more closely at the colony counts. Clicking cancel will abort the plugin. Click OK to continue.
    4. On the first image, ensure that the option is given to proceed or return to the setup menu, for example, to change the minimum colony size. To proceed with the batch process, click OK. Then, select a folder to keep the receipts and results table. Use the "receipts" folder or create a new folder.
    5. After the first image, the next images will default to the same threshold as the previous settings. Click OK to use these settings or adjust the settings. If the photos are consistent and the setting is accurate, click OK on the "Action Required" dialogue box.
      NOTE: Once all the images in the batch are completed, the results table saves automatically in the same folder as the receipts.
    6. Review the count receipts that are produced by the software and manually correct any counting errors. The ImageJ plug-in is statistically accurate, but errors do occur. Proof the receipts to examine outliers and identify miscounts. The software saves the CFU data as a .csv file in the same folder as the receipts.
  3. Analyze the data using the user-preferred software.

Access restricted. Please log in or start a trial to view this content.

Results
Loading...
$$\rightleftharpoonup{xx}$$ $$\longleftharp{xx}$$, $$\longrightharp{xx}$$,
Fly microbiome analysis with serial dilution steps, spot plating, and bacterial growth graphs.

Figure 1: The colonization assay measures CFUs in hundreds of individual flies using a 96-well plate format. <...

Access restricted. Please log in or start a trial to view this content.

Materials

List of materials used in this article
NameCompanyCatalog NumberComments
Bead beating and spot plating
Fly vialsGenesee32-121autoclavable
Fly vial stoppersGenesee59-201autoclavable
Hand Applicator3M3M PA1
Heat SealerEppendorf5390
Mini-Beadbeater 96BioSpec1001
Mini-BeadBeater Glass Mill Beads, 0.5 mmBioSpec11079105
MPS 1000 Mini PCR Plate SpinnerLabnetLI-CF-P1000
Rainin BenchSmart 96 semi-automated pipettorMettler Toledo30296705Less expensive options available, including slotted 96 well pin tool from VP Scientific
TempPlate semi-skirted 96-well PCR plate, straight skirt, naturalUSA scientific1402-9220Must be polypropylene for heat sealer
Thermal Bond Heat Seal Foil4titude4ti-0591Keep sterile
Tray Plate,128 x 85 mm, Polystyrene, SterileSPL Life Sciences31001For making rectangular agar plates
Photobox construction
¼”-20 X ½” Bolts (X2)AmazonASIN: B07BP1WR3HTo attach the camera bracket. Brand not important. Any 1/4"-20 1/2" bolt works.
¼”-20 x ½” Connector NutAmazonUPC: 799862376780AKA cap nut or connector bolt. This is for attaching the rubber bands on the plate holder. Brand not important.
¼”-20 x ¾” bolts (X3)AmazonASIN: B003QZSZY4For the plate holder. Brand not important.
1/8” x ½” washerAmazonUPC: 611982484599Washer for the cap nuts on outside of box. Brand not important. Spray paint black before attaching to blend with the acrylic.
18 Gauge Wire - Two Conductor Power Wire - 18 AWG Power Wire – 10ftSuperbrightleds.comWP18-2
22-10 AWG Red Wire Nut - WN-R2210 – Quantity 4Superbrightleds.comWN-R2210
22-18 AWG 3/16in Female Push On Connector - 22-18 AWG – Quantity 3Superbrightleds.comSCFP-2218
4" Solderless Clamp-On Jumper Connector - 8mm Single Color LED Strip Lights - Quantity 3Superbrightleds.comSBL-MA2P-8-2
4" Solderless Clamp-On Pigtail Adaptor - 8mm Single Color LED Strip Lights – Quantity 3Superbrightleds.comSBL-MA2P-8-1
6” drawer handleAmazonASIN: B07Z331P99Any drawer handle should work.
6” Drawer slidesBtibpseUPC: 712243424979Trim the soft close rubber stoppers on the drawer sliders.
8-32 x ½” Cap Nuts (x4)AmazonASIN: B00HYLZB98Attaches drawer slide bolts on outside of box. Brand not important. Nylon won't damage the acrylic. Spray paint black before attaching to blend with the acrylic.
8-32 x ½” Nylon Bolts (x4)AmazonASIN: B07KX9T7NFTo attach drawer slides. Brand not important. Any bolt or machine screw meeting the specifications works. Nylon won't damage the acrylic and allows you to cut the bolt flush with the nut. Spray paint black before attaching to blend with the acrylic.
Acrylic GlueSCIGRIPEan: 7844908489337SCIGRIP Weld-On #4 Adhesive, Pint and Weld-On Applicator Bottle with Needle
Black Cable Ties - 10 Pack - 4 Inch LongSuperbrightleds.comCT-B04-10
Camera L-BracketWLPREOE, Vikerer, UnbrandedASIN: B09X46YKQZThe bracket should be "reversed" from its intended configuration so that the camera is on the "outside" of the L. Some brackets come in two pieces and allow for this alternate configuration, some don't, you'll need one that can be flipped. Also should have 1/4" holes for attachment. WLPREOE, Vikerer, Unbranded. Amazon Serial Identification Number given as an example.
Canon T series camera for tethering option ORCanon, Panasonic, Sony, Nikon, etc..1894C002The Canon Ti series cameras are a good option and can tether to a computer. Use with the 18-55mm standard kit lens. Used options are recommended from the Canon T5 to T7 (current model).
Custom Length Single Color LED Strip Light - Eco Series Tape Light - 24V - IP20 - 250 lm/ft - Blue - 2 metersSuperbrightleds.comSTN-BBLU-B6A-08C1M-24V
Custom Length Single Color LED Strip Light - Eco Series Tape Light - 24V - IP20 - 250 lm/ft - Green – 2 metersSuperbrightleds.comSTN-BGRE-B6A-08C1M-24V
Custom Length Single Color LED Strip Light - Eco Series Tape Light - 24V - IP20 - 250 lm/ft - Natural White 4000K – 2 metersSuperbrightleds.comSTN-A40K80-B6A-08C1M-24V
Drill with ¼”, 1/8” drill bitsBlack & Decker‎BDCDD12PKBrand not important.
Flat Black Spray Paint, 2X Ultra-MatteRustoleum331182Paint the interior of everything FLAT black. Brand not important.
Laser Cut Acrylic WallsBig Blue Sawwww.bigbluesaw.comUse the attached PDF, delete all cutouts in the top piece except desired hole for camera
Mean Well LED Switching Power Supply - LPV Series 20-100W Single Output LED Power Supply - 24V DC - 20 WattSuperbrightleds.comLPV-20-24
Panasonic ZS100 for wifi connection to a phone, tablet, or computerCanon, Panasonic, Sony, Nikon, etc.DMC-ZS100KPanasonic cameras can be wirelessly connected to a computer for data transfer and remote shutter options. Used options are good.
Quick Release PlateNeewer Aluminium 50mm Quick Release Plate QR Clamp 3/8-inch with 1/4-inchASIN: B07417F21DAdd this to the bracket so the camera can be easily removed for changing color filters. Amazon Serial Identification Number given as an example.
Rubber Bands, Assorted sizesBAZIC ProductsAlliance Rubber 26649Rubber bands go on the plate holder. Brand not important.
Screw/Adhesive Cable Tie Mounting Bases - 3/4 inch base – Quantity 4Superbrightleds.comCTMB-20
SPST Round Rocker Switch - No LED – Quantity 3Superbrightleds.comRRS-SP
Tiffen 29 Filter (Red) 72 mmTiffen72R29
Tiffen 58 Filter (Green) 72 mmTiffen7258
Software
ImageJ64https://imagej.net/downloadsN/AFree. Just cite: Schindelin, J., Arganda-Carreras, I., Frise, E., Kaynig, V., Longair, M., Pietzsch, T., … Cardona, A. (2012). Fiji: an open-source platform for biological-image analysis. Nature Methods, 9(7), 676–682. doi:10.1038/nmeth.2019
MacOSXAppleN/AHas a useful batch rename feature in Finder to rename a group of photos to facilitate organizing and analyzing in Count-on-it.
UnixBSDN/A64 bit
WindowsMicrosoftN/A64 bit

Reprints and Permissions

Request permission to reuse the text or figures of this JoVE article

Request Permission

Tags

Drosophila MicrobiomeSerial DilutionAgar Plate PlatingImage Analysis SoftwareMRS Agar Growth96 Well Plate FormatGut Bacteria QuantificationImageJ CroptacularCount On It Plugin

Related Articles