This video demonstrates the use of scanning electron microscopy to visualize bacterial colonization and host–pathogen interactions in the bladder epithelium of a pre-infected mouse model.
A subscription to JoVE is required to view this content. Sign in or start your free trial.
Method Article
Preparation of Mouse Bladder Tissue for Visualization of Bacterial Infection
595 views
⸱
January 30th, 2026
In This Article
Abstract
Protocol
All procedures involving animal models have been reviewed by the local institutional animal care committee and the JoVE veterinary review board.
Imaging bladders by scanning electron microscopy
NOTE: This procedure can be performed at any time point at which visualization of the urothelium is desired. As indicated in Figure 1 (purple boxes), uropathogenic E. coli (UPEC) -urothelial interactions are best visualized between 6 h and 24 h post-UPEC inoculation during the reservoir formation phase, and urothelial exfoliation triggered by Gardnerella vaginalis is best visualized between 3 h and 12 h after the second G. vaginalis exposure.
- In situ bladder fixation
- Prepare fixative immediately before bladder harvest by adding glutaraldehyde (2.5% final) and paraformaldehyde (2% final) in 0.15 M sodium cacodylate buffer with 2 mM of CaCl2 at pH 7.4. Use paraformaldehyde and glutaraldehyde from newly opened glass ampules, as both fixatives oxidize over time in opened containers.CAUTION: Glutaraldehyde is toxic, a respiratory irritant, and corrosive; paraformaldehyde is flammable, carcinogenic, an irritant, and a reproductive toxin; sodium cacodylate is toxic and carcinogenic.
- To make 50 mL of fixative solution, add 6.25 mL of 16% paraformaldehyde, 2 mL of 50% glutaraldehyde, and 16.75 mL of ultrapure water to 25 mL of a 0.3 M solution of sodium cacodylate at pH 7.4 with 4 mM CaCl2.
- Warm the prepared fixative to 37 °C prior to administering to the bladders.
- Fill tuberculin slip-tip syringe with fixative and affix a catheter to the end, bevel facing opposite syringe markings. Snip off the excess tubing 1-2 mm from the end of the needle, taking care not to expose the needle tip. Flick the syringe to remove bubbles and push the plunger to void air and fill the catheter with fixative over a microcentrifuge tube to collect any fixative for proper disposal.
- Anesthetize and sacrifice the mouse using an approved method (e.g., cervical dislocation under anesthesia). Place the mouse on the dissecting surface with the legs secured (with rubber bands or pins). Open the mouse's pelvic area with forceps and a pair of surgical scissors to expose the bladder. Carefully push aside the adjacent fat but leave the bladder in place.
- Hold the syringe with the dominant hand with the needle pointing down and the needle bevel and syringe markings facing away from you. Dip the catheter tip into sterile lubricant.
- Position the catheter tip at the urethral opening, holding the syringe barrel away positioned at a 30-45° angle over the mouse body.
- Apply downward pressure using a very small clockwise motion with the tip and gently insert the catheter into the urethra. As the catheter tip enters the urethra, hinge the syringe toward the tail of the mouse while continuing to slide the catheter further into the urethra until the syringe barrel is parallel to the working surface. The entire catheter needle shaft (not including the base) should enter the mouse, positioning the catheter tip within the bladder lumen.
- Slowly deliver 50-80 µL of fixative, causing the bladder to inflate like a balloon. Keep the catheter in place and raise the syringe slightly, tilting the tip up.
- Using the other hand, open a hemostat and slide one prong under the catheter needle at the intersection of the urethra. Partially close the hemostat until it just makes contact with the needle.
- Gently slide the catheter needle out of the bladder while simultaneously clamping down and locking the hemostat completely to prevent loss of the fixative.
- Grip the hemostat so that it is parallel to the working surface with the bladder resting on top. Lift up gently and carefully cut under the hemostat (opposite side of the bladder) to remove the bladder with the hemostat still attached.
- Place bladder and attached hemostat into a Falcon tube containing warmed fixative. Ensure that the bladder is fully submerged in the fluid and not pressed against the walls of the tube. Incubate at 4 °C for 24 h.
- Bladder processing and imaging with scanning electron microscopy (SEM)
- Sagittally bisect the bladder with a cleaned, double-sided razor blade, and make a second cut tangential to the hemostat to release the bladder. This results in 2 half-bladder "cups." If any remaining fat pads exist on the exterior of the bladder, gently remove them.
- Rinse the bladder halves three times (10 min each) in sodium cacodylate buffer (0.15 M, pH 7.4).
- Stain the tissue with 1% osmium tetroxide in 0.15 M cacodylate buffer for 1 h at room temperature. Osmium is sensitive to light; therefore, perform this step with the staining vessel wrapped in foil to maintain a dark environment.
CAUTION: Osmium tetroxide is toxic and corrosive to skin. Do this step in the fume hood with gloves. - Rinse the bladder halves three times (10 min each) in ultrapure water. During these steps, osmicated oil can sometimes be seen on the surface of the water. Aspirate or wick this off to prevent contamination during the drying steps.
- Dehydrate tissues by submerging in a graded ethanol series (50, 70, 90, 100, and 100%) for 10 min each.
- Dry the fixed tissue using a critical-point dryer, performing 12 CO2 exchanges at the slowest speed. Set all additional settings to slow, except for the venting step, which is set to fast.
- Bisect each bladder half again with a clean double-sided razor to generate 4 total pieces to reduce curvature of the specimen for more efficient coating, for ease of imaging in the SEM, and to expose tissue that may have curled during drying.
- Adhere the bladder pieces to a conductive carbon adhesive tab on an aluminum stub and paint a small amount of silver adhesive around the bottom contact with a toothpick, taking care to prevent excess adhesive from wicking onto the inner surface of the bladder.
- Use a high vacuum sputter coater to sputter coat the sample stubs with 6 nm of iridium. If the samples continue to charge, ensure a conductive path is painted to the surface with silver paint and coat with an additional 4 nm of iridium.
- Image the samples with a scanning electron microscope. While conditions may vary depending on the microscope used, an accelerating voltage of 3 KeV with a beam current of 200 pA and a working distance of 12-13 mm worked well on a Zeiss Merlin FE-SEM when using the Everhart-Thornley (SE2) electron detector.
- In situ bladder fixation
Access restricted. Please log in or start a trial to view this content.
Results
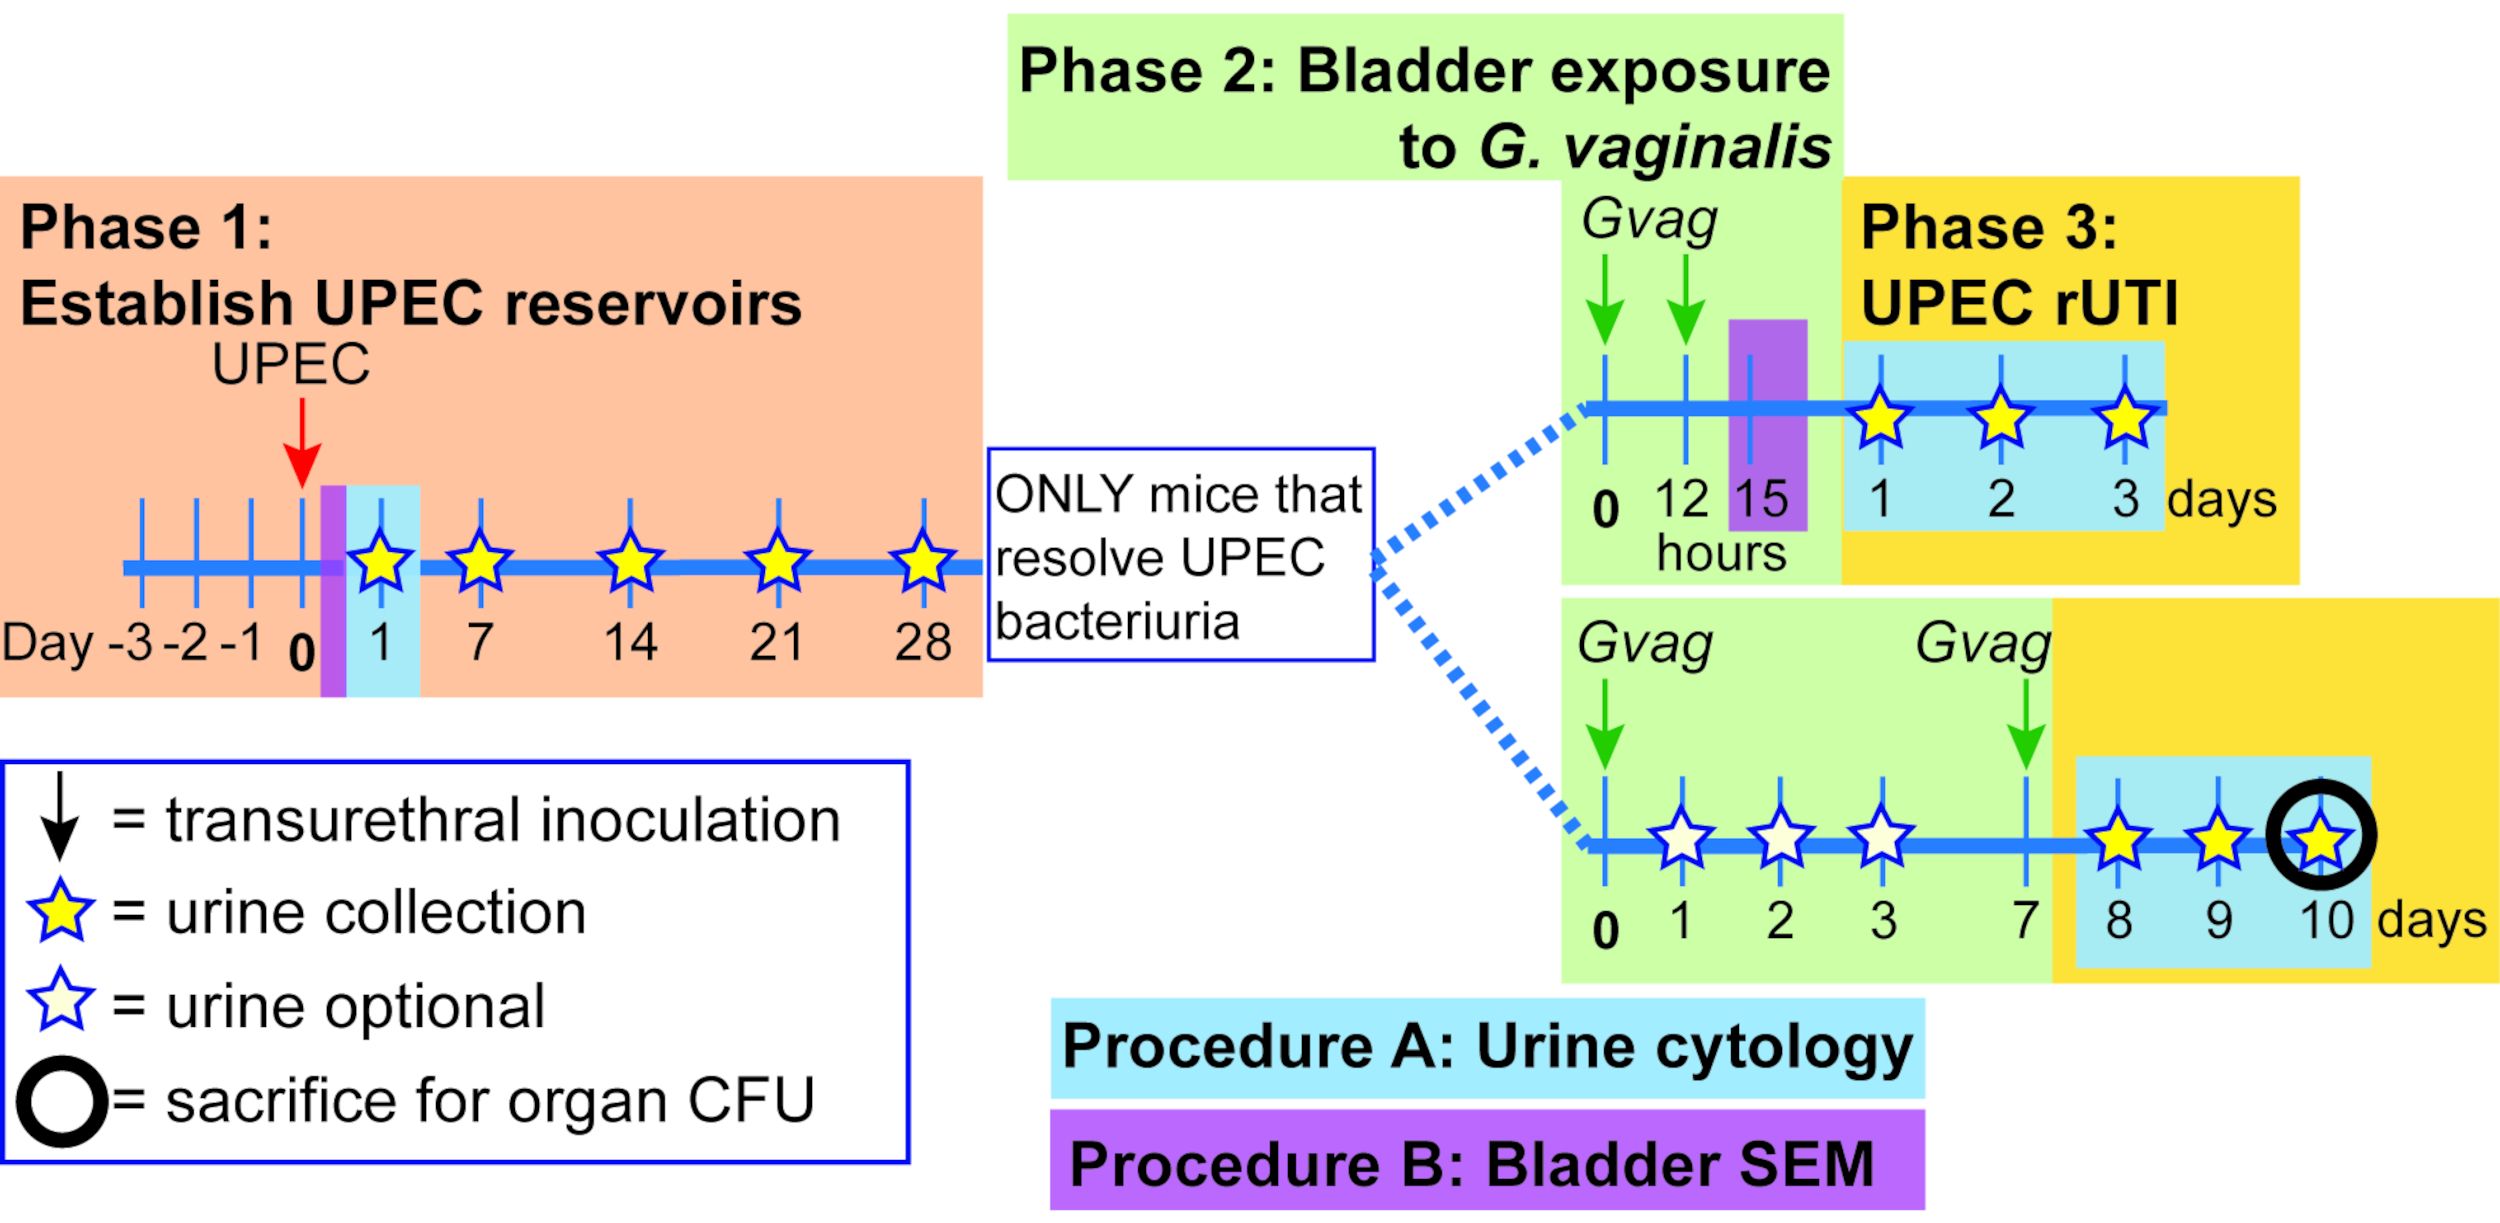
Figure 1. Schematic of Mouse Model. The timeline is highlighted to reflect the phases or procedures of the model outlined in the protocol. Phase 1 (orange): Establishing intracellular uropathogenic E. coli (UPEC) reservoirs. Mice are ...
Access restricted. Please log in or start a trial to view this content.
Materials
| Name | Company | Catalog Number | Comments |
|---|---|---|---|
| 30G x 1/2 needles | BD | 305106 | For catheters |
| 5 1/2" straight forcep hemostat | McKesson | 487377 | In situ bladder fixation |
| ACE 600 Sputter coater | Leica | SEM sample processing | |
| Aluminum SEM stub | Ted Pella | 16111 | SEM sample processing |
| Calcium chloride | EMS | 12340 | In situ bladder fixation |
| Conductive carbon adhesive tab | Ted Pella | 16084-1 | SEM sample processing |
| Conductive silver paint | Ted Pella | 16034 | SEM sample processing |
| CPD 300 Critical Point Drier | Leica | SEM sample processing | |
| Cytofunnel metal clip | Simport | M964B | cytospun urinalysis |
| Ethanol | EMS | 15050 | SEM sample processing |
| Glucose | Sigma | G7528 | For NYCIII G. vaginalis growth media |
| Glutaraldehyde | EMS | 16320 | In situ bladder fixation |
| Hema 3 staining kit | Fisher | 23123869 | Cytospun urinalysis |
| HEPES | Cellgro | 25-060-Cl | For NYCIII G. vaginalis growth media |
| Iridium | Ted Pella | 91120 | SEM sample processing |
| Merlin FE-SEM | Zeiss | Scanning electron microscope | |
| Milli-Q Water Purifier | Millipore | IQ-7000 | SEM sample processing |
| Osmium tetroxide | EMS | 19170 | SEM sample processing |
| Paraformaldehyde | EMS | 15710 | In situ bladder fixation |
| Polyethylene tubing | Intramedic | 427401 | for catheters |
| Proteose Peptone #3 | Fisher | DF-122-17-4 | For NYCIII G. vaginalis growth media |
| PTFE coated double edge razor blade | EMS | 72000 | Cutting bladders for SEM |
