All procedures involving animal models have been reviewed by the local institutional animal care committee and the JoVE veterinary review board.
1. Slice Culture Preparation
- Prepare mouse organotypic hippocampal slice cultures using postnatal 6- to 7-day old mice of either sex.
- Prepare dissection media for organotypic slice culture consisting of (in mM): 238 sucrose, 2.5 KCl, 1 CaCl2, 4 MgCl2, 26 NaHCO3, 1 NaH2PO4, and 11 glucose in deionized water, then gas with 5% CO2/95% O2 to a pH of 7.4.
- Prepare organotypic slice culture media consisting of: 78.8% (v/v) Minimum Essential Medium Eagle, 20% (v/v) horse serum, 17.9 mM NaHCO3, 26.6 mM glucose, 2 M CaCl2, 2 M MgSO4, 30 mM HEPES, insulin (1 µg/mL), and 0.06 mM ascorbic acid, pH adjusted to 7.3. Adjust the osmolarity to 310–330 osmol using an osmometer.
- Dissect hippocampi out from the whole brain by using two spatulas, and slice (400 µm) using a tissue chopper. Separate slices by using two forceps and transfer to 30 mm cell culture inserts in a 6-well plate filled with culture media (950 µL) underneath the inserts.
- Store organotypic slice cultures in a tissue culture incubator (35°C, 5% CO2) and change the slice culture media every two days.
2. Plasmid Preparation
- Prepare the plasmid for the gene of interest.
- Subclone enhanced green fluorescent protein (EGFP) gene into a pCAG vector.
- Purify pCAG-EGFP plasmid with an endotoxin-free purification kit and dissolve in an internal solution that consists of diethyl pyrocarbonate-treated water containing 140 mM K-methanesulfonate, 0.2 mM EGTA, 2 mM MgCl2, and 10 mM HEPES, adjusted to pH 7.3 with KOH (plasmid concentration: 0.1 µg/µL).
3. Glass Pipette Preparation
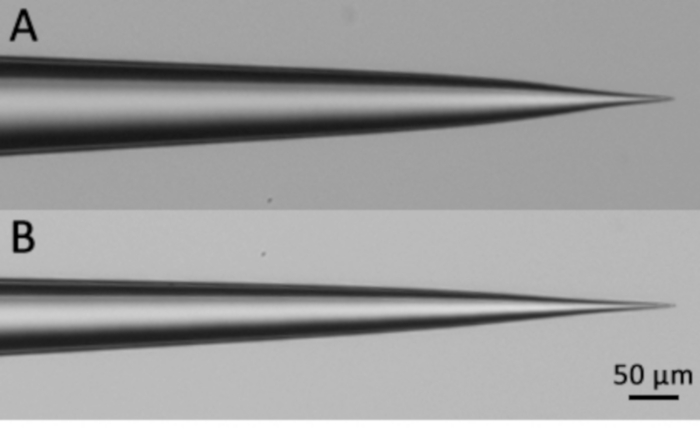
- Pull borosilicate glass pipettes (4.5–8 MΩ) on a micropipette puller (Figure 1A).
NOTE: The glass pipettes used for whole-cell patch clamp recordings are ideal for electroporation.
- Bake glass pipettes overnight at 200°C to sterilize.
- Check the size of the pipette tip under a dissection microscope to approximate the electrical resistance.
- Optional: Verify pipette resistance by attaching the pipette to the electroporation electrode and use the micromanipulator to maneuver the pipette tip into filter-sterilized artificial cerebrospinal fluid (aCSF) containing (in mM): 119 NaCl, 2.5 KCl, 0.5 CaCl2, 5 MgCl2, 26 NaHCO3, 1 NaH2PO4 and 11 glucose in deionized water, gassed with 5% CO2/95% O2 to a pH of 7.4. Confirm the actual resistance using the readout on the electroporator.
NOTE: The sharper the pipette tip, the larger the electrical resistance. The pipette resistance should be below 10 MΩ. Glass pipettes with high pipette resistance (Figure 1B) often clog at the tip during repeated electroporation.
4. Electroporation Rig Setup
- Install the electroporator to a standard whole-cell electrophysiology rig, equipped with an upright microscope mounted on a shifting table with a micromanipulator and peristaltic pump.
- Install the headstage of the electroporator onto a micromanipulator and connect a pair of speakers to the electroporator. Connect the electroporator to a foot pedal which can be used to send a pulse when ready.
NOTE: The speakers emit a tone when turned on, which is an indicator of the electrical resistance at the electrode. This makes it possible to determine relative changes in resistance without pulling attention away from the procedure.
5. Electroporation Preparation
- Transfer slice culture inserts from 6-well plates to 3 cm Petri dishes loaded with 900 µL of culture media and store in a tabletop CO2 incubator until ready to perform electroporation.
- Preincubate fresh culture inserts with slice culture media (1 mL) for at least 30 min in a 3.5 cm Petri dish to culture slices after electroporation.
- Clean and prepare the rig for electroporation.
- Perfuse the lines with 10% bleach for 5 min to sterilize the tubing and chamber prior to beginning the experiment for the day.
- Perfuse the lines with deionized autoclaved water for at least 30 min to rinse completely.
- Perfuse the lines with filter-sterilized aCSF containing 0.001 mM tetrodotoxin (TTX).
NOTE: TTX minimizes cellular toxicity and death due to overexcitation of interneurons.
- Set the electroporator’s pulse parameters: amplitude of –5 V, square pulse, train of 500 ms, frequency of 50 Hz, and a pulse width of 500 µs.
- Fill glass pipette with 5 µL of plasmid-containing internal solution.
- Remove any trapped air bubbles from the pipette tip by flicking and gently tapping the tip multiple times.
- Check the tip for damage by visualizing it under a dissection microscope or by repeating step 3.3.1 to check the pipette resistance.
NOTE: If the tip is damaged, the glass pipette must be discarded, and this step must be repeated with a new glass pipette previously prepared in step 3.
- Securely attach the pipette tip to the electrode and turn the speakers on. Record the readout (the pipette’s resistance) of the electroporator when the tip has made contact with the aCSF medium.
- Cut the culture insert membrane using a sharp blade and isolate one slice culture. Carefully transfer the slice culture to the electroporation chamber by using sharp angled forceps and fix its position with a slice anchor.
- Do not keep the slice culture outside of the incubator for more than 30 min at a time to prevent side effects such as changes in neuronal health or function.
6. Electroporate Cells of Interest
- Apply positive pressure to the pipette with mouth or by using a 1 mL syringe (0.2–0.5 mL pressure) attached to the tubing.
- Use the micromanipulator’s 3-dimensional knob controls to maneuver the pipette tip near the surface of the slice culture.
- Choose a target cell and approach it, keeping the positive pressure applied until a dimple forms on the cell surface, visible on the microscope.
- Perform pressure cycles.
- Quickly apply mild negative pressure by mouth so that a loose seal forms between the pipette tip and the plasma membrane, indicated visually by the membrane going up into the pipette tip somewhat. Observe an increase (~2.5x the initial resistance) in pipette resistance by listening for an increase in tone coming from the speakers. Quickly re-apply positive pressure so that the dimple re-forms.
- Immediately complete at least two more pressure cycles without pausing, then hold negative pressure for 1 s.
NOTE: Pausing between cycles, applying too much pressure, or holding the negative pressure for too long can cause significant cell damage and possibly cause the cell to die during electroporation.
- Quickly pulse the electroporator once using the foot pedal when the tone from the speakers reaches a stable apex in pitch, indicating peak electrical resistance. Do not wait at the peak resistance for more than 1 s before sending the pulse.
NOTE: We have observed no off-target electroporation when using this protocol. Only the cells in contact with the glass pipette during pressure cycles were transfected. Positioning the pipette near other neurons does not result in gene transfection.
- Gently retract the pipette approximately 100 µm from the cell without applying pressure.
- Re-apply positive pressure, verifying that the resistance is similar to the recorded readout in step 5.5, then approach the next cell.
- Remove potential clogs, indicated visually or by a significantly increased (>15% higher) pipette resistance after electroporation, by applying positive pressure.
NOTE: If there is no visible clog and the resistance is still significantly higher, discard the pipette and use a new one. On an average, a pipette can be used for up to 20 electroporation events if the user is careful.
After electroporation, transfer the slice culture onto a fresh culture insert, and incubate at 35°C in the incubator for up to 3 days.