1. Prepare Reagents and Materials Required
- Prepare phosphate-buffered saline (PBS) containing 2% fetal bovine serum (FBS) ("wash buffer"). Prepare PBS with 2% fetal calf serum (FCS) containing 0.1% nonionic detergent ("perm-wash buffer"; see the Table of Materials). Prepare PBS with 1.5% formaldehyde.
NOTE: Formaldehyde is corrosive and potentially carcinogenic and must be handled while wearing appropriate personal protective equipment.
- Prepare PBS containing 2% FBS and 0.5 mM ethylenediaminetetraacetic acid (EDTA) for magnetic cell separation ("MCS buffer").
- Prepare 50 µg/mL phalloidin-fluorescein isothiocyanate (Phalloidin-FITC) in dimethyl sulfoxide (DMSO). Prepare a 1 mg/mL nuclear stain (e.g. 1 mg/mL 7-amino actinomycin D (7-AAD) in DMSO or bis-benzimide dye; see the Table of Materials) in DMSO. Prepare fluorochrome-labeled antibodies appropriate for the cells of interest and the imaging flow cytometer.
- Obtain animal tissues (e.g., lymph nodes and spleen) as a source of T cells and allogeneic animal tissues (e.g., spleen and bone marrow) as a source of antigen-presenting cells or progenitors.
- Prepare cell culture medium (e.g., Roswell Park Memorial Institute medium (RPMI) 1640 or Dulbecco's Modified Eagle Medium (DMEM) supplemented with 10% FBS), 50 µM 2-mercaptoethanol, penicillin, and streptomycin and obtain 24- and/or 96-well cell culture plates.
2. Prepare Antigen-presenting Cells (APCs)
NOTE: In theory, any APC population could be examined with this method. Immature mouse bone marrow-derived dendritic cells (DCs) as APCs were sued in this case. Many protocols exist for generating these cells. Briefly, the following protocol was used.
- Flush marrow from femurs and tibias into RPMI 1640 or DMEM.
- Pass the suspended cells through a 70-µm cell strainer to remove small pieces of bone and debris.
- Pellet the cells by centrifugation and then lyse red cells using an ammonium chloride buffer for 5 min at room temperature.
- Pellet the cells by centrifugation (400 x g, 5 min) and resuspend the cell pellet.
- Wash cells in 5 - 10 mL of wash buffer, pellet by centrifugation (400 x g, 5 min), and re-suspend the cell pellet.
- Enrich hematopoietic precursors over a cell separation column by labeling the cells with biotinylated anti-CD3 (5 µg/mL), anti-B220 (5 µg/mL), anti-MHC class II (1 µg/mL), and anti-CD11b (5 µg/mL) antibodies.
- Pellet the cells by centrifugation (400 x g, 5 min) and re-suspend the cell pellet.
- Incubate the cells with anti-biotin magnetic microbeads (see the Table of Materials) at 4 °C for 10 min.
- Wash and pellet the cells (400 x g, 5 min) and re-suspend them in 1 mL of MCS buffer before removing the labeled cells using a large positive selection (LS) magnetic cell separation column primed with 3 mL of MCS buffer and placed in its magnet. Wash the column 3 times with 3 mL of MCS buffer; the flow-through will contain the desired cells.
- Culture the cells that pass through the column for 6 days in RPMI 1640 or DMEM supplemented with 2 ng/mL recombinant mouse granulocyte-macrophage colony-stimulating factor (GM-CSF) and 2 ng/mL of recombinant human transforming growth factor β1 (TGFβ1). Replace half the medium every 2 days with a fresh complete medium containing 2 ng/mL GM-CSF and TGFβ1.
NOTE: Human TGFβ1 has activity in mouse cells. Data have been generated using these immature DCs. Other cells (e.g., B cells and mature DCs) may be suitable as APCs but have not been tested in this assay.
- Cryopreserve DCs in 90% serum/10% DMSO and store in liquid nitrogen; recover on the day of use. Prior to use, count the number of viable DCs in a hemocytometer using trypan blue exclusion. Re-suspend the cell pellet in culture medium at the appropriate density (see step 4.1) prior to use in section 4.
3. Prepare T Cells
- Use negative selection methods to avoid inadvertently transmitting activating or inhibitory signals to the cells.
NOTE: In this example, CD4+ T cells are prepared for analysis.
- To prepare CD4+ T cells from the mouse spleen, mash the spleen through a 70-µm cell strainer using the plunger of a syringe. Wash the cell strainer with wash buffer.
- Pellet the suspended cells by centrifugation (400 x g, 5 min) and then lyse the red cells by re-suspending the pellet in an ammonium chloride buffer for 5 min at room temperature.
- Pellet the cells by centrifugation (400 x g, 5 min) and re-suspend the pellet.
- Wash the cells in 5 - 10 mL of wash buffer and pellet by centrifugation (400 x g, 5 min). Re-suspend the pellet.
- Stain the cells with biotinylated antibodies to CD8, major histocompatibility complex class II (MHC II, 1 µg/mL), and CD19 (5 µg/mL). Incubate for 10 min at 4 °C.
- Wash the cells in 10 mL of wash buffer and pellet by centrifugation (400 x g, 5 min). Re-suspend the pellet.
- Incubate the cells with anti-biotin magnetic microbeads (see the Table of Materials) according to the manufacturer's directions.
- Wash the cells in 10 mL of wash buffer and pellet by centrifugation (400 x g, 5 min); re-suspend the pellet.
- Resuspend the cells in 1 mL of MCS buffer and enrich the CD4+ T cells over a magnetic cell separation column primed with 3 mL of MCS buffer on a magnet. Wash the column 3 times with 3 mL of MCS buffer. Column flow-through will contain the enriched T cells.
- By standard flow cytometry, assess T cell purity using an aliquot of the negatively selected cells. Stain the cells using a fluorochrome-streptavidin conjugate (to identify any biotin-labeled cells that should have been removed on the column) and an antibody or antibodies to identify the T-cell population of interest (CD4 in this case); a purity of ≥85% is acceptable.
- Count the T cells in a hemocytometer by trypan blue exclusion (≥90% viability is acceptable).
NOTE: MCS buffer contains EDTA, which must be removed prior to the assay. To accomplish this, pellet the cells by centrifugation (400 x g, 5 min) and wash them in 1 mL of wash buffer. Pellet the cells again (400 x g, 5 min) and re-suspend in culture medium at the appropriate density (see step 4.1).
4. Co-incubate T Cells and DCs
- Seed T cells and DCs at a 2:1 T: DC ratio in a 24-well or 96-well cell culture plate. Ensure that the final culture volume is ≤500 µL for 24-well plates or ≤50 µL for 96-well plates.
NOTE: Smaller volumes encourage cell-cell interactions and allow space for subsequent fixation buffers.
- Adjust precise cell numbers empirically, but as a general guide, use 1 x 10⁶ T cells and 0.5 x 10⁶ DCs per well (96-well plate). These should be considered the minimum numbers of cells because using fewer cells makes the enumeration of immune synapses difficult.
- To increase cell numbers, set up replicate wells and pool after step 5 (fixation).
NOTE: When setting up replicate wells, it is advisable to seed DCs in all of the wells first and then seed T cells in all of the wells; this minimizes discrepancies in incubation time between wells.
- Incubate the plate for 4 h at 37 °C in a 5% CO2 atmosphere.
5. Fix Cells in Plate
- Add 3 times the culture volume of 1.5% formaldehyde in PBS to each well and incubate at room temperature for 30 min; it is important to fix cells prior to removing them from the plate to minimize the disruption of cell-cell interactions.
- Transfer cells in the plate into tubes for subsequent washing and staining. At this stage, set aside additional cells for single-stain controls. Apart from these controls, the entire culture should be stained with the antibody cocktail (see step 4.1.1).
6. Stain Cells
- Stain cells in 100 µL of wash buffer containing a cocktail of the desired fluorochrome-conjugated antibodies for 30 min at room temperature, protected from light.
NOTE: The cocktail includes T cell-specific and APC-specific antibodies. Fluorochromes should be chosen such that they can be distinguished using the configuration of the imaging flow cytometer. In the experiments shown here, blue fluorophore-conjugated CD11b (5 µg/mL, see the Table of Materials) and APC-conjugated CD90.2 (5 µg/mL) were used.
- Wash the cells in 1 mL of wash buffer and centrifuge for 5 min at 400 x g. Decant the supernatant. Resuspend the cells in perm-wash buffer containing phalloidin FITC at 0.05-0.5 µg/mL and incubate for 30 min at room temperature protected from light.
NOTE: Phalloidin FITC concentrations of about 0.1 µg/mL work well for mouse cells, but the appropriate concentration is expected to vary by supplier, cell type, and imaging flow cytometer.
- Wash the cells in 1 mL of perm/wash buffer and centrifuge for 5 min at 400 x g. Decant the supernatant. Resuspend the cells in perm/wash buffer containing nuclear dye at the appropriate concentration (e.g., approximately 25 µg/mL 7-AAD) and incubate for 30 min at room temperature protected from light.
- Wash the cells in 1 mL of perm/wash buffer and centrifuge for 5 min at 400 x g. Decant the supernatant. Wash the cells once in wash buffer, pellet, and re-suspend in 50 - 100 µL of wash buffer, transferring the cells to small, capped microcentrifuge tubes.
- Proceed to data acquisition immediately or store the cells at 4 °C protected from light for up to several days prior to acquisition on the imaging flow cytometer.
NOTE: Cells have been successfully stored in this way for up to 7 days. Longer storage may be possible but has not been tested.
7. Acquire Data
- Initialize and configure the imaging flow cytometer according to the manufacturer's instructions. Ensure stability of the flow core prior to collecting any data.
- Reserve one channel for brightfield image acquisition. Acquire single-stain control data with the brightfield channel turned off.
- Click the "Load" button and insert a tube containing a fully stained sample (a sample that has been stained with all required fluorochromes) into the holder.
- In the "workspace" window, select and create a new scatterplot with the aspect ratio over the area and gate singlets where the aspect ratio is close to 1. Create a new scatterplot for each channel used (intensity of the channel in the horizontal axis).
- For each fluorochrome, check the positive population and, if required, adjust the laser voltage in the "Illumination" box.
- Unload the tube and load the first single-stained tube.
- In the "Acquisition Settings" box, type the sample name and set the number of events that should be collected; if it is a single stain (for compensation controls), 1,000 - 2,000 events are sufficient.
- In the "Channels" box, select the channels that each sample has been stained with. For single-stain controls, all channels should be selected with brightfield and side scatter off. Click the "Record" button under the "Acquisition" box; when the number of events reaches the specified threshold, the acquisition will stop automatically.
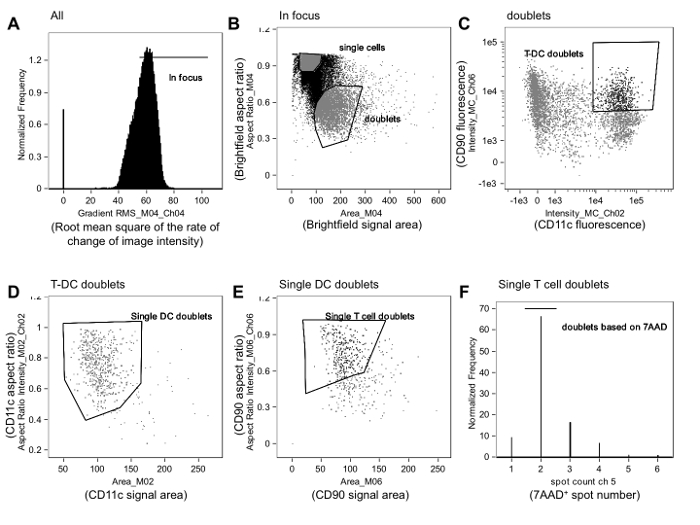
- Click the "Return" button to unload the tube. Repeat steps 7.2.4 - 7.2.6 for each single-stain control. Depending on the cytometer and software, it may not be possible to set all of the gates shown in Figure 1 during acquisition (more precise gating is performed during analysis; see section 8).
- Acquire samples as for single-stained samples (in step 7.2), but in the "Channels" box, select all channels that are required, including the brightfield channel.
- Before recording data, check to confirm that the channel intensity is appropriate for identifying the desired cell populations. If not, adjust the laser settings and re-record single-stain controls using the new settings, as described in step 7.2.
- For each sample, acquire several tens of thousands of events.
NOTE: Under most conditions, cell-cell contact events are a small minority of the total cell number (most are single cells). In general, it is desirable to have at least 100 events in the final membrane contact gate.