All procedures involving sample collection have been performed in accordance with the institute's IRB guidelines.
1. Glycochips Production
- Microarray preparation
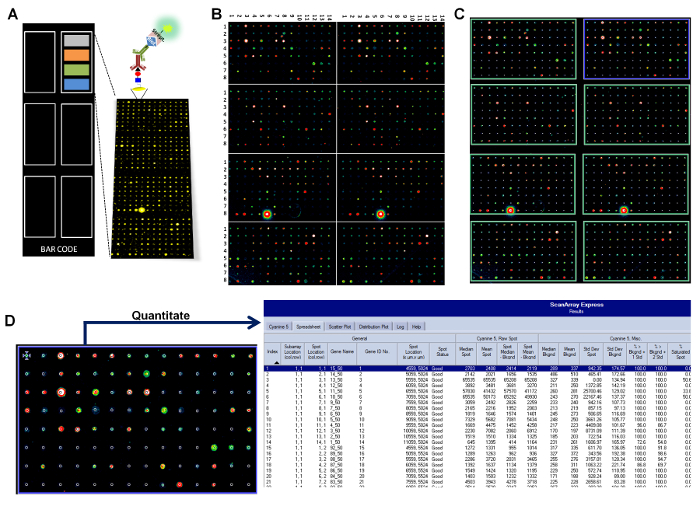
- Print the glycans (50 mM) and polysaccharides (10 µg/mL) in 300 mM phosphate-buffered saline (PBS, pH 8.5) at 6 replicates onto N-hydroxysuccinimide-derivatized glass slides, using non-contact robotic arrayer (drop volume ~900 pL). Each slide contains 4 different blocks of sub-arrays (Figure 1A, in colors) repeated 6 times. Every single sub-array is formed by 112 different glycan spots, including controls (8 rows × 14 columns) (Figure 1B).
NOTE: Glycan-related information is provided in Table 1. The glycan library used for printing microchips is the result of a long-term synthetic effort of the IBCh team; examples of synthesis are described in related publications. The glycan library included blood group antigens and some of the most frequently occurring terminal oligosaccharides, as well as core motifs of mammalian N- and O-linked glycoproteins and glycolipids, tumor-associated carbohydrate antigens, and polysaccharides from pathogenic bacteria.
- Incubate the slides in a moisture box (relative humidity ~70%) at room temperature (25 °C) for 1 h.
- Blocking microarrays: incubate the slides for 1.5 h with blocking buffer at room temperature (100 mM boric acid, 25 mM ethanolamine, 0.2% (v/v) Tween-20 in ultrapure water).
- Wash the glycochip with ultrapure water and dry it by air.
- Glycochip quality control
- Analyze two microarrays from each batch using 1mg/mL solution of complex immunoglobulin preparation (CIP, containing immunoglobulin: IgG, IgM and IgA), 10 µg/mL solution of biotinylated goat anti-human immunoglobulins as a secondary antibody (IgM + IgG + IgA), followed by 1 µg/mL solution of the corresponding fluorescent streptavidin conjugate (via protocol described below, see step 2).
- Scan and analyze the glycochips (see step 3, analysis of glycan array).
- Use microarray batches with intra- and inter-chip correlation higher than 0.9.
2. Glycan Array Technique
- Prepare the following aqueous solutions (in ultrapure water) and store them at room temperature (25 °C):
- Buffer-1: 1% (w/v) bovine serum albumin (BSA) in phosphate-buffered saline (PBS), 1% (v/v) Tween-20 and 0.01% (w/v) sodium azide (NaN3).
- Buffer-2: 1% (w/v) BSA in PBS, 0.1% (v/v) Tween-20 and 0.01% (w/v) NaN3.
- Buffer-3: 0.1% (v/v) Tween-20 in PBS.
- Buffer-4: 0.001% (v/v) Tween-20 in PBS.
- Glycochip and sample preparation
- Put the storage box with the slides on the table until they reach room temperature (25 °C).
NOTE: Use powder-free latex gloves. The glycochip must be manipulated by the bottom part of the glass slide, where the barcode is located. The barcode will help you to identify the right side, avoiding the contact with the surface where the glycans are printed.
- Open the box, take the glycochip and place it in the incubation chamber (25 °C), already conditioned with wet filter paper to keep humidity constant inside the chamber.
- Meanwhile, dilute the mice serum with Buffer-1 (1:20) in 1.5 mL tubes. Homogenize the serum solution (5 s) with a vortex mixer.
NOTE: The volume needed to cover a single glycochip surface totally is approximately 1 mL.
- After the homogenization, incubate the diluted serum at 37 °C for 10 min in a water bath to avoid immunoglobulin aggregation. Centrifuge the tubes for 3 min at 10,000 x g and 25 °C, collect the supernatant and discard any precipitated material.
- Place the glycochip carefully in the incubation chamber. Incubate it for 15 min at 25 °C with 1 mL of Buffer-3 to eliminate any residual material on the surface of the glycochip.
- Hold the glycochip in a vertical position and rewash it with some drops of Buffer-3 using a plastic Pasteur pipette. Carefully remove the buffer from the glycochip surface using filter paper.
3. Reaction: antibodies binding
- Place the glycochip in the incubation chamber. Spread the diluted serum sample over the glycochip surface using a micropipette. Incubate with orbital agitation (30 rpm) at 37 °C for 1.5 h. Ensure that all dry area of the glycochip surface is covered by the diluted serum sample using the tip of the pipette.
- Remove any excess sample and immerse the glycochip for 5 min in Buffer-3 at 25 °C. Then, move the glycochip to a container with Buffer-4 (5 min) and finally wash (5 min) the glycochip with ultrapure water. Centrifuge the glycochip for 1 min at 175 x g and 25 °C to remove the liquid.
4. Detection: secondary antibody
- Place the glycochip in the incubation chamber. Spread over the glycochip surface a solution (5 µg/mL) of goat anti-mouse (IgG + IgM) conjugated to biotin in Buffer-2. Incubate with orbital agitation (30 rpm) at 37 °C for 1 h.
- Remove the unbound fraction and repeat the washing steps.
- After the centrifugation, incubate the glycochip in darkness at 25 °C for 45 min (30 rpm) with 2 µg/mL of the corresponding fluorochrome-labeled streptavidin solution (in Buffer-2).
- In darkness, remove the unbound fraction and repeat the washing steps.
- Dry the glycochip by air.
NOTE: Glycochip should be scanned as soon as possible. But if it's impossible to do scan immediately after staining, glycochips can be stored in a cool and dry place in darkness.
3. Analysis of Glycan Array
- Scan the array
- Leave the glycochip on the table until it reaches room temperature in dark. At the same time, turn on the slide scanner and the laser (excitation wavelength of 633 nm).
- Holding the microarray, slide the glycochip into the slot until it touches the back.
- Scan the glycochip ("run easy scan"), and save the scan as a ".TIFF" file.
Table 1: List of glycans, their binding to natural circulating antibodies (IgM + IgG) of BALB/c mice (n = 20), expressed in relative fluorescence units (RFU) as median ± MAD, and the number of animals exceeding cut off (≥4000 RFU). This table has been reproduced from Bello-Gil, D. et al. Please click here to download this Table.