All procedures involving sample collection have been performed in accordance with the institute's IRB guidelines
1. In Situ Immunofluorescence Staining of tumor-infiltrating lymphocytes (TILs)
- Procedural guidelines
- Perform all experimental steps at room temperature.
- For all steps, perform the dilutions with Tris Buffer Saline (TBS; see Table of Materials).
- Perform the wash in TBS for all the steps except after the primary antibody incubation. For the latter, use Tris Buffer Saline Tween20 (TBST, see Table of Materials). For buffer composition and reconstitution, see Table 1.
- Use a humidity chamber for antibody incubations and a staining jar for washing.
- Do not let the section dry out during the procedure.
- Pretreatment
- Thaw the slide containing the tissue sample and carefully dry the slide around the specimen with a paper towel. Delimitate the reaction area containing the tissue with a hydrophobic barrier pen (see Table of Materials). Dry for 2 min.
- Fix the samples in 100% acetone for 5 min, dry for 2 min, and wash with TBS for 10 min.
- Saturation and blockade
- Pretreat the slides for 10 min with 3 drops of avidin 0.1%, tap and/or flick the slide to distribute the avidin and remove air bubbles, and then treat for 10 min with 3 drops of biotin 0.01% (see Table of Materials), tap, and/or flick. Wash with TBS.
- Perform an Fc receptors blockade. Apply 100 µL of a 5% volume/volume of normal serum diluted in TBS. Use serum from the same host species as the labeled secondary or tertiary antibody (see Table of Materials); donkey serum was used here. Incubate for 30 min.
- During the incubation, briefly spin the anti-CD8, program cell death protein 1 (PD-1), and T-cell immunoglobulin and mucin-containing protein-3 (Tim-3) antibodies (Table of Materials). Prepare the mix of primary antibodies in TBS as described in Table 2.
- Immuno-staining for CD8, PD-1, and Tim-3
- Prepare the primary antibody mixture. Refer to Table of Materials and Table 2 for the antibodies used (anti-CD8, PD-1, Tim-3, and their corresponding secondary antibodies) and their concentrations.
- Tap and/or flick the remaining donkey serum (added in step 1.3.2). Incubate the slides with 100 µL of the non-labeled primary antibodies mix for 1 h in a humidified chamber.
- During the incubation, briefly spin the Cyanine 5 anti-rabbit, Alexa Fluor 488-anti-goat, and biotinylated anti-mouse antibodies and prepare the mix of secondary antibodies as described in Table 2.
- Wash the slides in TBST for 5 min. Dry the slides.
- Incubate the slides with 100 µL of the secondary antibodies for 30 min in a humidified chamber.
- Prepare the mixture of tertiary antibodies containing Cyanine 3-streptavidin, as described in Table 2.
- Wash the slides in TBS for 10 min. Dry the slides.
- Incubate the slides with 100 µL of the tertiary antibody mixture for 30 min.
- Wash the slides in TBS for 10 min. Dry the slides.
- Cell mounting
- Mount the slides in a 4',6-Diamidino-2-Phenylindole, Dihydrochloride (DAPI)-containing mounting medium (1.5 µg/mL DAPI) with a coverslip compatible for fluorescence microscopy (see Table of Materials).
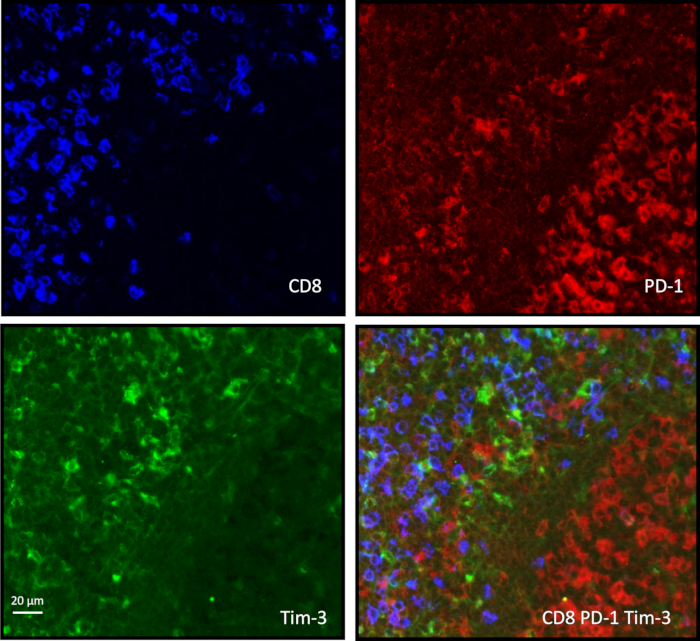
NOTE: As a negative control for each experiment, one slide with isotype-matched antibodies was used at the same concentration as the corresponding antibodies. For this staining, we used mouse IgG1, rabbit IgG, and goat IgG-negative control antibodies (see Table of Materials). As a positive control, we used human hyperplasic tonsil, which is known to be positive for the tested markers, for each experiment. A typical staining is described in the results (Figure 1). Mono-staining of CD8, PD-1, and Tim-3 should be performed individually (one staining per slide) with the same pre-treatment and without DAPI. A slide in the same experimental conditions without any antibody and only a DAPI mounting medium should also be performed. A slide should be imaged using identical experimental conditions without any antibody and without DAPI.
2. Fluorescence Analysis and Automated Cell Count
- Image acquisition with the automated microscope
- Create a protocol.
- Turn on the automated microscope software and the fluorescence illuminator.
- In the menu bar, click on "File," "Create protocol," select "DAPI," "FITC," and "TRITC."
- Click "Next," "Tissue section," and click "Next," "Protocol name." Choose a name, for example, "CD8-PD-1-Tim-3," click "Next" and "Save."
- Manually place a slide on the stage.
- In the menu bar, click "setup" and "settings." Click "Set home Z" in the new window.
- Adjust exposure time with a positive control slide, i.e., a CD8, PD-1, and Tim-3 triple-stained with a DAPI sample.
- In the control bar, click "set exposure."
- Adjust the exposure time for each filter until a sufficient but not saturating signal is obtained.
- For monochrome imaging, perform the following:
- Select acquisition, and under 'autofocus,' choose the DAPI filter.
- In the "scan area limit," move the objective upper to the upper left corner of the slide. Click "Mark". Do the same for the lower right corner.
NOTE: This step delimitates the area of low-power imaging (LP imaging) at 4X; be sure to place the mark well to surround all the samples of the series.
- For high power (HP) imaging, perform the following:
- Under 'Autofocus,' choose "DAPI."
- Under the 'Acquisition' band, choose "DAPI," "FITC," "Cy3", and "Cy5". Click "OK". Click "File" and "Save protocol" on the menu bar.
- Scan the slides.
- Load the protocol by clicking "File" and "Load protocol" from the menu bar. Click "Start".
- Enter 'Lab ID' (folder location for image storage). Enter Slide ID to identify the slide. Click "Next".
- Click "Monochrome Imaging" (to scan the whole slide under bright field light and acquire sequential images using a 4x objective).
NOTE: This produces a grayscale overview of the slide.
- Click "Find Specimen". Select the area of tissue to be scanned at low resolution (4x): hold the 'Ctrl' key and click on a field using the cursor to select or deselect fields (Figure 2A).
- Click "LP Imaging" (4x imaging) for fluorescent Red Blue Green image acquisition of each field.
- For HP field selection, hold down the 'Ctrl' key and click on a field using the cursor to select or deselect fields corresponding to the tissue area that will be scanned at high resolution (20x). Select 5 fields (Figure 2B).
- Click "HP Imaging" (20x imaging) for a multispectral image acquisition of each field (Figure 2C).
- Click "Data Storage" to store images in the folder selected at the beginning in LabID.
NOTE: The process is summarized and illustrated in Figure 2. For each step (tissue detection, field selection), an algorithm can be incremented and trained by the user for a whole-automated scan process.
Table 1: Buffer composition of TBS and TBST. TBS is used for antibody mixes and dilutions. For washes, all steps are performed with TBS except for the washes following primary antibodies, where TBST is recommended.
| TBS | TBST |
| Tris-HCl | 0.05 M | 0.05 M |
| NaCl | 0.15 M | 0.15 M |
| Tween 20 | - | 0.05% |
| pH | 7.6 | 7.6 |
| preparation | 1 tablet in 500 mL H2O |
Table 2: Detailed antibodies mix composition for CD8-PD-1-Tim-3 immunofluorescence staining. For each primary, secondary, and tertiary antibody mixes, the dilution to perform in the corresponding volume of TBS is given for a total volume of 1 mL. For one slide, the total reaction volume is 100 µL for a tissue area of 2 cm2.
| The volume of primary antibody | Final V= 1mL |
| Rabbit anti-CD8 | Mouse anti-PD-1 | Goat anti-Tim-3 | TBS |
| 1.6 µL | 2 µL | 30 µL | 966.4 µL |
| The volume of secondary antibody | |
| Cyan 5 anti-rabbit | Biotinylated anti-mouse | Alexa Fluor 488 anti-goat | TBS |
| 3.3 µL | 2 µL | 2.5 µL | 992.2 |
| The volume of tertiary antibody | |
| Cy3 labeled streptavidin | | TBS |
| 3.3 µL | | 996.7 |