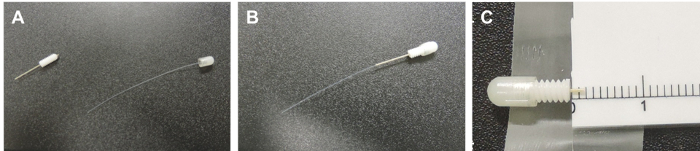
All procedures involving animal models have been reviewed by the local institutional animal care committee and the JoVE veterinary review board.
1. Material Preparation
NOTE: The surgery is conducted under aseptic conditions. Prior to starting, make sure that all surgical instruments, including the drill bits, are cleaned with an appropriate disinfectant.
- Prepare an anesthetic mixture: 0.02 mg/mL of fentanyl, 0.4 mg/mL of midazolam, and 0.2 mg/mL of medetomidine (final concentrations in the mixture).
NOTE: See the respective Discussion section for alternative anesthetics.
- Prepare an antidote mixture: 0.07 mg/mL of flumazenil and 0.42 mg/mL of atipamezole (final concentrations in the mixture).
- Assemble the catheter and the catheter cap with the inlet and the screw. Cut the catheter to a length of 2 mm with a scalpel (Figure 1).
NOTE: Do not use scissors for this since they squeeze and distort the circular cross-sectional shape of the catheter tip.
2. Surgical Preparation
- Anesthetize the rat by an intraperitoneal administration of the anesthetic mixture (1.5 mL/kg of body weight).
- Shave the head of the rat between the ears using the electric shaver. Place a homeothermic blanket on the stereotactic frame before positioning the animal, to avoid hypothermia throughout the surgery.
- Immobilize the rat's head in the stereotactic frame using the ear bars and bite plate, ensuring that the head is horizontal and stable. Check the stability by applying pressure to the skull with finger or forceps.
NOTE: A loose fixation and non-horizontal positioning within the stereotactic frame may cause a deviation from the intended coordinates.
- Apply lubricating eye drops to prevent cornea dryness during the surgery. Cover the eyes with an opaque material to prevent any surgical light exposure.
- Clean the shaven area by alternating the application of 70% ethanol and 10% povidone-iodine complex.
NOTE: Follow all precautionary measures during surgery to avoid infection. The surgery is conducted under aseptic conditions. If asepsis is broken, then the contaminated material has to be replaced.
3. Catheter Implantation
- Make a longitudinal incision of about 2 cm of length in the middle of the head skin. Use bulldog clamps to hold the skin off to the sides. For an overview of these steps, see Figure 2.
- Remove the blood using a cotton-tipped applicator.
- Remove the skull periosteum. Clean the tissue with the cotton-tip applicator and expose the skull bone. Allow the skull to dry for about 1 min.
- Identify the anatomical landmarks, Lambda, Bregma, and medial suture. With the drill installed on the stereotactic frame, position the drill tip at the Bregma as the starting point. Move 2 mm posterior from the Bregma and move ~2.4 mm laterally to the medial suture.
- Drill a 0.5 mm diameter hole for the catheter at this position. Gently puff away any bone dust.
NOTE: It is important that the dura mater remains intact during the drilling. To ensure this, 1) use a drill that can be installed on the stereotactic frame, 2) inspect the hole frequently during the drilling, and 3) drill down in small steps. If too much pressure is applied to the skull, the drill tip will continue into and damage the brain when the skull is fully penetrated.
- Drill 3 further holes (~1.3 mm in diameter) for the anchor screws a few millimeters away from the first hole. Gently blow bone dust away.
NOTE: Select anchor screw locations that provide enough space for the catheter top (~2 mm in diameter) and the anchor screw tops (~1 mm).
- Remove the bone dust by irrigation with around 1 - 2 mL of sterile phosphate-buffered saline (PBS) or physiological saline using a syringe. Clean the skull. Tighten the anchor screws by 2 - 3 full turns.
NOTE: The anchor screws are necessary to stabilize the set-up by holding the dental cement and, thereby, the catheter in place. While tightening an anchor screw, ensure that it is not easily removable by gently lifting it upwards with forceps. Since the implantation of the catheter itself causes tissue trauma, additional dura injury while drilling for or tightening the anchor screws will lead to multiple traumatic injuries and possibly hamper the comparability within a group. Tighten the anchor screws first and insert the catheter last.
- Insert the 2-mm length catheter through the first hole, perpendicular to the skull surface. While still holding the catheter in, apply a little dental cement and let it polymerize with a brief (~5 s) exposure to the dental curing light to stabilize the catheter, allowing the use of both hands in the next step.
CAUTION: While working with a dental curing light, avoid looking directly at the tip, or at the light reflected from the application area, as the high intensity of this light can cause retinal damage. Use appropriate protective goggles.
- Apply more dental cement around the catheter, anchor the screws, and solidify the dental cement with the dental curing light (~15 - 30 s). Confirm the hardening of the cement with the tip of a forceps.
4. Closing of the Wound and Antagonization of Anesthesia
- Close the head skin with resorbable sutures, anterior and posterior to the catheter.
NOTE: Since there will be a bumpy set-up over the skull at the end of the implantation, do the wound closure accordingly. Lifting up the skin too much will result in discomfort for the animal.
- Inject the antidote mixture subcutaneously (1.5 mL/kg of body weight) using a 1 mL syringe with a 26 G needle.
- Administer enrofloxacin (2.5%) by subcutaneous injection (7.5 mg/kg body weight) for prophylactic antibiotic treatment. Administer carprofen (1 mg/mL; 5 mg/kg body weight) and buprenorphine (1.2 mg/kg) for pain relief by subcutaneous injection.
5. Post-operative Care and Medication
- Return the animal to the modified cage and keep it under observation for 1 - 3 h, with an application of infrared light to avoid hypothermia. Constantly observe and reposition the animal every 5 to 10 minutes until postoperative recovery. Take special care to avoid constant light exposure to the eyes till recovery.
- Repeat enrofloxacin (7.5 mg/kg body weight) and carprofen (1 mg/mL; 5 mg/kg body weight) administrations by subcutaneous injections the day after surgery. Buprenorphine is not necessary to be refreshed as the previous treatment is effective for 72 hours.
6. Preparation of Immunization Mixture (at the Earliest 14 Days after Catheter Implantation)
NOTE: Place the syringes on ice during the preparation procedure.
- Connect two 10 mL Luer lock tip glass syringes to the short arms of a 3-way stopcock and close the third outlet with the long arm.
- Ensure the connections are secure and leak-free: add approximately 4 mL of sterile PBS to the open syringe while holding piston 2. Insert piston 1 and push both pistons back and forth while checking for leakage. If no leakage occurs, discard the PBS and remove piston 1 again.
- Pipette 1 mL of incomplete Freund's adjuvant (IFA) and 50 µg of recombinant myelin oligodendrocyte glycoprotein (rMOG1-125) together and adjust the mixture to a final volume of 2 mL with sterile PBS (pH 7.4) in a suitable tube.
NOTE: Due to losses of emulsion on the tips or walls of syringes during the preparation, prepare a larger volume than intended for the administration. It is similarly more practical to prepare for more than 1 animal at once.
- Place the diluted IFA and rMOG1-125 mixture in the open syringe. Insert the piston gently while maintaining a loose pressure on the opposite piston (Figure 3A).
- Emulsify the inoculum by driving it from one syringe to the other by pushing the pistons back and forth until it is white and viscous (Figure 3B).
- Fix a 1 mL Luer lock syringe to the open short arm of the 3-way stopcock and fill it with inoculum (Figure 3C). Distribute all inoculum to 1 mL syringes. Keep it on ice until the injection. Administer the mixture on the day of the preparation.
7. Immunization
- Anaesthetize the rat with isoflurane in a chamber (~2 min, mixed with oxygen 2 L/min) and then sustain anesthesia through a mask (mixed with oxygen 1.5 L/min).
- Inject 200 µL of inoculum subcutaneously at the tail base using a 21 G needle.
NOTE: Administer the injection slowly as the solution is viscous.
8. Intracerebral Cytokine Injection
- Adjust the length of the connector cannula (2 mm). (See Figure 4 for the preparation steps.)
- Fill a 1 mL syringe with the cytokine mixture (500 ng/µL of tumor necrosis factor-alpha (TNF-alpha), 300 U/µL of recombinant rat interferon-gamma (IFN-gamma) in sterile PBS). Connect the syringe to a connector cannula. Fill the cannula with the cytokine mixture. Avoid any bubbles.
- Mount the syringe onto the programmable syringe pump and program it to inject 0.2 µL/min (Figure 5A). Start the pump and keep it working in order to avoid an air bubble formation at the tip of the cannula.
NOTE: The injection speed must take into account the inner diameter of the specific syringe used; thereby, the syringe diameter has to be registered during the pump set up.
- Anesthetize the rat with isoflurane in a chamber (~2 min, mixed with 2 L/min of oxygen) and then sustain the anesthesia through a mask (mixed with 1.5 L/min of oxygen) (Figures 5B and 5C). Apply lubricating eye drops as the animal will be anesthetized for at least 30 min.
- Remove the catheter cap with the inlet. Insert the connector cannula into the catheter and screw and tighten it (Figures 5D and 5E).
NOTE: Do not overtighten it, as this will destroy the upper tip of the catheter.
- Allow the injection to proceed for 10 min (the total volume of injection being 2 µL). Stop the pump. Leave the cannula inside the catheter for 20 min to allow the injected volume to fully diffuse.
- Unscrew the connector cannula and remove it slowly to avoid a vacuum effect.
- Reattach the catheter cap with the inlet and screw it. Allow the animal to recover from the anesthesia in a cage.