1. Fixation and Immunofluorescent Staining Procedure
- Using a p200 pipette, transfer dissected brains from the 9-well dish to a 0.5 mL microcentrifuge tube filled with 0.5 mL of 4% paraformaldehyde diluted in PTN (0.1 M Sodium Phosphate Buffer pH 7.2, 0.1% nonionic surfactant). At least 10 - 15 brains of the same genotype can be combined into one microcentrifuge tube. All remaining steps (until mounting of brains onto slides) are completed in 0.5 ml microcentrifuge tubes.
CAUTION: Paraformaldehyde (PFA) should be handled in a fume hood. PFA waste should be saved and disposed of properly. Twenty percent of the paraformaldehyde purchased in glass ampules can be aliquoted into microcentrifuge tubes and stored at -20 °C until needed.
- Inside a fume hood, incubate brains in 4% paraformaldehyde for 20 min with slow-speed rocking at room temperature.
- Following fixation, allow brains to settle to the bottom of the microcentrifuge tube by gravity.
NOTE: The brains may occasionally stick to the microcentrifuge tube's side. If this occurs, it is usually helpful to laterally rotate the tube between the index finger and thumb or gently tap the tube on the bench to promote the sinking of the brains.
- Remove the fixative using a p1000 pipette and perform two "quick" washes with 500 μL of PTN, allowing the brains to settle to the bottom of the microcentrifuge tube between washes. During these quick washes, once all the brains have settled by gravity to the bottom of the microcentrifuge tube, the PTN can be immediately exchanged for fresh buffer; no additional wash time is required.
NOTE: Typically, leaving extra buffer in the tube is preferable to risking brain removal. Careful examination of the pipette tip is often required to ensure no brains have been mistakenly removed from the tube. If brains have been accidentally pipetted into the tip, dispense them back into the microcentrifuge tube, wait for the brains to settle, and then continue removing any remaining PTN.
- After the last quick wash, use a p1000 pipette to perform three "long" washes: add 500 μL of PTN and wash for 20 min at room temperature on a rocker/nutator. All future "long" washes should be for 20 mins.
NOTE: Fixed brains may be stored overnight at 4 °C in PTN following these washes.
- Remove the last wash using a p1000 pipette and incubate brains on a rocker or nutator at room temperature in 0.5 mL of blocking solution [PTN + 5% normal goat serum (NGS)] for at least 30 min at room temperature.
- Goat secondary antibodies will be used in subsequent protocol steps. If secondary antibodies from another species are used, normal serum from that species (rather than NGS) should be used in the blocking and antibody solutions.
- Using a p1000 pipette, remove the blocking solution and add the primary antibody diluted in PTN (PTN + 5% NGS + diluted primary antibody). When using a primary antibody for the first time, the optimal dilution of that antibody should be determined empirically.
NOTE: For visualizing mushroom body neurons, antibodies recognizing Fas2 are typically used. These antibodies are available from the Developmental Studies Hybridoma Bank (DSHB) as antibody 1D4 and should be diluted 1:20 in PTN + 5% NGS.
- Incubate brains in primary antibody solution on a rocker/nutator for 2 - 3 nights at 4 °C.
- Following incubation with primary antibodies, allow brains to settle to the bottom of the microcentrifuge tube and then remove the primary antibody solution.
- Using a p1000 pipette, perform 2 "quick" washes and 3 "long" 20 min washes with 0.5 mL of PTN as described above in Steps 1.4 and 1.5, carefully allowing brains to settle by gravity to the bottom of the microcentrifuge tube between each wash.
- Incubate brains for 3 h at room temperature with appropriate fluorescently labeled secondary antibodies. Secondary antibodies are usually diluted in 0.5 mL of PTN + 5% NGS at a concentration of 1:200.
NOTE: Once fluorescent secondary antibodies have been added, brains should be kept in the dark for the remainder of the experiment.
- Following secondary antibody incubation, allow brains to settle to the bottom of the microcentrifuge tube and remove the secondary antibody solution.
- Perform 2 "quick" washes and 3 "long" 20 min washes with 0.5 mL of PTN as described above in Steps 1.4 and 1.5, carefully allowing brains to settle to the bottom of the microcentrifuge tube between each wash.
- Following the third "long" 20 min wash, use a p200 pipette to remove as much buffer as possible.
- Add 75 μL of fluorescent anti-fade mounting medium to the brains. Pipette brains and mounting medium into the pipette tip once to mix. Do not invert the tube since brains may become stuck on the cap or sides of the microcentrifuge tube.
NOTE: Following suspension of brains in mounting medium, tubes may be wrapped in aluminum foil to slow fluorophore quenching and stored at 4 °C overnight. If necessary, brains can be stored for several days at 4 °C but should ideally be mounted onto slides as soon as possible.
2. Mounting Adult D. melanogaster Brains onto Microscope Slides and Imaging
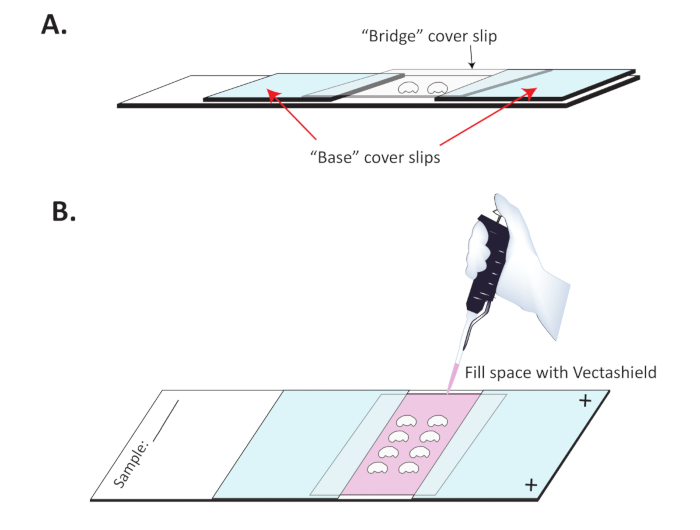
- Build a "bridge" slide. Position two "base" coverslips roughly 1 cm apart on a positively charged slide. Ensure that the positively charged side of the slide is facing up. Adhere the coverslips to the slide with fingernail polish, as shown in Figure 1A. Sealing the three outer edges of each base cover slip with fingernail polish is usually helpful to ensure mounting media does not wick under these base coverslips. Let fingernail polish dry completely (10 - 15 min) before proceeding.
- Place the slide under the stereomicroscope and pipette the mounting media solution containing the dissected brains into the space between the two coverslips. To provide more contrast, it is helpful to maneuver the gooseneck lights so that they are parallel with the bench top.
- Remove extra mounting media from the slide using a pipette, being careful not to pipette the brains off the slide.
- Wick away extra mounting media. This will allow the brains to be positioned more precisely during the next step.
- Using a pair of forceps and the stereomicroscope, position the brains on the slide in a grid pattern with antennal lobes facing up.
- Place a cover slip (the "bridge") over the brains (Figure 1A). Use fingernail polish to seal the sides of the bridge cover slip where they contact the "base" cover slips.
- Using a p200 pipette, slowly fill the center cavity under the bridge with fresh mounting media (Figure 1B). Place one drop at a time on the open edge of the center coverslip and allow the mounting media to wick under the center bridge coverslip. Continue until the entire cavity is filled with mounting media, then seal the top and bottom with clear fingernail polish.
- Once the fingernail polish is dry, image the slides immediately or store in a lightproof tight slide box at -20 °C.
- Within one week, image brains using a laser-scanning confocal microscope with excitation lasers and filter cubes appropriate to the chosen fluorescent secondary antibodies. Z-stack images of mushroom body neurons are typically obtained using 20X or 40X objectives.