Method Article

Detection of Protein-Protein Interactions in Drosophila Larvae Using a Proximity Ligation Assay

July 8th, 2025

In This Article

Abstract

Loading...
$$\rightleftharpoonup{xx}$$ $$\longleftharp{xx}$$, $$\longrightharp{xx}$$,

Source: Wang, S., et al. Detection of In Situ Protein-protein Complexes at the Drosophila Larval Neuromuscular Junction Using Proximity Ligation Assay. J. Vis. Exp. (2015).

This video demonstrates the visualization of protein-protein interactions at the Drosophila neuromuscular junction (NMJ) using Proximity Ligation Assay (PLA). After isolating the body walls, interacting proteins are probed with primary antibodies and PLA-conjugated secondary antibodies. The proximity of the interacting proteins facilitates the ligation of probes with connector oligonucleotides, forming circular DNA, which is then amplified by rolling circle amplification. Fluorescent probes bind to the amplified DNA, allowing the visualization of protein-protein interactions at the NMJ.
Protocol

Loading...
$$\rightleftharpoonup{xx}$$ $$\longleftharp{xx}$$, $$\longrightharp{xx}$$,

1. Body Wall Preparation

NOTE: Preparation of third instar larval body walls (for study of the NMJs which innervate the body wall muscles) was performed as previously described but with some modifications.

  1. Dissection
    1. Raise fly stocks and crosses at 25 °C for five to six days using standard procedures.
    2. Pick crawling third instar larvae from vials or bottles using fine forceps.
    3. Wash the larvae in a small Petri dish containing Phosphate Buffer Saline (PBS) to remove any food particles.
    4. Place a single larva onto a sylgard disc and immerse it in a few drops of ice-cold PBS. Using ice-cold PBS will help stun the larva making it easier to manipulate. Throughout the dissection, ensure that the preparation is always submerged in PBS to prevent it from drying.
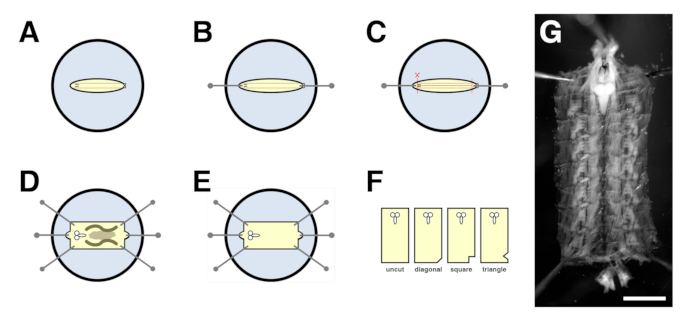
    5. Position the larva with its dorsal side facing up so that the two tracheal tracts are visible under a dissecting microscope (Figure 1A). Using the forceps to grasp a minutien pin, pin the larva down at the posterior end near the spiracles (Figure 1B). With another pin, pierce through the cuticle at the anterior end near the mouth hooks. Gently stretch the larva out lengthwise, then pin it down (Figure 1B).
    6. Using microdissection scissors, pinch the posterior end near the pin to create a small opening. The incision should be superficial enough to just pass through the cuticle.
    7. Placing the tip of the bottom blade of the scissors into the incision, cut along the entire length of the dorsal midline between the two tracheal tracts (Figure 1C). Point the scissor blades slightly upwards when cutting to avoid damaging the ventral body wall muscles.
    8. Make a small horizontal incision slightly anterior to the posteriorly placed pin (Figure 1C). Make another similar incision slightly posterior to the anteriorly placed pin (Figure 1C). The incisions should just pass through the cuticle.
      NOTE: The three incisions from steps 1.1.7 and 1.1.8 combined should resemble an "Static equilibrium, ΣFx=0, ΣFy=0; diagram detailing force vectors and balance principles." when completed, i.e., a left- and right-hand flap on the dorsal side of the larval body should be produced.
    9. Carefully clean out the internal organs with the forceps. Adding a few forceful drops of PBS will help displace the organs out of the larval body, thus making it easier to remove them. Avoid poking the larval body as it will cause damage to the body wall muscles.
    10. Unfurl the larval body open and pin the corners down (Figure 1D). When pinning, stretch the body wall both horizontally and vertically to form an evenly tensioned rectangle (see Figure 1G for the shape), taking care not to tear the body wall muscles in the process.
    11. Finish removing any remaining internal organs (Figure 1E).
  2. Fixation and Permeabilization
    1. Immerse the pinned body walls in several drops of Bouin's Solution. Incubate for 15 min on ice. Alternatively, use 4% paraformaldehyde (PFA) as an alternative fixative; incubate for 30 min.
    2. Rinse three times with Phosphate Buffer Saline with Triton (PBT).
    3. Using fine forceps, carefully remove the pins and transfer the body walls by their corners into a siliconized 0.65 ml microcentrifuge tube.
    4. Store the body walls in PBT at 4 °C until ready for PLA. For optimal results, start immunostaining the body walls within a day or two of dissection.
      NOTE: To save on reagents and to ensure that all body walls are treated equally during the assay, different genotypes can be placed into a single tube. Genotypes can be distinguished by cutting the corners of the body walls differently (see Figure 1F for example).

2. Immunohistochemistry

NOTE: Immunostaining of third instar larval body walls was performed as previously described but with some modifications.
NOTE: Perform all steps at room temperature and with gentle agitation unless otherwise stated.

  1. Blocking
    1. Wash the body walls with PBT three times for 10 min each.
    2. Block with 1% Bovine Serum Albumin (BSA) for 1 hr.
  2. Immunostaining
    1. Incubate the body walls with mouse and rabbit primary antibodies against the two proteins of interest (diluted in 1% BSA) for 2 hr at room temperature, or overnight at 4 °C. In this case, use 1:10 mouse anti-Dlg (Dlg = discs large) and 1:250 rabbit anti-HtsM (HtsM: Hu-li tai shao mutant). Antibodies against markers that are not made in mouse or rabbit can also be included — e.g., use 1:200 goat anti-Hrp (Hrp = horseradish peroxidase) to delineate the neuronal membranes.
    2. Wash with PBT three times for 10 min each.
    3. Incubate with fluorophore-conjugated secondary antibodies to detect the markers (diluted in 1% BSA) for 2 hr at room temperature, or overnight at 4 °C. As the PLA signal is later visualized with a red fluorophore, another fluorophore must be used to detect the marker — e.g., use 1:200 Fluorescein isothiocyanate (FITC)-conjugated anti-goat to detect the goat anti-Hrp antibody. Due to the use of light-sensitive reagents, keep the tubes in the dark from this point onwards.
      NOTE: The kit that is used allows PLA to be performed between primary antibodies raised in mouse and rabbit, with the signal visualized on the red channel under confocal microscopy. If desired, other kits are available that allow the assay to be done with primary antibodies raised in other species, and the signal visualized on other channels.

3. Proximity Ligation Assay

NOTE: Perform all steps at room temperature and with gentle agitation unless otherwise stated.

  1. PLA Probes
    1. Wash the body walls with PBT three times for 10 min each.
    2. Incubate with PLA probes (1:5 dilution each in 1% BSA) for 2 hr at 37 °C. In this case, use 40 µl of PLA probe anti-mouse MINUS, 40 µl of PLA probe anti-rabbit PLUS and 120 µl of 1% BSA to ensure the proper immersion and mixing of 5-10 body walls. Up to a 1:25 dilution of the PLA probes can still result in an adequate signal-to-noise ratio (i.e., for this experiment).
  2. Ligation
    1. Wash the body walls with Wash Buffer A twice for 5 min each.
    2. Incubate with Ligation solution (1:40 dilution of Ligase in Ligation buffer) for 1 hr at 37 °C. In this case, use 5 µl of Ligase, 40 µl of 5 Ligation buffer and 155 µl of high purity water to ensure the proper immersion and mixing of 5-10 body walls.
  3. Amplification
    1. Wash the body walls with Wash Buffer A twice for 2 min each.
    2. Incubate with Amplification solution (1:80 dilution of Polymerase in Amplification buffer) for 2 hr at 37 °C. In this case, use 2.5 µl of Polymerase, 40 µl of 5 Amplification buffer and 157.5 µl of high purity water to ensure the proper immersion and mixing of 5-10 body walls.
  4. Preparation for Imaging
    1. Wash the body walls with Wash Buffer B twice for 10 min each.
    2. Wash with 0.01x Wash Buffer B once for 1 min.
    3. Equilibrate in a few drops of mounting solution for at least 30 min before mounting, or store overnight at 4 °C.
    4. Using fine forceps, carefully transfer the body walls onto a platform slide with their cuticles facing down. Position the body walls in rows and in the same orientation within a drop or two of mountant. Place a 22 mm x 40 mm coverslip over the preparation taking care not to generate air bubbles, then seal the slide with clear nail polish.
    5. Store the slides in the dark at -20 °C until ready for confocal imaging.

Access restricted. Please log in or start a trial to view this content.

Results

Loading...
$$\rightleftharpoonup{xx}$$ $$\longleftharp{xx}$$, $$\longrightharp{xx}$$,

Morphogenetic changes in embryonic development; diagram illustrating various deformation stages.
Figure 1: Preparation of third instar larval body walls. (A-F) Schematic drawings representing a body wall dissection. (A) Place a single larva onto a sylgard disc with its dorsal side facing up so that the two tracheal tracts are visible. ...

Access restricted. Please log in or start a trial to view this content.

Disclosures

Loading...
$$\rightleftharpoonup{xx}$$ $$\longleftharp{xx}$$, $$\longrightharp{xx}$$,
No conflicts of interest declared.

Materials

List of materials used in this article
NameCompanyCatalog NumberComments
Forceps (fine #5)AlmedicA10-704
Sylgard DiscWorld Precision InstrumentsSYLG184Mix elastomer base and curing agent in a 10:1 ratio. Set for 30 min. Pour into a mold (e.g. use a 12-well cell culture plate). Let cure for at least 24 hr. Adhere to the lid of a 60x15mm petri dish lid when dissecting.
Minutien Pins (0.0125 mm tip diameter)Fine Science Tools26002-10
Microdissection Scissors (ultra fine)Fine Science Tools15200-00
Platform SlidesGlue two 22x22mm coverslips onto a microscope slide with clear nail polish, leaving a <20mm gap in between for sample mounting.
w1118Bloomington Drosophila Stock Center3605
hts01103Bloomington Drosophila Stock Center10989Stock was re-balanced over a GFP balancer so that homozygous mutants can be selected based on the absence of GFP signal.
1x PBS (Phosphate Buffered Saline): 3mM NaH2PO4, 7mM Na2HPO4, 130mM NaCl, pH 7.0NaH2PO4 (Caledon Laboratories - 8180-1), Na2HPO4 (Caledon - 8120-1), NaCl (Caledon - 7560-1)
Bouin's SolutionSigma-AldrichHT10132
4% PFA (Paraformaldehyde): 4% PFA in 1x PBSPFA (Anachemia Science - 66194-300). See doi:10.1101/pdb.rec9959 Cold Spring Harb Protoc 2006 for instructions on how to make the solution.
1x PBT (Phosphate Buffered Saline with Triton): 1x PBS with 0.01% TritonTriton X-100 (Sigma-Aldrich - T8787)
1% BSA (Bovine Serum Albumin): 1% BSA in 1x PBTBSA (Bioshop Canada - ALB001). Store at 4 °C.
mouse anti-Dlg (Discs large)Developmental Studies Hybridoma Bank4F3Use at a 1:10 dilution in 1% BSA.
rabbit anti-HtsM (Hu-li tai shao)Provided by Dr. Lynn Cooley (Yale University). Use at a 1:250 dilution in 1% BSA.
rabbit anti-Pak (p21-activated kinase)Provided by Dr. Nicholas Harden (Simon Fraser University). Use at a 1:500 dilution in 1% BSA.
mouse anti-Wg (Wingless)Developmental Studies Hybridoma Bank4D4Use at a 1:5 dilution in 1% BSA.
goat anti-Hrp (Horseradish peroxidase)Jackson ImmunoResearch123-065-021Use at a 1:200 dilution in 1% BSA.
FITC-conjugated donkey anti-goatJackson ImmunoResearch705-095-003Use at a 1:200 dilution in 1% BSA.
Duolink In Situ PLA Probe anti-mouse MINUSSigma-AldrichDUO92004
Duolink In Situ PLA Probe anti-rabbit PLUSSigma-AldrichDUO92002
Duolink In Situ Detection Reagents RedSigma-AldrichDUO92008
1x Wash Buffer A: 0.01M Tris, 0.15M NaCl, 0.05% Tween 20, pH 7.4Sigma-AldrichDUO82049Tris (Caledon Laboratories - 8980-1), NaCl (Caledon - 7560-1), Tween 20 (Fisher Scientific - BP337)
1x Wash Buffer B: 0.2M Tris, 0.1M NaCl, pH 7.5Sigma-AldrichDUO82049Tris (Caledon Laboratories - 8980-1), NaCl (Caledon - 7560-1)
0.01x Wash Buffer B: 2mM Tris, 1mM NaCl, pH 7.5Sigma-AldrichDUO82049Tris (Caledon Laboratories - 8980-1), NaCl (Caledon - 7560-1)
Duolink In Situ Mounting Medium with DAPISigma-AldrichDUO82040

Reprints and Permissions

Request permission to reuse the text or figures of this JoVE article

Request Permission

Tags

Neuromuscular JunctionPrimary AntibodiesRolling Circle AmplificationFluorescent DetectionBody Wall IsolationLigase EnzymePolymerase Amplification

Related Articles