In this video, an anesthetized mouse undergoes a surgical procedure in which cancer cells are injected into the common carotid artery (CCA) to facilitate targeted delivery to the brain. The procedure involves precise suturing and manipulation of the carotid arteries to direct the injected cells toward the internal carotid artery (ICA), promoting tumor formation in the brain over time.
A subscription to JoVE is required to view this content. Sign in or start your free trial.
Method Article
Modeling Brain Tumor Metastasis via Internal Carotid Artery Injection of Cancer Cells
1.7K views
⸱
April 28th, 2025
In This Article
Abstract
Protocol
All procedures involving animal models have been reviewed by the local institutional animal care committee and the JoVE veterinary review board.
1. Preparation of cancer cells for injection
NOTE: In this study, the human breast cancer cell line, BT-474 (BT474), was used. BT474 was cultured in a complete growth medium comprising RPMI (Roswell Park Memorial Institute Medium) 1640 medium supplemented with 10% fetal bovine serum and 1% insulin. The cells were maintained in an incubator at 37 °C with 5% carbon dioxide in air atmosphere. Authenticate the cell line by satellite tandem repeats testing, confirm expression of the reporter protein (e.g., luciferase), if any, and check for mycoplasma infection.
- Seed BT474 cancer cells at a seeding density of 2.0 × 10^6 cells into a T75 flask using 10 mL of complete growth media and culture (at 37 °C with 5% carbon dioxide) to 70%-80% confluency before injection.
- On the day of injection, discard growth media and wash the cell monolayer twice with phosphate-buffered saline (PBS).
- Add 5 mL of prewarmed cell culture dissociation reagent and incubate at 37 °C for 5 min or until cells have detached. After 5 min, gently tap the flask to aid cell detachment.
- Add 5 mL of complete growth media containing 10% fetal bovine serum to quench the dissociation reagent activity.
- Gently resuspend the cells by pipetting to reduce cell clumps.
- Transfer the cell suspension into a 50 mL tube and centrifuge at 180 x g for 3 min at room temperature.
- Decant the supernatant and resuspend the cell pellet in 10 mL of Hank's Balanced Salt Solution (HBSS) without calcium and magnesium to minimize cell clumping.
- Centrifuge the cell suspension at room temperature at 180 x g for 3 min.
- Decant the supernatant to remove residual serum/dissociation reagent and resuspend the cell pellet in 3 mL of HBSS.
- Place a 100 µm cell strainer on a fresh 50 mL conical tube and pass the cell suspension through to remove cell clumps.
NOTE: A single-cell suspension is essential to minimize blood vessel occlusion and the risk of stroke on injection. - Calculate the number of viable cells using Trypan Blue exclusion and a hemocytometer using standard methods.
- Dilute the cell suspension with HBSS to a cell concentration of 2.5 x 10⁶ cells/mL.
- Keep the tube horizontal on ice and gently rock the tube periodically to minimize clumping. The cell suspension can be stored on ice for a maximum of 6 h.
NOTE: Rocking was done manually, but this can also be done using a shaker at low rpm.
2. Preparation of the mouse for the procedure
NOTE: In this study, 4-5 weeks old, female NOD scid mice were used. Introduce soft-diet recovery food (e.g., diet gel, hydrogel, mashed mouse chow) to mice 3 days before the procedure to encourage feeding after the procedure.
- Autoclave surgical tools. Spray and wipe down the surgical area and equipment with surface disinfectant, followed by 70% ethanol.
- Place an animal heat mat under the surgical board to prevent hypothermia. Switch this on 30 min before surgery. Spray and wipe down the surgical board with surface disinfectant, followed by 70% ethanol.
- Prepare a clean animal housing cage and a warm heating pad for recovery.
- Put on clean personal protective equipment (gown, mask, hairnet, and gloves). Maintain sterility throughout the procedure using clean exam gloves and an 'instruments tips-only' technique.
- Anesthetize the mouse with an anesthetic chamber using 5% isoflurane with an oxygen flow of 2 L/min until the mouse loses the pedal reflex.
- Take the animal out of the chamber and place it in a nose cone delivering 2% isoflurane at an oxygen flow of 2 L/min for the remaining surgical procedure.
- Ear punch mouse for identification and use electric clippers to shave the fur from the neck region. Clean excess hair from exposed skin using tape.
- Weigh the mouse for calculating the anesthetic and analgesic drug doses required. Administer buprenorphine and meloxicam at 50 µg/kg and 1 mg/kg, respectively, via subcutaneous injection.
- Transfer the mouse to a warm surgical board and secure the nose cone with tape.
- Apply ocular lubricant to the eyes to prevent drying.
- Secure the mouse gently by first hooking the upper incisor teeth using thread taped to the surgical board, followed by taping the front and hind legs. This step extends the body and keeps the neck straight during the procedure.
- Perform preoperative skin preparation as described below.
- Wipe the neck with a topical antiseptic (povidone-iodine) to reduce skin microflora load and remove loose hair. Clean from the center of the skin, working outward to prevent recontamination of the incision site. Repeat the process using 70% ethanol. Perform three alternating rounds of iodine and ethanol for disinfection.
- Lay a surgical drape over the animal. This is cut and fashioned from a piece of sterile paper towel or autoclave bag.
- Lay out sterile paper towels or autoclave bags for surgical tools.
- Check for reflex via 'Pinch test' to ensure sufficient anesthesia before continuing the procedure.
3. Internal carotid injection
NOTE: In this experiment, a 31 G infusion cannula and foot-activated syringe-driver setup were utilized to facilitate the injection procedure. This setup is optional, and the user can use a 31 G insulin syringe and skip steps 3.11 and 3.12. To prepare the infusion cannula, pull and separate the needle portion from the syringe fitting portion of a 31 G needle using two pairs of suture clamps. Next, attach the needle portion to one end of a fine infusion tubing approximately 10 cm long.
- Position the dissection microscope over the mouse.
- Using scissors, make a vertical 15 mm incision along the midline at the neck region starting from 5 mm below the jaw to the thoracic inlet.
- Using two pairs of angled forceps, part the skin and underlying salivary glands and apply retractors to keep the trachea exposed. The next step will expose the carotid sheath that lies parallel to the trachea.
- Using two pairs of fine-angled forceps, bluntly dissect the muscle and fat tissue adjacent to the trachea to expose the right carotid sheath. The carotid sheath is the fibrous layer covering the common carotid artery, vein, and vagus nerve, and this bundle can be visualized by the bright red common carotid artery. In this study, the injection was performed on the right carotid artery.
- Clear a segment of the common carotid artery caudal to the carotid bifurcation of the surrounding fascia and separate it from the vagus nerve and veins.
- Isolate and clear the carotid bifurcation (the junction that joins the external and internal carotid arteries) from the surrounding nerves and fascia. Position fine forceps under the external carotid artery and pass a silk suture (5-0 thickness) under the artery. Knot and tighten the suture and cut the excess line.
NOTE: This ligature (L1) will prevent injectate from transiting through the external carotid artery. - Position fine forceps under the common carotid artery and pass a silk suture (5-0 thickness) under the artery. Tie a knot and tighten the suture at a position proximal to the proposed injection site. Cut the excess suture, leaving about 10 mm of line.
NOTE: This second ligature (L2) will restrict blood flow and bleeding after injection. It is also used to position and hold the carotid artery during the injection. - Cut and moisten a strip of (autoclaved) low-lint disposable wipers about 10 mm x 5 mm. Fold the strip into 4 mm x 5 mm, 2-3 mm thick, and place it underneath the carotid artery at the proposed injection site. This will support the vessel during the injection.
- On the common carotid artery rostral to the proposed injection site, place a third ligation (L3) with a loose knot. This is tightened only after the injection (at step 3.16).
- Gently agitate the cell suspension and draw 200 µL of cell suspension into an insulin syringe (with a 31 G needle).
- Load the syringe into the syringe driver, which is connected to an activating foot pedal.
- Attach a fine cannula with a 31 G needle to the syringe and prime the line.
- Check whether the carotid artery is well-positioned and pressurized.
- Using two fine angled forceps, one gently tensioning onto the end of the first ligature and the other holding the 31 G needle, slowly insert the needle with bevel up into the lumen of the blood vessel taking care not to puncture it.
- Slowly inject 100 µL of cell suspension (from step 1.13) into the common carotid artery at 10 µL/s. This will deliver 2.5 × 10^5 cells into the blood vessel. Successful injection is visualized via the clearing of blood from the carotid blood vessel.
- Gently lift and tighten the loose ligature (L3) (from step 3.9) immediately after withdrawing the needle to prevent backflow and bleeding. Trim excess suture.
NOTE: It is normal to observe a small amount of blood spurting after the withdrawal of the needle. However, there must not be any active bleeding after the third ligature is tightened. - Remove the piece of moistened low-lint disposable wipers.
- Using a P200 pipette, rinse the surgical cavity twice with 150-200 µL of sterile water or saline.
- Check again for bleeding, and then remove the retractors.
- Reposition the soft tissue, salivary glands, and skin over the carotid artery and trachea.
- Close the skin layer of the incision using a suture needle holder, forceps, and an absorbable or non-absorbable 6/0 monofilament suture in a continuous pattern.
- Discard the cannula needle syringe and prepare a new setup for the next mouse. Using a new syringe will ensure that the number of cells injected into each mouse is consistent.
NOTE: Representative snapshots of the procedure are in If the vessel is punctured or torn by the needle, indicated by the leakage of injectate or bleeding, the procedure is deemed unsuccessful. Following this, the needle must be withdrawn, and the third ligature must be immediately tightened to prevent further bleeding. If bleeding is persistent after tightening of the suture, the animal must be euthanized with pentobarbital.
4. Post-injection recovery
- Inject buprenorphine (50 µg/kg) and meloxicam (1 mg/kg) via subcutaneous injection as post-surgical pain relief.
- Move the animal to a warm and clean cage to recover from anesthesia. It is normal for an animal to have subdued activity (huddled and inactive or moving around slowly) after waking up.
- After 30-45 min, transfer mice to a long-term holding facility.
- Provide mice with a soft diet (diet gel, hydrogel, mash) for at least a week post-surgery and check physical status daily with special attention for signs of stroke, infection, and bleeding around the wound site.
- Two days post-surgery, it is typical for the animal to have reduced activity, mild ruffled fur, and lost 15% of pre-operative body weight. Administer analgesic (meloxicam) daily for 2-3 days post-surgery to manage pain and aid recovery.
- From day 3 onwards, animals must have regained activity, increased feeding and grooming frequency, and regained weight. Euthanize animals with persisting physical condition deficits (pain, huddled, inactive, weight loss) after 4 days post-surgery by injecting sodium pentobarbital at 200 mg/kg via intraperitoneal injection.
- Tumor engraftment and progression can be monitored using anesthesia and imaging modality of choice, such as bioluminescent imaging, MRI, or PET/MRI. The requirement and ability to undertake such imaging will be inherently dependent on the individual project aims and facility within which it is undertaken, and depending on the type of reporter tag the cell lines used, accessibility of relevant radiochemistry and nuclear imaging facilities.
NOTE: Some animals may not respond well and experience a stroke despite a successful procedure. After the procedure, animals that present with any symptoms of neurological distress (turning head and pulling to one side, circling behavior, rolling, thrashing, loss of motor function) must be euthanized immediately.
Access restricted. Please log in or start a trial to view this content.
Results
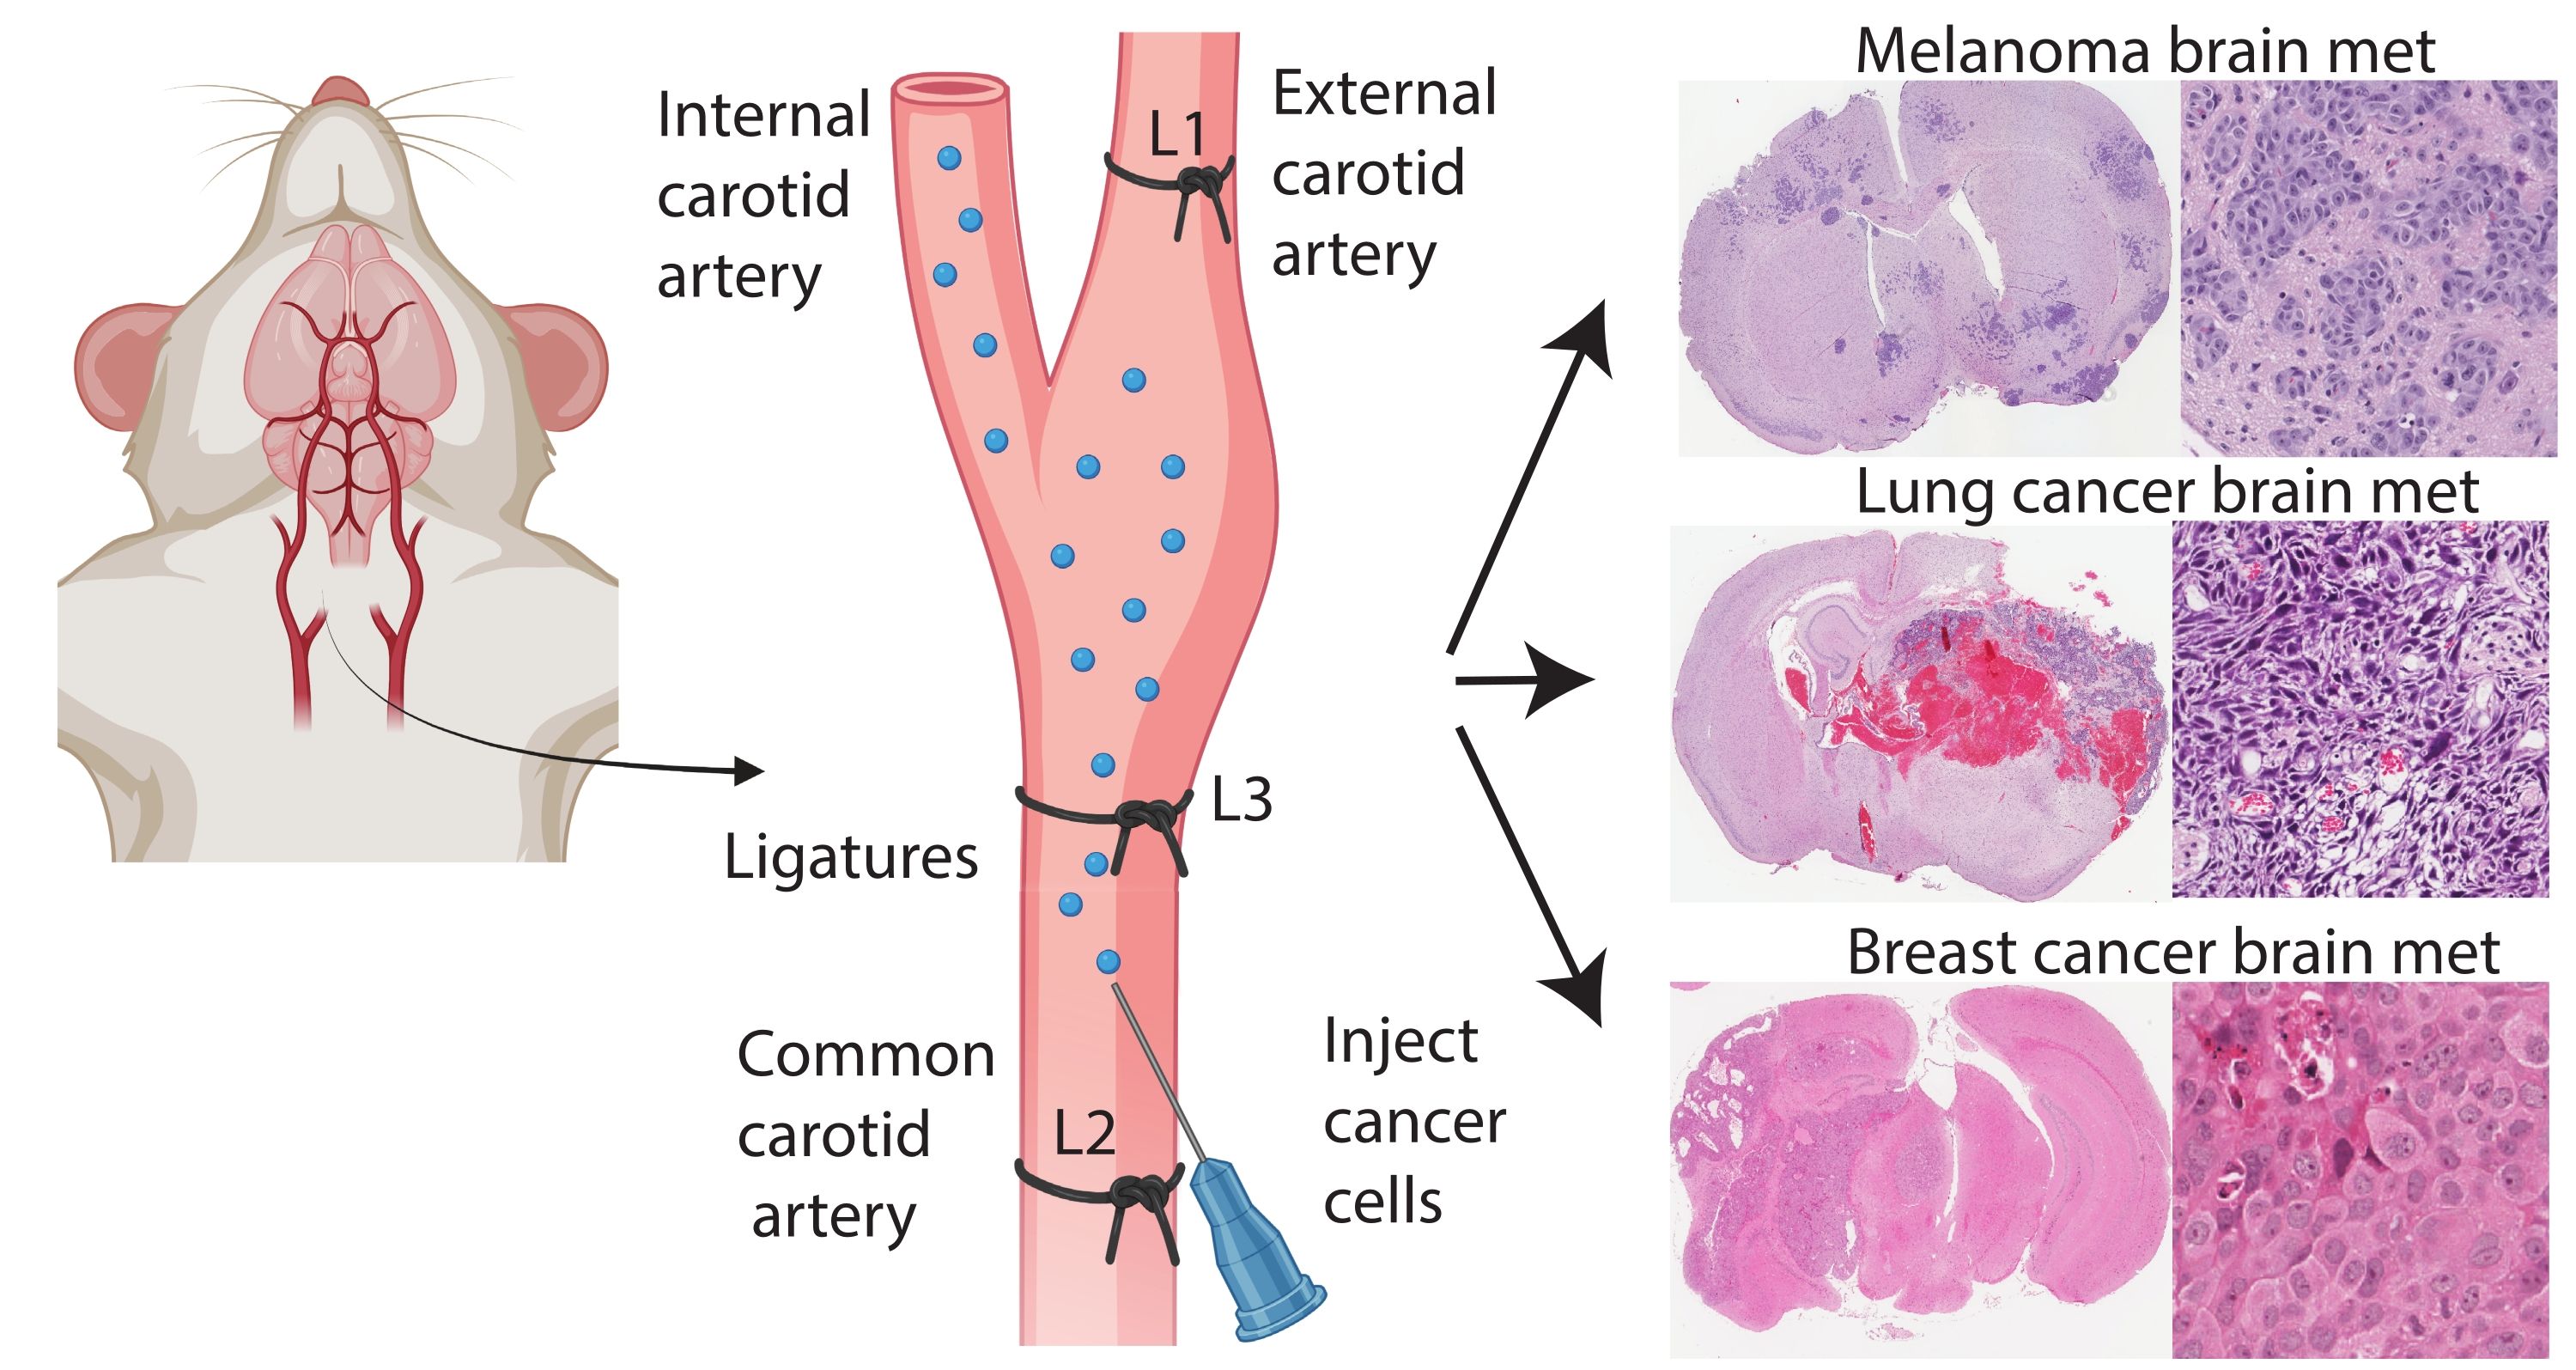
Figure 1: Schematic representation of internal carotid artery injection protocol for brain metastasis. Internal carotid artery injection with external carotid artery ligation can reliably pr...
Access restricted. Please log in or start a trial to view this content.
Materials
| Name | Company | Catalog Number | Comments |
|---|---|---|---|
| 30G Microlance needle | BD | 23748 | |
| 31G Ultra-Fine II insulin syringe | BD | 326103 | |
| Angled forceps | Proscitech | T67A-SS | Fine pointed, angled without serrations, 18mm tip, length 128 mm |
| Animal heat mat | |||
| Antibiotic and antimycotic | ThermoFisher Scientific | 15240062 | |
| BT-474 (HTB-20) breast cancer cell line | ATCC | HTB-20 | |
| Buprenorphine (TEMGESIC) | |||
| Countess cell counter | ThermoFisher Scientific | C10227 | |
| Dissection microscope | |||
| Ear puncher | |||
| Electric clippers | |||
| Fine angled forceps | Proscitech | DEF11063-07 | Angled 45°, Tip smooth, Tip width: 0.4 mm, Tip dimension: 0.4 x 0.3 mm, length 9cm |
| Fine tubing for cannula, Tubing OD (in) 1/32, Tubing ID (in) 1/100in | Cole Parmer | EW-06419-00 | |
| Foetal bovine serum | ThermoFisher Scientific | 26140079 | |
| Hank's Balanced Salt Solution without calcium and magnesium | ThermoFisher Scientific | 14170120 | |
| Isoflurane | |||
| Kimwipes Low lint disposable wipers | Kimberly Clark- Kimwipes | Z188964 | |
| Mashed mouse chow | |||
| Meloxicam (METACAM) | |||
| Nose cone | Fashioned out of a microfuge tube | ||
| PAA ocular lubricant (Carbomer 2mg/g) | Bausch and lomb | ||
| Povidone-iodine solution | Betadine | 2505692 | |
| PPE (glove, mask, gown, hairnet) | |||
| Retractors | Kent Scientific | SURGI-5001 | |
| RPMI 1640 Media | ThermoFisher Scientific | 11875093 | |
| Silk suture 13mm 5-0, P3, 45cm | Ethicon | JJ-640G | |
| Sterile normal saline | ThermoFisher Scientific | TM4469 | |
| Sticky tape | |||
| Surgical board | A chopping board wrapped with autoclavable bag. | ||
| Surgical scissors | Proscitech | T104 | Tip Dimensions (LxD): 38x7mm, Length 115mm |
| Suture forcep/ Curved Brophy forceps | Proscitech | T113C | Curved, Rounded narrow 2 mm tip, with serrations, length 165 mm |
| Suture needle holder (Olsen Hegar needle holder) | Proscitech | TC1322-180 | length 190 mm, ratchet clamp |
| Syringe driver with foot pedal/ UMP3 Ultra micro pump | World Precision Instruments | UMP3-3 | |
| T75 tissue culture flask | ThermoFisher Scientific | 156499 | |
| Thread | |||
| Trigene II surface disinfectant | Ceva |
