This video demonstrates how to measure mitochondrial oxygen consumption rate (OCR) in mouse striatal brain slices. It details the steps for preparing the tissue plate and sensor cartridge, loading them into the flux analyzer, and explains the cellular processes underlying OCR patterns.
A subscription to JoVE is required to view this content. Sign in or start your free trial.
Method Article
Measurement of Oxygen Consumption Rate in Acute Mouse Brain Slices
1.1K views
⸱
April 28th, 2025
In This Article
Abstract
Protocol
All procedures involving animal samples have been reviewed and approved by the appropriate animal ethical review committee.
1. Hydrate cartridge sensors (1 day before the assay)
- Open the extracellular flux assay kit (see Table of Materials) and remove both the sensor cartridge (green) and utility plate (clear; Figure 1A). Place the sensor cartridge aside (sensors up) and do not touch the sensors.
- Add 600 µL of calibrant solution (pH 7.4) to each well of the utility plate. Place the sensor cartridge on top of the utility plate and submerge the sensors in the calibrant solution. Make sure the triangular notch of the utility and sensor cartridge plate are correctly aligned (Figure 1B).
- Seal the extracellular flux assay kit with sealing film to prevent evaporation of the calibrant solution, and then place it in a 37 °C incubator not supplemented with CO2 or oxygen overnight.
2. Prepare the tissue plate (on the day of the assay)
- Open the islet capture microplate and take out the islet plate for tissue sitting.
- Warm an appropriate volume (625 µL per well) of pre-oxygenated modified artificial cerebrospinal fluid (ACSF, composition 140 mM NaCl, 2.5 mM KCl, 2.4 mM CaCl2, 1.3 mM MgSO4, 0.3 mM KH2PO4, 25 mM glucose, 10 mM HEPES, pH 7.2) buffer to 37 °C in a 50 mL tube. Then add BSA to a final concentration of 4 mg/mL to prepare the respiration buffer. In general, 50 mL is enough for one plate.
- Add 625 µL of respiration buffer (pre-oxygenated ACSF buffer with 25 mM glucose and 4 mg/mL BSA) to each well of the islet plate carefully and avoid shaking the plate. Ensure no residual drops are on top of the sensor cartridge and no air bubbles are present in the buffer of each well.
3. Acute striatal slice preparation and excised slice placement
- Decapitate the mouse after cervical dislocation and immediately dissect the brain in 10 mL of ice-cold pre-oxygenated cutting solution (125 mM NaCl, 2.5 mM KCl, 26 mM NaHCO3, 3.7 mM MgSO4, 0.3 mM KH2PO4, 10 mM glucose, pH 7.4).
- Section coronal striatal slices with a vibratome following the manufacturer's instruction (see Table of Materials) at a thickness of 150 µm in ice-cold, pre-oxygenated cutting solution.
- Recover the slices in 50 mL of oxygenated ACSF (125 mM NaCl, 2.5 mM KCl, 26 mM NaHCO3, 2.4 mM CaCl2, 1.3 mM MgSO4, 0.3 mM KH2PO4, 10 mM glucose, 2 mM HEPES, pH 7.4) and keep in solution for up to 30 min at room temperature (RT).
- After recovery, transfer the slices to a 35 mm x 10 mm Petri dish with 5 mL of respiration buffer.
- Use a stainless-steel biopsy punch (e.g., 1.5 mm diameter) to create a circular piece of tissue in the desired area of the sliced brain. Keep the slice in the buffer while gently pressing down with the punch. Make sure the punch is pushed down hard enough to cut the tissue. Remove the rest of the tissue, lift the punch away, and remove the circular piece of tissue into the buffer.
- Cut the very end of a 1 mL pipette tip to make a hole with a 1.5-2.0 mm diameter and use it to hold and transfer the punched slice to the top of the capture screen. Suction one piece of punched brain tissue and carefully place the tissue onto the mesh side of the capture screen (Figure 2A). The capture screen will be a circular piece of plastic with the mesh attached to one side.
NOTE: The capture screens are included in the microplate pack (see Table of Materials). - Gently use a paper tissue to dry the capture screen briefly. With the moisture removed, the tissue becomes sticky, which allows the slice to attach to the center of the mesh. Do not dry the slice too much, as it will be damaged otherwise.
- Hold the capture screen slice side down with tweezers and place it into one of the wells of the incubating islet plate (Figure 2B). Be careful not to drop the slice; if so, take the screen out and place a new slice on it.
NOTE: Do not place brain slices into the two background correction wells (A1 and D6) in the islet plate. - Incubate the islet plate at 37 °C in an incubator for at least 30 min to allow temperature and pH equilibration before running the assay.
4. Loading of cartridges with desired compounds
- Dilute the desired compounds in modified ACSF (37 °C) to the final stock concentration of 10x, 11x, 12x, and 13x of the working concentration for ports A to D, respectively, and adjust to pH 7.4. The test will administer the compounds in order from port A to D. For this experiment, the following solutions were used, with their respective working concentration mentioned before them: 10 mM pyruvate (port A), 20 µM oligomycin (port B), 10 µM or other concentrations of carbonyl cyanide 4-(trifluoromethoxy) phenylhydrazone (FCCP) (port C), and 20 µM antimycin A (port D).
- Gently preload 75 µL of the diluted compounds into the appropriate injection ports of the sensor cartridge. Place the tips halfway into the injection ports at a 45° angle with the tip against the wall of the injection port. Tips should not be inserted completely to the bottom of the injection ports as this may cause compound leakage through the port.
- Withdraw the tips from the ports carefully to avoid creating air bubbles. Do not tap any portion of the cartridge to avoid alleviating air bubbles.
- Visually inspect the injection ports for even loading. Ensure all liquid is in the port and no residual drops are present on top of the cartridge.
- Place the sensor cartridge onto the utility plate and put it into an incubator (non-CO2) for 30 min to allow it to heat up to 37 °C again. Handle carefully by only holding onto the utility plate. Move as little as possible.
5. Calibration and performing the assay
- Load the assay template in the software. Press the green START button.
- Make sure to load the correct protocol. The protocol contains a combination of 3 min mix, 3 min wait, and 2 min measure sequences (these three steps form one measurement). Change the distance of the probe head from 26,600 to 27,800 in the hardware settings under instrument settings. There is no need to change the probe head for the XFe24 analyzer. Press START.
- Load the sensor cartridge on the utility plate into the instrument tray. The notch goes in the front left corner. Ensure that the plate sits correctly and is flat. Load the drug-filled sensor cartridge into the analyzer for calibration.
- Follow the instructions on the screen to calibrate and equilibrate the sensors. This takes around 30 min.
- Once the calibration step is done, remove the calibration plate and replace it with the islet plate (containing the mesh and tissue slices).
- Measure the oxygen consumption in each well of the plate using the assay protocols. The protocol contains a combination of 3 min mix, 3 min wait, and 2 min measure sequences (these three steps form one measurement), at which point the oxygen consumption rate (OCR) is calculated.
- For the entire experiment, include 4x OCR measurements to create a baseline, followed by the injection of port A (pyruvate) with 4x measurements, then the injection of port B (oligomycin) with 8x measurements, then the injection of port C (FCCP) with 5x measurements, and, finally, the injection of port D (antimycin A) with 6x measurements.
NOTE: This number of measurements after each compound injection is determined depending on when the measurement reaches the plateau. - Analyze the OCR measurement data and the coupling efficiency data.
Access restricted. Please log in or start a trial to view this content.
Results
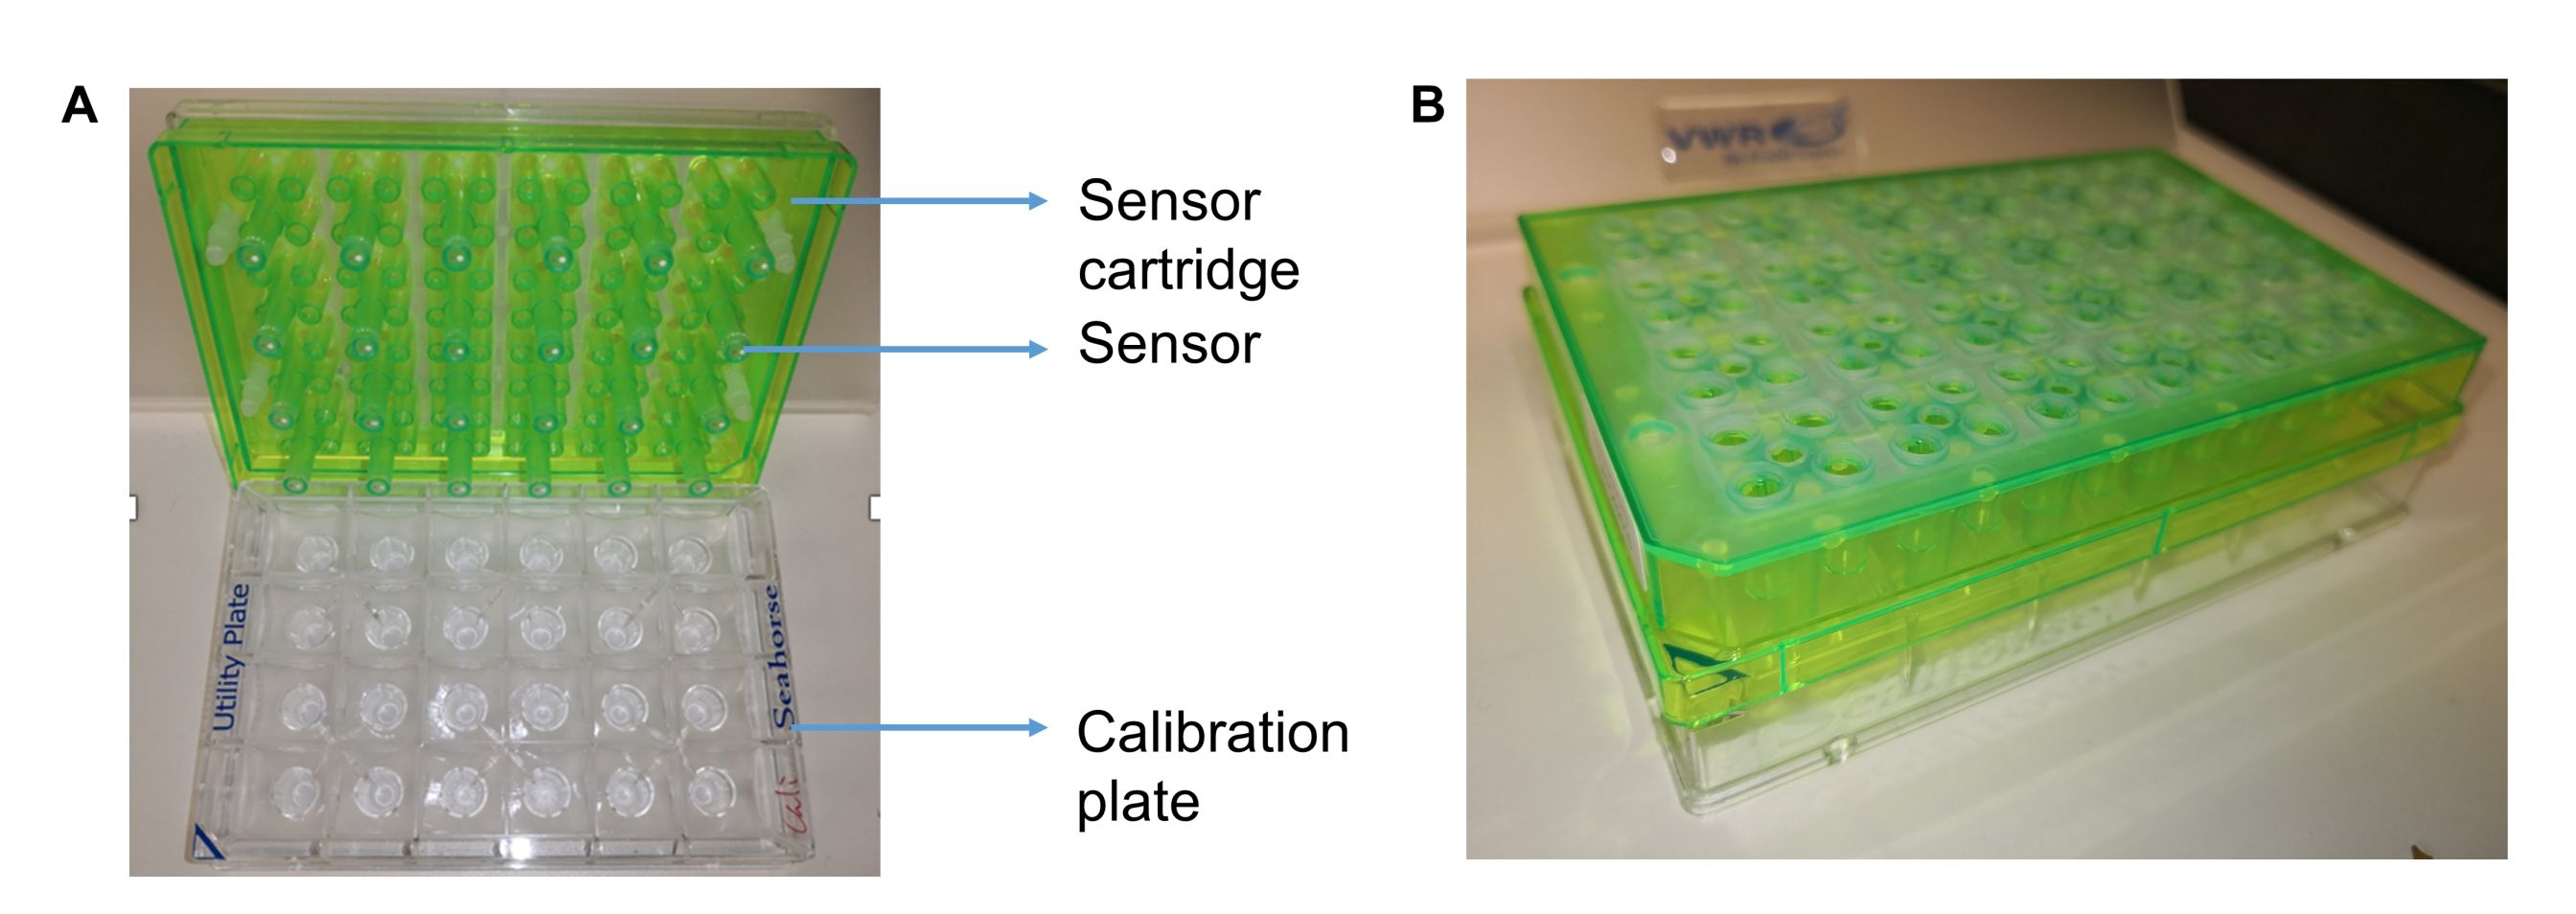
Figure 1: Images showing the extracellular flux analyzer hydrate cartridge sensors and plate. (A) The...
Access restricted. Please log in or start a trial to view this content.
Materials
| Name | Company | Catalog Number | Comments |
|---|---|---|---|
| Accumet AB150 pH benchtop meter | |||
| Antimycin A from streptomyces sp. | |||
| Bovine Serum Albumin (BSA) | |||
| Carbonyl cyanide 4-(trifluoromethoxy) phenylhydrazone (FCCP) | |||
| D-Glucose | |||
| DMSO | |||
| HEPES | |||
| Humidified non-carbon dioxide incubator | |||
| Oligomycin from Streptomyces diastatochromogenes | |||
| Parafilm | |||
| Seahorse XF Calibrant Solution 500 mL | |||
| Seahorse XF Extracellular Flux Analyzer | |||
| Seahorse XFe24 Extracellular Flux Analyzer | |||
| Seahorse XF24 FluxPaks | |||
| Sodium pyruvate | |||
| Stainless steel biopsy punches | |||
| Sterile cell culture dish, 35 x 10 mm | |||
| Vibratome | |||
| Water bath |
