A subscription to JoVE is required to view this content. Sign in or start your free trial.

Method Article

Immunolabeling of Neuronal Membrane Proteins in a Freeze-fractured Specimen of Mouse Brain Tissue

802 views

April 28th, 2025

In This Article

Abstract

Source: Schönherr, S., et. al. Combined Optogenetic and Freeze-fracture Replica Immunolabeling to Examine Input-specific Arrangement of Glutamate Receptors in the Mouse Amygdala. J. Vis. Exp. (2016)

This video demonstrates the immunolabelling of freeze-fractured replicas of mouse brain tissue for electron microscopy. The fractured and coated replicas are digested to expose receptors. Primary and gold-tagged secondary antibodies are added to label specific neuronal membrane receptors. The replica is mounted on a grid and visualized under an electron microscope.

Protocol

All procedures involving animal samples have been reviewed and approved by the appropriate animal ethical review committee.

1. Specimen Preparation

  1. Brain fixation
    1. Preparation of the fixative
      1. For 1 L of fixative, weigh 10 g of paraformaldehyde and add it to 300 ml of deionized water (H2O). Heat to 55 - 60 ºC for ~10 min with continuous stirring.
      2. Switch off the heat and add 7 - 8 drops of 4 N Sodium Hydroxide (NaOH). The solution should become clear in ~10 minutes.
      3. Let it cool down to room temperature or RT, add 150 ml of a saturated solution of Picric acid, and bring it to 500 ml with deionized H2O.
      4. Add 500 ml of 0.2 M phosphate buffer (PB). Filter with filter paper. Adjust pH to 7.4 with NaOH.
      5. Cool the fixative to 6 ºC, and store it in dark glass bottles for not more than one day at 6 ºC.
    2. Transcardiac perfusion
      1. Anesthetize mice with an intraperitoneal injection of thiopental (120 mg/kg body weight). Make sure the animal is deeply anesthetized by checking the pedal withdrawal reflex, which should be absent. Place the animal on its back on a perfusion table with the four extremities tied down.
      2. Open the abdominal wall longitudinally with blunt-end scissors and make two additional cuts laterally along the caudal border of the rib cage to expose the diaphragm. Cut away the diaphragm and cut the thoracic wall at the osteocartilageneous border on both sides. Lift the caudal end of the central slab of the thoracic wall containing the sternum to expose the heart.
      3. Remove the pericardium and make a small, precise cut in the tip of the left ventricle to admit the cannula of the perfusion apparatus. Use a blunt cannula with an internal diameter of 0.6 mm. Pass the cannula gently through the ventricle till the tip appears into the ascending aorta, and secure the cannula with a clamp. To allow the blood and perfusates to exit from the blood stream, make a cut in the right atrium.
      4. Perfuse mice transcardially using a peristaltic pump at a flow rate of 5 ml/min at first with phosphate buffer saline or PBS (25 mM, 0.9% sodium chloride or NaCl, pH 7.4) for approximately 1 min, followed by ice-chilled fixative for 7 min.
      5. After fixation, sever the mouse head with a pair of scissors and then cut the skin through the midline from neck to nose. Remove the muscle to expose the skull fully.
      6. Using sharp scissors, make a longitudinal cut through the occipital and interparietal bones starting from the foramen magnum. Using fine tweezers remove these bones to expose the whole cerebellum. Then make another longitudinal cut through the parietal and frontal bones till the nasal bone and remove them with tweezers to expose the whole brain.
      7. Using a spatula, remove the brain without damaging it and place it in ice-cold 0.1 M PB.
  2. Sectioning and trimming of the specimens
    1. Cut a coronal block of approximately 5 - 6 mm with razor blades containing the area of interest. Glue it onto the holder of the vibroslicer with a cyanoacrylate glue. Orient the tissue block so that the neocortex faces the vibrating blade. Slice coronal sections containing the amygdala at 140 µm with the vibroslicer (Figure 1A) in ice-cold 0.1 M PB and collect them in a 6-well dish in the same buffer.
    2. Under a stereomicroscope, trim out the region of interest (here, the medio-dorsal paracapsular cluster of the intercalated cell masses of the amygdala or ITC; see Figure 1B) from the slice. Do this in a Petri dish coated with silicone elastomer and filled with 0.1 M PB, using an ophthalmic scalpel. Make sure that the trimmed blocks fit into the hole of the spacer (approximately 1.5 mm) (Figure 1B).
    3. Move the trimmed blocks into cryoprotection solution (30% glycerol in 0.1 M PB) overnight (O/N) at 6 ºC.

2. High-Pressure Freezing

NOTE: The Freeze-fracture Replica Immunolabeling (FRIL) consists of 6 essential steps (Figure 2): 1) Rapid freezing with high pressure (at 2,300 - 2,600 bar) of the specimen. 2) Fracturing of the specimen. The fracture plane generally follows the central hydrophobic core of frozen membranes, splitting them into two half-membrane leaflets: a half that lies adjacent to the protoplasm (P-face) and a half that lies adjacent to the extracellular or exoplasmic space (E-face). 3) Replication of the specimen by vacuum-deposition of platinum and carbon. 4) Detergent-digestion of the tissue. 5) Immunogold labeling. 6) Analysis of the replica using a transmission electron microscope.

  1. Preparation of copper carriers
    NOTE: To be handled through the successive stages of the FRIL procedure, specimens need to be mounted onto metal (gold or copper) carriers. These carriers vary in size and design according to the mode of fracturing and the type of machines used. Here, we used copper carriers (Figure 1B, E) and a hinged "double replica table" (see Figure 3B), which, when opened, produces a tensile fracture through the frozen specimen (Figure 2). This allows to retain and replicate both sides of the fractured specimen.
    1. Polish copper carriers with a tarnish remover using a sheet of chamois skin.
    2. Place carriers in a glass pot and clean twice with a non-ionic detergent (pH ~1.5) in a sonicating water bath, then extensively wash in tap water followed by deionized water, and then rinse twice with ethanol.
    3. Sonicate the copper carriers in acetone for 15 min.
    4. Place the carriers on filter paper to dry.
    5. Attach a ring of double-sided tape to a copper carrier (Figure 1C), which will serve as the holding well for the trimmed block (holding carrier).
  2. Freezing of the specimen
    NOTE: Handle liquid nitrogen with care and wearing appropriate goggles.
    1. Turn on the high-pressure freezing unit (Figure 1F) for at least 1.5 hours before freezing the specimen.
    2. Start heating by pressing the "AIR HEATER" button, and bake out for 50 min. Set air temperature to 80 °C.
    3. Connect the nitrogen tank to the high-pressure freezing unit and press the "NITROGEN" button to fill the inside Dewar with liquid nitrogen. The "NITROGEN LEVEL" lamp lights up. Start cooling by pressing the "Cooling" button.
    4. Press the "DRIVE IN" button when the "NITROGEN LEVEL" goes out. Check that the hydraulic system moves the piston back and forth 3 times.
    5. Press the "AUTO" button, and the "NITROGEN" button. As soon as "READY" lights up, the high-pressure freezing unit is ready for high-pressure freezing.
    6. Place a trimmed block in the hole of the double-sided tape (Figure 1B) using a platinum wire loop which has been melted into a glass pipette.
    7. Remove the excess of the cryoprotectant solution using filter paper or a brush.
      NOTE: This procedure is also important to remove air bubbles that may form around the tissue and which could cause distortion of the tissue shape and/or ultrastructure.
    8. Under a stereomicroscope, cover the holding carrier with another carrier, so that the tissue block is sandwiched between the two carriers.
    9. Insert the carrier sandwich into the specimen holder of the high-pressure freezing unit (Figure 1D). Insert the specimen holder into the high-pressure freezing unit (tip down) and secure it by screwing in the specimen holder.
    10. Initiate the freezing cycle by pressing the "Jet-Auto" button. Working as quickly as possible, remove the specimen holder and submerge the tip with liquid nitrogen into an insulated box. Immerse the tips of two pairs of forceps in the liquid nitrogen to cool them.
    11. Carefully remove the carrier-sandwich from the specimen holder and place it in a pre-chilled cryovial. Make sure that the carriers are only handled with liquid nitrogen-cooled forceps. Cryovials should be perforated to allow the nitrogen to flow out from the vial (Figure 1G).
    12. Repeat steps 2.2.6 to 2.2.11 until all desired samples have been frozen. Multiple carrier-sandwiches containing the same type of sample can be stored in the same vial.
    13. Store the cryovials containing the carriers in a cryotank until replication (Figure 1H).


3. Freeze-fracture and Replication

  1. Preparation of the electron beam guns
    1. Before inserting the electron beam guns, remove the shield with the "deflector plate". Place the "setting gauge" to center the filament into the collet chuck through the lower cathode cover.
      NOTE: The larger diameter end of the setting gauge is used for the carbon gun, whereas the smaller diameter end is for the platinum gun.
    2. Slide the new filament over the gauge until "the pressure laminae" can clamp the ends of the filament, ensuring that the filament coil does not lie at an angle.
    3. Remove the setting gauge and insert the carbon rod. Fix it by tightening the collet chuck of the evaporator rod holder, ensuring that the height of the end of the rod is at the middle of the second coil from the bottom. For the platinum gun, the height of the end of the platinum rod should be at the middle of the second filament coil from the top.
    4. Replace the deflector plate and insert guns into the freeze fracture unit. Clean the guns with a sand-blaster after usage.
  2. Set up of freeze-fracture unit
    1. Switch on the freeze fracture unit (Figure 3A) by turning MAINS to 1. For a detailed description of the freeze-fracture and replication procedures, see the operating instructions provided by the manufacturer.
    2. Prior to cooling the freeze-fracture device, bake out the entire cooling system of the unit with warm air. Press the "Thawing" button in the MTC 010 device (temperature control unit) (Figure 3A) and let the bake out process run for 45 min.
    3. Activate the vacuum station. The freeze-fracture unit usually operates in a vacuum range of ~10-6 - 10-7 mbar.
    4. Fill nitrogen tank and connect it to the freeze fracture unit. Check that the valve holder is dry and also clean the entry of the tank before insertion of the valve holder (humidity can interfere with vacuum and indication of N2 filling of the tank).
    5. Start cooling by setting the temperature to -115 °C. Cooling takes about 45 min.
    6. Insert the electron beam guns and adjust current and voltage to reach the following parameters for evaporation:
      Carbon gun: rotation on, position 90°, rate of carbon accumulation 0.1 - 0.2 nm/sec
      Carbon-platinum gun: rotation off, position 60°, rate of accumulation 0.06 - 0.1 nm/sec
      NOTE: If a gun is used for the first time after exchange of the carbon or platinum rod, degas for 3 min before usage.
  3. Fracturing and replication

    1. Insert frozen carrier sandwiches into a double replica table making sure all manipulations are done in liquid nitrogen.
    2. Transfer the double replica table to a Dewar vessel and fix it to the specimen stage receiver at an angle of 45°. The liquid nitrogen level should always be above the double replica table.
    3. Pick up the double replica table with the table manipulator and insert it into the freeze fracture unit onto the cold stage. Wait approximately 20 min to allow the temperature of the double replica table to adjust to -115 °C.
    4. Check that the vacuum is below 10-6 mbar and the temperature is -115 °C.
    5. Fracture the tissue by manual counter clockwise rotation of the wheel connected to the shroud placed above the double replica table. When the shroud turns, it forces the double replica table to open, fracturing the tissue.
    6. Press the "High tension" button in the EVM 030 device (electron beam evaporation control unit) of the freeze-fracture unit (Figure 3A).
    7. Replicate the exposed surfaces of the fractured tissue (Figure 3C) by evaporation of carbon (rotating) by means of an electron beam gun positioned at a 90° angle to a thickness of 5 nm, followed by a unidirectional shadowing with platinum-carbon at a 60° angle to a thickness of 2 nm. Finally, apply a 15 nm thick layer of carbon from a 90° angle (rotating).
    8. Use the following parameters for evaporation:
      1st carbon: rotation on, position 90°; speed 0.1 - 0.2 nm/sec; 5 nm
      2nd carbon-platinum: position 60°; speed 0.06 - 0.1 nm/sec; 2 nm
      3rd carbon: rotation on, position 90°; speed 0.3 - 0.5 nm/sec; 15 nm
    9. Remove the replicated specimens from the freeze fracture unit and transfer them to a ceramic 12-well plate (Figure 4A) filled with TBS (Tris-buffered saline, pH 7.4).
    10. Using a platinum loop wire rod, remove the replicated tissue from the specimen carrier (Figure 4A).
    11. Repeat steps 3.3.1 to 3.3.10 until all samples have been replicated.

    4. SDS-digestion of the replica

    1. Transfer the replica to a 4 ml glass vial filled with 1 ml of SDS-digestion buffer (2.5% Sodium Lauryl Sulfate, 20% sucrose in 15 mM Tris, pH 8.3). Digest for 18 hr at 80 °C with shaking (45 strokes/min).
    2. Transfer replicas to a new tube filled with SDS-digestion buffer and store at RT.

4. Immunolabeling

NOTE: All incubations are performed at RT with gentle shaking except for incubations with antibodies.

  1. Wash the replica for 10 min in fresh sodium dodecyl sulfate (SDS)-digestion buffer.
  2. Wash the replica once with 2.5% BSA (bovine serum albumin) in Tris-Buffered Saline or TBS for 5 min, and then 3 x 10 min with 0.1% BSA in TBS.
  3. Block non-specific binding sites in TBS with 5% BSA for 1 hr.
  4. Apply primary antibodies diluted in 2% BSA-TBS. Perform incubations in a 30 µl drop (Figure 4B) in a humid chamber at 15 °C for 72 hr (Figure 4C).
    1. For this study, process both replicas from the fractured tissue. Incubate one replica with a guinea pig polyclonal antibody raised against the amino acids 717 - 754 of the mouse GluR1 common to all α-Amino-3-hydroxy-5-methyl-4-isoxazolepropionic Acid Receptor or AMPA-R subunits (dilution: 1:200) or a mouse monoclonal antibody raised against a recombinant fusion protein covering amino acids 660 - 811 of the NR1 subunit of the N-Methyl-D-Aspartate Receptor or NMDA-R (dilution: 1:500), and a rabbit polyclonal antibody raised against the green fluorescent protein (dilution: 1:300).
    2. Incubate the other replica with a rabbit polyclonal antibody raised against a synthetic peptide corresponding to amino acids 384 - 398 of the rat µ-opioid receptor (dilution: 1:500).
  5. Wash in TBS with 0.05% BSA (3 x 5 min.).
  6. Apply secondary antibodies. For this study, use gold (5 nm for ionotropic glutamate receptors, 10 for µ-opioid receptors, and/or 15 nm for Channelrhodopsin-2 Yellow Fluorescent Protein or ChR2-YFP) conjugated antibodies diluted in TBS with 2% BSA. Dilute secondary antibodies 1:30 and incubate in a 30 µl drop at 15 °C O/N.
  7. Wash 3 x 5 min in 0.05% BSA-TBS at RT.
  8. Wash 2 x 5 min in ultrapure water.
  9. Mount replica on formvar-coated 100-line parallel bar grid (Figure 4D).

Access restricted. Please log in or start a trial to view this content.

Results
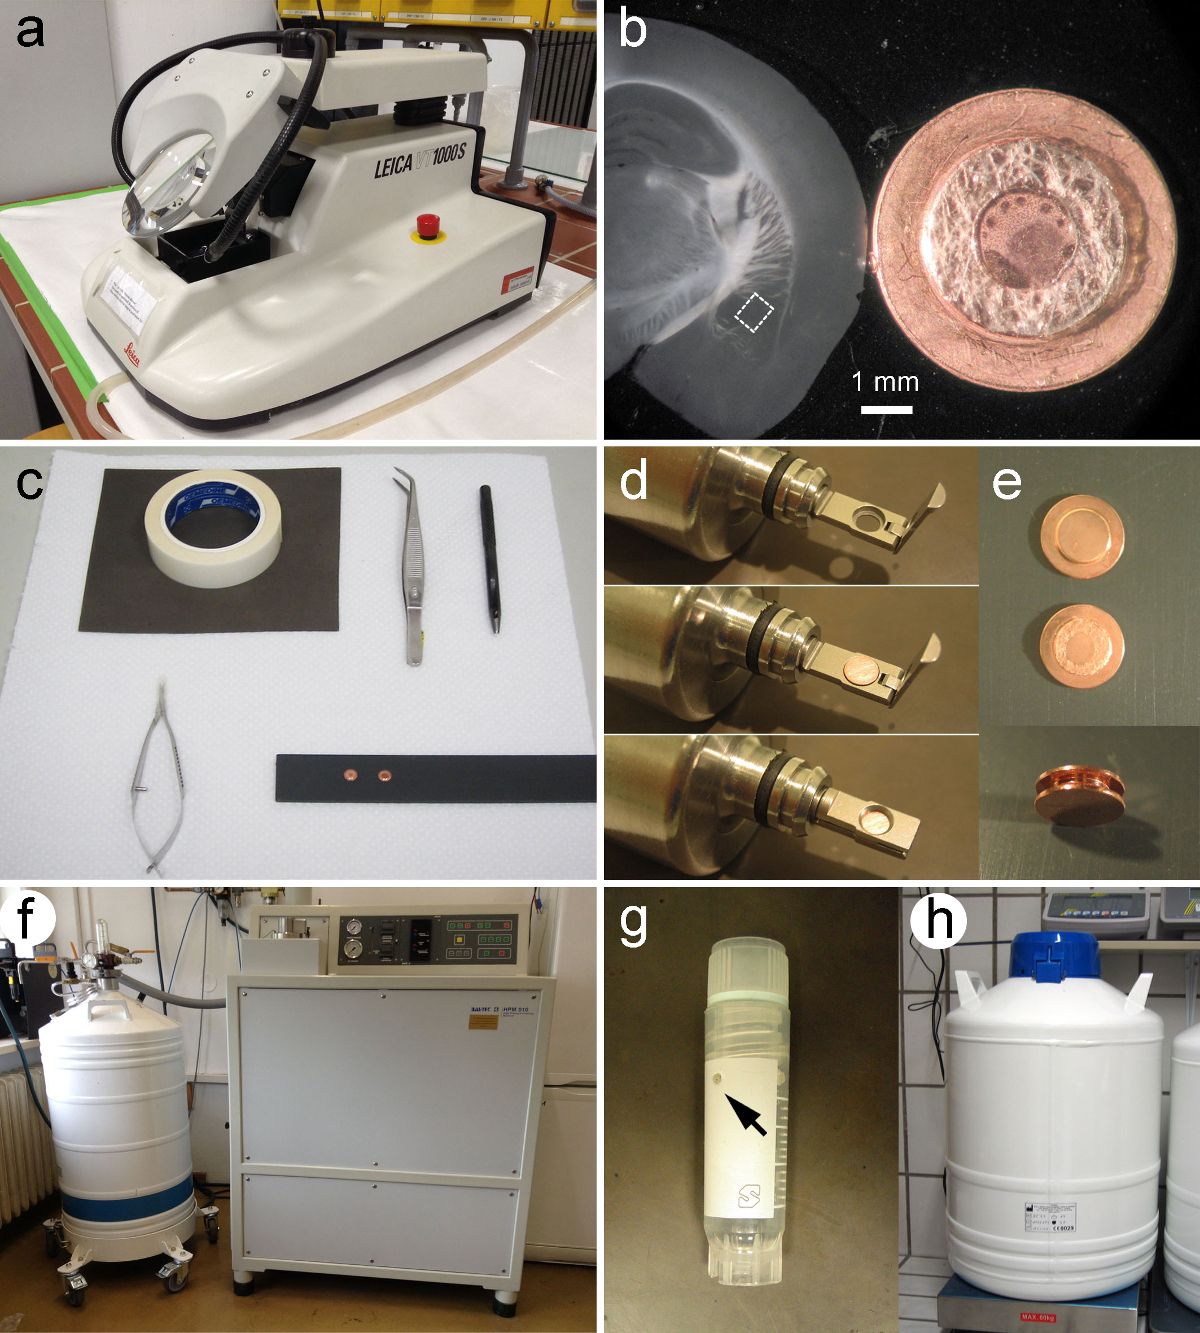
Cryogenic preparation and analysis setup; equipment, microtome, samples, and Dewar flask.

Figure 1. Tissue Preparation and High-pressure Freezing. (A) Vibroslicer is used to sec...

Access restricted. Please log in or start a trial to view this content.

Materials

List of materials used in this article
NameCompanyCatalog NumberComments
Tissue preparation
Paraformaldehyde EM gradeAgar Scientific Ltd., United KingdomAGR1018
Saturated picric acid solutionSigma-Aldrich, USAP6744-1GA
Na2HPO4-2H20Merck Millipore, Germany1065860500
NaH2PO4-2H2OMerck Millipore, Germany1063451000
NaClMerck Millipore, Germany1064041000
4N NaOHCarl Roth, GermanyT198.1
ThiopentalSandoz, Austria5,133
GlycerolSigma-Aldrich, USAG5516-500ML
GenPure ultrapure water systemThermo Fisher Scientific, USA50131235
Peristaltic pumpISMATEC, GermanyISM 930C
Filter PaperMACHEREY-NAGEL, GermanyMN 615 1/4
Vibroslicer, VT1000SLeica Microsystems, Austria
Ophthalmic scalpelAlcon Laboratories, USA
Perfusion cannulaVieweg, GermanyF560088-1
High-pressure Freezing
Copper carriersEngineering Office M. Wohlwend, CH528
Sidol PolishHenkel, Germany
Chamois skinHousehold supply store
Hole punch, 1,5mmStubai, Austria
Denatured ethanolDonauchem, Austria
AcetoneRoth, Germany9372.5
High Pressure Freezing Machine HPM 010BalTec, CH; now Leica MicrosystemsHPM010
Stereo-microscopeOlympus, JapanSZX10
Liquid nitrogen
Cryo-vialsRoth, GermanyE309.1
CryoCaneNalge Nunc International,USA5015-0001
CryoSleeveNalge Nunc International,USA5016-0001
Liquid nitrogen storage vesselCryopal, FranceGT38
Non-ionic detergent (Lavocid)Werner & Mertz Professional, Germany
Freeze-fracture and Replication
Sandblaster, Mikromat 200-1JOKE Joisten & Kettenbaum, GermanySANDURET 2-K
Siliciumcarbid SIC 360, grain size 25 - 21µJOKE Joisten & Kettenbaum, Germany955932
Freeze Fracture System BAF 060BalTec, CH; now Leica MicrosystemsBAF060
Ceramic 12 well plateGröpel, Austria14511
Trizma baseSIGMA, USAT1503
Trizma hydrochlorideSIGMA, USAT3253
Sodium chlorideMerck, Germany1,06,40,41,000
SDS, Sodium lauryl sulfateRoth, Germany5136.1
SucroseMerck, Germany1,07,68,71,000
TRISRoth, Germany5429.3
Universal Hybridization OvenBinder, Germany7001-0050
Immunolabelling
BSASIGMA, USAA9647
Anti-GFP AntibodyMolecular Probes, USAA11122
Anti-pan-AMPAR AntibodyFrontier Institute, Japanpan AMPAR-GP-Af580-1
Anti-NMDAR1 Antibody, clone 54.1Merck Millipore, GermanyMAB363
Opioid Receptor-Mu (MOR) AntibodyImmunoStar, USA24216
EM goat anti-guinea pig, 5nm; secondary antibodyBBInternational,EM.GAG5
EM goat anti-rabbit, 15nm; secondary antibodyBBInternational,EM.GAR15
Donkey anti-rabbit, 10nm, secondary antibodyAURION, NetherlandsDAR 10nm
Copper grids, 100 Parallel BarAgar scientific, UKG2012C
IncubatorMajor Science, USAMO-RC
Pioloform PowderAgar scientific, UKR1275
ChloroformRoth, Germany3313.1

Tags

Freeze Fracture ReplicaImmunolabeling TechniquePlatinum Carbon CoatingSDS Digestion BufferGold Conjugated AntibodiesTransmission Electron MicroscopyFormvar Coated GridPrimary Secondary Antibodies