Method Article

Simultaneous Plethysmography and Electromyography Recording in an ALS Mouse Model

April 28th, 2025

In This Article

Abstract

Loading...
$$\rightleftharpoonup{xx}$$ $$\longleftharp{xx}$$, $$\longrightharp{xx}$$,

Source: Jensen, V. N., et al. Repeated Measurement of Respiratory Muscle Activity and Ventilation in Mouse Models of Neuromuscular Disease. J. Vis. Exp. (2017).

This video demonstrates the method for recording simultaneous plethysmography and electromyography signals in a freely moving ALS mouse model. The procedure involves using implanted electrodes and a transmitter to capture muscle activity, alongside a plethysmography chamber to monitor breathing patterns, to investigate the role of accessory muscles in the ALS mouse.

Protocol

Loading...
$$\rightleftharpoonup{xx}$$ $$\longleftharp{xx}$$, $$\longrightharp{xx}$$,

All procedures involving animal models have been reviewed by the local institutional animal care committee and the JoVE veterinary review board.

1. Preparing the Mouse for Surgery

  1. Choose the desired mouse for implantation (i.e., SOD1(G93A) or control) and weigh the animal.
    NOTE: The recommended age and weight for a mouse (male or female) undergoing this surgery is P56 - P120 and ≥ 24 g, respectively.
  2. Anesthetize the mouse under 3.5% isoflurane with a 2 L/min oxygen flow rate. Perform a toe pinch and a tail pinch to make sure that the mouse is fully anesthetized.
  3. Once anesthetized, remove the mouse from the drop box and maintain anesthesia via a nose cone by setting the isoflurane level to 1.5% and the oxygen flow rate to 1 L/min. Perform a toe pinch and/or tail pinch to make sure that the anesthesia is maintained.
  4. Apply lubricant ophthalmic ointment to prevent the eyes from drying out during surgery.
  5. Shave the mouse to expose a surgical site between the ear and shoulder (Figure 1C).
  6. Clip the toenails ipsilateral to the surgical site to reduce the chance of the mouse pulling out the leads or causing wounds by scratching during the healing process.
  7. Alternate swabbing the surgical site, first with disinfectant and then with isopropanol. Repeat 2 more times.

2. Implanting the Telemetry Device to Record Scalene and Trapezius Electromyography (EMG) Activity

  1. Place the animal underneath a dissection microscope, on its side on top of a sterile pad covering a heating pad, and secure the nose cone in place with tape. Note that it is best to implant the right side to reduce the electrocardiogram (ECG) signal originating from the heart.
    NOTE: Monitor breathing and adjust the isoflurane levels, if necessary, to maintain a regular respiration rate and appropriate surgical plane of anesthesia.
  2. Pull the forelimb toward the ipsilateral foot along the torso.
    NOTE: This position displaces the scapula caudally, providing surgical access to the scalene and trapezius muscles.
    1. Take the blunt curved forceps, hold back the front paw ipsilateral to the surgical site, and tape the paw in place (Figure 1C). Use strong adhesive surgical tape to make sure that the paw is secure for the duration of the procedure.
  3. Put on a fresh pair of surgical gloves. Use the scalpel to make an oblique incision, approximately 2 cm long, between the shoulder and the ear (red line in Figure 1C).
  4. Using two #2 laminectomy forceps, one in each hand, pull back the fat pad and spread apart the trapezius and platysma muscles to expose the fascia covering the sternocleidomastoid and scalene muscles (Figure 1D and E).
  5. Use the pale sternocleidomastoid muscle and phrenic nerve as landmarks to identify the scalene muscles. Note that the phrenic nerve runs parallel to the scalene muscles, while the sternocleidomastoid lies inferior. The scalene muscles run obliquely from the cervical vertebrae to the ribs under the trapezius muscle. Biopotential leads will be inserted into the anterior scalene muscle, which can be identified as the muscle that runs adjacent to the phrenic nerve (Figure 1F and G).
    NOTE: Caution. This area is highly vascularized, and care must be taken to avoid cutting the subclavian artery. Avoid damaging the phrenic nerve and brachial plexus.
  6. Once the scalene and trapezius muscles have been identified (Figure 1G), make a subcutaneous pocket for the transmitter on the back of the animal, between the scapulas.
    1. Use the tissue-separating scissors. Insert the blunt tips just beneath the skin and spread them until a pocket opening about 1.25x the width of the transmitter is formed (Figure 1H).
      NOTE: The transmitter should be inserted with minimal resistance, but the pocket should not be so big that the transmitter can move on its own. If the pocket is too small, the transmitter could rub against the skin, causing irritation that may prompt the animal to scratch the skin and/or pull the lead out. If the pocket is too large, seromas could form, or the transmitter could migrate to an unfavorable position.
  7. Flush with warm, sterile saline and insert the transmitter with the flatter side against the muscle. Position the transmitter so that it lies flat and the wires emerge from the pocket, parallel to each other rather than twisted (Figure 1I). Curl any excess length of wire under the device and lay it flat.
  8. Run the leads from the transmitter to the scalene and trapezius muscles so that the two sets of bipotential leads lie flat and parallel to each other.
  9. Use the laminectomy forceps to separate the anterior scalene from the surrounding muscles and insert a 25-gauge needle perpendicular to the muscle fibers through the scalene muscle.
    1. Insert one lead into the tip of the needle and then pull the needle out of the muscle, leaving behind the lead inserted into the muscle up to the insulation of the wire (Figure 1J and K). Record which colored leads are inserted into which muscle.
  10. Place a small drop of cyanoacrylate adhesive onto the exposed end of the wire, close to the muscle where the lead is inserted, and quickly slide the lead cap over the wire so that no wire is exposed between the lead cap and the muscle (Figure 2A and B).
    NOTE: Although it is an accepted practice to secure EMG leads with cyanoacrylate, an alternative method is to tie a silk suture knot around the lead cap.
  11. Trim the excess wire distal to the cap and apply a drop of cyanoacrylate adhesive to the end of the lead cap/wire. Give the glue time to polymerize before releasing (Figure 2C and D).
  12. Follow the same steps (steps 3.10-3.12) to insert the opposite polarity lead parallel to the first in the same muscle, 1 - 2 mm away from the first lead.
  13. Repeat steps 3.10 - 3.12 to insert leads into the trapezius muscle, which is located just anterior to the scalene muscle (Figures 1L and M).
  14. Ensure that the wire leads are fixed in place and that there is just enough slack for the animal to perform body movements without pulling on them. Ensure that any excess length of lead does not push against the skin, as this could cause irritation that may prompt the animal to scratch or pull the lead out. Reposition the leads, if necessary, to prevent any potential discomfort.
  15. Gently remove the tape holding down the forelimb. Pull the fat pad back over the muscle and use it to cover the inserted leads. Close the incision with cyanoacrylate adhesive by teasing the skin flaps back together so that the incision lines up. Pinch a portion of the skin flaps together with the curved forceps and apply a small line of cyanoacrylate adhesive along this line.
  16. Inject 0.1 mL of carprofen subcutaneously to alleviate post-operative pain while the animal is still under anesthesia.
    NOTE: Continue to administer 0.1 mL of carprofen once a day for 1 - 2 days post-surgery, and then as needed after that.
  17. Remove the animal from the nosecone and place it in a clean cage in the pre-warmed incubator until it is awake and moving around the cage voluntarily. Afterward, keep the animal in the incubator for at least 15 minutes, monitoring its movements and alertness.

3. Postoperative Care

  1. House animals separately following surgery. Provide healing animals with diet gel and a water bottle.
  2. Monitor the animal for the first 30 minutes after surgery. Check on the animal at least every hour for 5 hours after surgery. In the days following surgery, check at least twice daily.
  3. Watch for necrosis, infection along the incision and within the body cavity containing the implant (i.e., heat, swelling, and redness), and seroma formation.
    NOTE: These signs occur within the first week after surgery. Figure 1N shows a healthy, healed animal one month after surgery. Although EMG recordings can be made immediately after implantation, the animals are given at least one week to heal before recording EMG and plethysmography, as ECG signals can be high immediately after implantation.

4. Acquiring Simultaneous Electromyography and Plethysmography Signals

  1. Turn on all acquisition equipment, including bias flow.
    NOTE: The flow rate for mice is typically set at 1.0 L/min.
  2. Calibrate the plethysmography chamber(s) using a flow meter.
    NOTE: Periodically check the plethysmography chambers to ensure that the seals are not cracked or broken. To maintain their good condition, coat the rubber seals with a lubricant such as vacuum grease once a week.
  3. Input transmitter calibration as specified by the manufacturer.
  4. Place the mouse in the plethysmography chamber for at least 1 h to acclimate it before recording EMG and plethysmography. Using multiple chambers, it is possible to record from one mouse while the next mouse is acclimating in a second chamber. Do not turn on the transmitter during the acclimation period to conserve battery power (Figure 1O).
  5. Prior to recording (but after calibration), turn on the transmitter by placing a strong magnet within 1 in of the implanted animal; a red light on the front of the receiver will indicate when the transmitter is on.
  6. Begin acquisition using the pulldown menu labeled "Acquisition" and choose "Start Acquisition." Although the recording duration may vary by experiment, a typical plethysmography and EMG recording lasts 1 - 3 h.
    NOTE: The transmitter has an intrinsic sampling rate of 240 Hz. A faster rate of 500 Hz is set in the software to interpolate between points and to provide a smoother waveform. The low pass filter (that serves as an anti-alias filter) and the high pass filter in the implant specify the 1- to 50-Hz bandwidth for this telemetry device. 60-Hz A/C interference does not contribute to excess noise in the EMG signal because the implants are battery-powered, and the animal shields the implant and leads from electric fields. Plethysmography, EMG, and video are automatically synchronized in real time via acquisition software.
  7. When the acquisition is finished, turn off the transmitter with a magnet and remove the animal from the chamber.

Access restricted. Please log in or start a trial to view this content.

Results
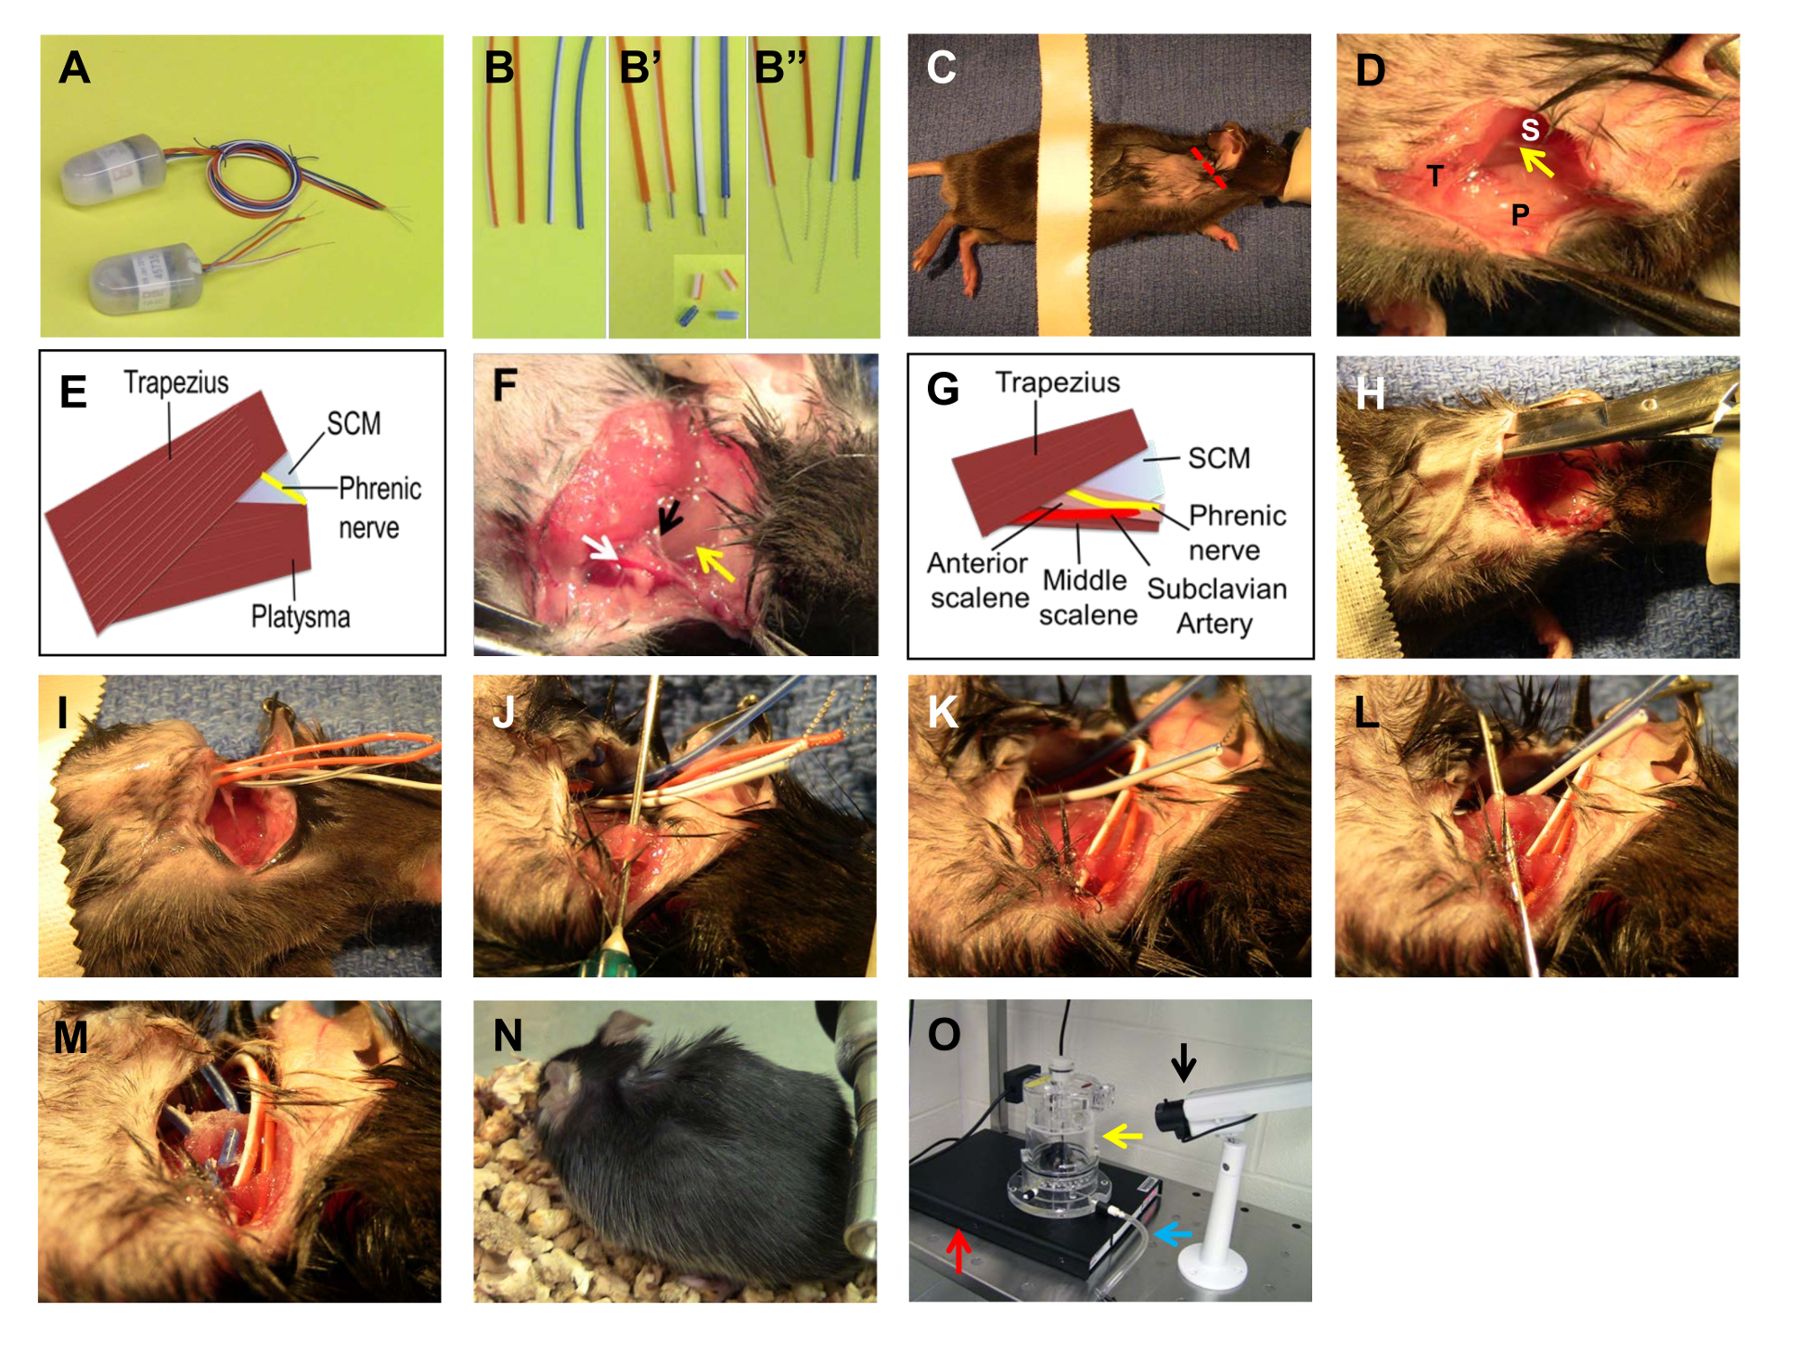
Loading...
$$\rightleftharpoonup{xx}$$ $$\longleftharp{xx}$$, $$\longrightharp{xx}$$,
Experimental setup for nerve study in rats, including diagram and surgical procedure steps.

Figure 1. Implantation of Telemetry Device to Measure Respiratory Muscle EMG.

Access restricted. Please log in or start a trial to view this content.

Materials

List of materials used in this article
NameCompanyCatalog NumberComments
B6.Cg-Tg (SOD1*G93A)1 Gur/JJackson Laboratory4435
Plethysmography ChamberBuxco Respiratory Products/ Data Sciences International601-1425-001
Telemetry Receivers (Model RPC-1)Data Sciences International272-6001-001
Bias Flow Pump (Model BFL0500)Data Sciences International601-2201-001
ACQ-7000 USBData Sciences InternationalPNM-P3P-7002XS
Dataquest A.R.T. Data Exchange MatrixData Sciences International271-0117-001
New Ponemah Analysis SystemData Sciences InternationalPNM-POST-CFG
Ponemah Physiology Platform Acqusition software v5.20Data Sciences InternationalPNM-P3P-520
Ponemah Unrestrained Whole Breath Plethysmography analysis package v5.20Data Sciences InternationalPNM-URP100W
Configured Ponemah Software SystemData Sciences InternationalPNM-P3P-CFG
Analysis Module (URP)Data Sciences InternationalPNM-URP100W
Universal AmplifierData Sciences International13-7715-59
Sync BoardData Sciences International271-0401-001
Sync CableData Sciences International274-0030-001
Transducer-Pressure BuxcoData Sciences International600-1114-001
Flow MeterData Sciences International600-1260-001
Magnet and Radio included in F20-EET Starter KitData Sciences International276-0400-001
Axis P1363 Video CameraData Sciences International275-0201-001
Terg-A-ZymeFisher Scientific50-821-785Enzyme Detergent
ActrilMinntech Corporation78337-000Chemical Sterilant
Stereo Dissecting Microscope (Model MEB126)Leica10-450-508
Servo-Controlled Humidifier/Infant IncubatorOHMEDA Ohio Care Plus6600-0506-803
TL11M2-F20-EET TransmittersData Sciences International270-0124-001
Dumont #2 Laminectomy Forceps - Standard Tips/Straight/12cm (x2)Fine Scientific Instruments11223-20For handling wires
Dumont #2 Laminectomy Forceps - Standard Tips/Straight/12cm (x2)Fine Scientific Instruments11223-20For surgery
Narrow Pattern Forceps- Serrated/Curved/12cmFine Scientific Instruments17003-12
Spring Scissors - Tough Cut/Straight/Sharp/12.5cm/6mm Cutting EdgeFine Scientific Instruments15124-12
Tissue Separating Scissors - Straight/Blunt-Blunt/11.5cmFine Scientific Instruments14072-10
Fine Scissors - Tough Cut/Curved/Sharp-Sharp/9 cmFine Scientific Instruments14058-11For cutting wires and clipping nails
Scalpel Handle #3World Precision Instruments500236
Scalpel BladeFine Scientific Instruments10010-00For preparing lead caps
Polysorb Braided Absorbable sutureCovidenD4G1532XFor coiling transmitter leads
GlutureZoetis Inc.6606-65-1Cyanoacrylate adhesive
3 mL Syring Slip Tip - SoftVitality Medical118030055
25G Needle (X2)Becton Dickinson and Co.305-145
Cotton Tipped ApplicatorsHenry Schein Animal Health100-9175
Andis Easy Cut Hair Clipper SetAndis049-06-0271Electrical Razor sold at Target
IsofluraneHenry Schein Animal Health29404Anesthetic
Isopropyl Alcohol 70%Priority Care 1MS070PC
Dermachlor 2% Medical Scrub (chlorohexidine 2%)Butler Schein55482
Artificial TearsHenry Schein Animal Health48272Lubricant Opthalmic Ointment
Vacuum greaseDow Corning Corporation1597418
Water BlanketJorVetJOR784BN

Reprints and Permissions

Request permission to reuse the text or figures of this JoVE article

Request Permission

Tags

Plethysmography RecordingRespiratory Muscle ActivityImplanted ElectrodesWireless Signal TransmissionBreathing Pattern AnalysisAccessory Muscle RoleFreely Moving MouseSimultaneous Signal Recording

Related Articles