This video demonstrates a technique to induce blood clot formation in a mouse brain. An anesthetized mouse with a cranial window and a thinned skull undergoes photothrombosis through the activation of a photosensitive dye using high-intensity light. This process generates reactive oxygen species, which damage the vessel walls and trigger clot formation, ultimately obstructing blood flow to the brain.
A subscription to JoVE is required to view this content. Sign in or start your free trial.
Method Article
Inducing Blood Clot Formation in the Mouse Brain Using a Photosensitive Dye
820 views
⸱
April 28th, 2025
In This Article
Abstract
Protocol
All procedures involving animal models have been reviewed by the local institutional animal care committee and the JoVE veterinary review board.
1. Anesthetizing for Cortical Preparation
- Place the mouse in an induction chamber with 2-3% isofluorane mixed with oxygen to induce anesthesia. Observe the respiration rate decrease as the mouse is induced. Pinch the paw of the mouse to determine whether the mouse is ready to move to the nose cone. Note: Anesthesia level is a critical step in any in vivo preparation and care should be taken not to induce a level that will cause global ischemia.
- Once the mouse is sufficiently anesthetized, transfer the animal to the surgery/imaging platform and place the mouse’s nose in the nose cone and apply 1-1.2% isofluorane to maintain an anesthetized state. Ensure that the mouse is lying on a temperature-controlled heating pad to maintain the body temperature (37°C +/- 0.5°C) throughout the remaining procedures. Place vet ointment over the eyes to prevent dryness while under anesthesia.
- Monitor the physiology of the mouse using a pulse oximetry system using the tail or foot clip provided with the system. Check that the respiratory rate is maintained between 50-65 breaths/min. Check that the heart rate remains between 300 to 450 bpm and oxygen saturation is maintained between 97-98% to ensure long-term survival of the animal.
- When the mouse is adequately anesthetized, shave the hair over the cranium using electric clippers, remove residual hair and clean with betadine, followed by an ethanol swab. Repeat this procedure up to three times to ensure a sterile surgical environment.
2. Surgical Procedure
- With the scalp fully cleaned and shaven, make a 5 mm incision in the scalp of the mouse to reveal the cranial fissures and to locate bregma.
- Use a sterile cotton applicator to remove any remaining fascia overlying the cranium.
- Glue a custom-made stainless-steel ring (Figure 1) with tissue adhesive to the bone overlying the parietal cortex using the stereotaxic coordinates of Bregma: -1 to -3 mm and lateral: 2-4 mm. Note: The glue typically sets within 2 min after the placement of the ring onto the bone.
- Affix the ring to a stereotaxic holder (Figure 2) to stabilize the mouse and to prevent movement during imaging.
- Under a surgical grade dissecting microscope, slowly drill a 1-2 mm section in the cranium using a speed controlled dremel-like tool (Meisinger 3.9 mm drill bit) making sure to keep the area level as it is drilled. Achieve this using a zig-zag pattern. To avoid heat buildup, set the drill speed to low and take frequent breaks.
- When the cranial skull becomes shiny in appearance, continue the thinning of the skull using a scalpel blade utilizing the same zig-zag pattern to keep the thinned surface level to facilitate smooth removal of thin layers of cranial skull. Using the tip of the scalpel blade make small linear strokes with light pressure to remove thin layers of bone at a time. Continue until the vasculature is clearly visible through the dissecting microscope.
- If the experimenter punctures through or break the skull during the thinning process, euthanize the animal due to likely damage to the underlying cortex.
Note: The mouse skull is approximately 300 µm in thickness and is comprised of two thin layers of compact bone (one external and one internal layer) and a layer of spongy bone sandwiched between the two layers of compact bone. The external layer of compact bone and most of the spongy bone are removed within the 5 mm drilling area resulting in an approximate 50 µm layer of compact bone remaining (see Figure 2B). Visualization of the vasculature will ensure that the final intact thinned skull is approximately 50 µm in thickness. The skull is therefore still present when thinned to this thickness.
3. Microscope Set-up
- Use an inverted microscope system (conventional, confocal or two-photon systems) that has an objective inverter. Note: It is also possible to utilize a standard upright microscope. The limiting factor will be the space between the stage and the objectives. Modifications to the stage may be necessary to accomplish this setup.
- Secure the surgical/imaging platform to a custom-made stage that is located aside the base of the microscope. Note: The platform is made using a laboratory jack to allow vertical movement of the surgical/imaging platform under the objective. The laboratory jack is mounted to a plate affixed to four cylindrical poles. (See Figure 2).
- Position the objective inverter containing a 20X objective over the cranial window. Use an external light source to find the cranial window by looking through the eyepieces of the microscope and position the objective in the imaging area. Note: The imaging area will be denoted by the presence of the vasculature.
- For water-based objectives, use artificial cerebrospinal fluid (aCSF) (130 mM NaCl; 30 mM KCl; 12 mM KH2PO4; 200 mM NaHCO3; 30 mM hydroxyethylpiperazine ethane sulfonic acid [HEPES]; and 100 mM glucose) as the medium due to potential leakage into the cranial cavity during imaging (Figure 3).
4. Rose Bengal Dye Preparation, Administration and Induction of Stroke
- Prepare a fresh 20 mg/ml solution of Rose Bengal in aCSF; filter and sterilize before administration. Do not reuse or store the Rose Bengal once it has been mixed. Make a fresh solution for each experiment.
- Give a 0.1 ml tail vein injection of Rose Bengal while scanning the cranial window with a 561 nm laser to ensure adequate injection of the solution. Note: Rose Bengal will be visualized within 5 sec after injection in the vasculature of the brain. The entire vessel should be filled with Rose Bengal.
- Following adequate injection of Rose Bengal dye choose an appropriate vessel for thrombosis based on vessel diameter (40-80 µm) to ensure reproducibility of a particular lesion volume. Differentiate between arteries and veins by looking at the direction of blood flow: arteries will move from larger diameter to smaller diameter vessels, veins move from smaller to larger diameter vessels. This is easily accomplished by visualization once Rose Bengal is injected.
- Change the microscope setting as follows:
- Increase the dwell time. Note: This will vary depending on the microscope system being utilized.
- Increase the laser power to 100%.
- Collect time sequence images at 1 frame/sec using the maximum scan speed.
- Scan the mouse until a stable clot is formed within the vessel. Note: This typically is achieved within 5 min of continuous scanning (See Figure 4).
- Following the induction of clot formation using Rose Bengal, remove the mouse from the imaging area back to the dissecting microscope. Carefully remove the stainless-steel ring from the cranial skull. Examine the cranial window for any bleeding. If bleeding occurs, terminate the experiment.
- Use 6.0 monofilament suture to close the incision over the skull. Place antibiotic ointment along the suture line to prevent infection. Inject Buprenex (0.05 mg/kg) subcutaneously every 12 hr for three days for pain management.
- Return the mouse to a recovery chamber following removal from the anesthetic until fully awake and freely moving.
- Return the mouse to a clean cage for further investigation at a later time.
Access restricted. Please log in or start a trial to view this content.
Results
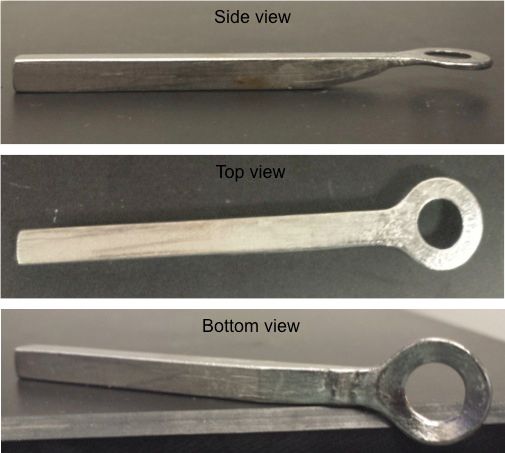
Figure 1: Stainless Steel Ring. Three views (top, side and bottom views) are shown of the stainless-steel ring holder that is applied to the skull of the mouse to affix it to the stereotaxic holder.
Access restricted. Please log in or start a trial to view this content.
Materials
| Name | Company | Catalog Number | Comments |
|---|---|---|---|
| Reagents | |||
| Rose Bengal | Sigma | 330000 | |
| Isoflurane Anesthetic | MWI Veterinary Supply | 088-076 | |
| Vetbond | 1469SB | 1469SB | |
| aCSF | 126 mM NaCl, 2.5 mM KCl, 1.25 mM NaH2PO4, 2 mM MgCl2, 2 mM CaCl2, 10 mM glucose and 26 mM NaHCO3 (pH 7.4). | ||
| Equipment | |||
| Dissecting Scissors | Bioindustrial Products | 500-410 | |
| Operating scissors 14 cm | Bioindustrial Products | 12-055 | |
| Forceps Dumont High Tech #5 style, straight | Bioindustrial Products | TWZ-301.22 | |
| LabJack 132X80 | Optosigma Co | 123-6670 | |
| Platform for Labjack 8X 8 | Optosigma Co | 145-1110 | |
| Ear bar holder from stereotaxic setup | Stoelting/Cyborg | 51654 | |
| Dispomed Labvent Rodent anesthesia machine | DRE, Inc. | 15001 | |
| Tech IV Isoflurane vaporizer | DRE, Inc. | 34001 | |
| F Air Canister | DRE, Inc | 80120 | |
| Bain circuit breathing tube | DRE, Inc | 86111B | |
| Rodent adapter for bain tube | DRE, Inc | 891000 | |
| O2 regulator for oxygen tanks | DRE, Inc | CE001E | |
| Rodent induction chamber | DRE, Inc | 15004C | |
| Ethicon Silk 6-0; 18 in with P-3 needle | Suture Express | 1639G | |
| Objective inverter Optical Adapter | LSM technologies | ||
| Foredom drill Dual voltage 110/120 | Foredom | 134.53 |
