This video demonstrates the activation and migration of neural stem cells (NSCs) in a mouse spinal cord injury model. To expose the spinal cord, a vertebra from the thoracic region of the spine is removed from an anesthetized mouse. A superficial injury is then created in the white matter of the spinal cord using a bent needle, which preserves the central canal. Following the injury, NSCs surrounding the canal are activated and migrate to the injury site to assist tissue repair.
A subscription to JoVE is required to view this content. Sign in or start your free trial.
Method Article
A Minimal Spinal Cord Injury Model to Study Neural Stem Cell Activation and Migration
1.2K views
⸱
April 28th, 2025
In This Article
Abstract
Protocol
All procedures involving animal models have been reviewed by the local institutional animal care committee and the JoVE veterinary review board.
1. Minimal Spinal Cord Injury Surgery
NOTE: Prior to surgery make sure that all surgical instruments and materials are sterilized by appropriate methods (Figure 1A).
- Build a thoracic support arch by rolling up 4–5 squares of gauze and taping them together in the middle to obtain a fixed roll of gauze.
- Place the mouse in the induction chamber and initiate anesthesia with 5% isoflurane. Confirm the absence of a toe pinch reflex before proceeding, as well as throughout the procedure. As the surgery can take upwards of 30 min to complete, optimize for the minimal isoflurane exposure (5 min at 5% and the remaining time at 2–3%).
- Transfer the mouse to a nose cone attached to the anesthetic machine at 2–3% isoflurane maintenance dose. Use hair clippers to remove fur from the dorsum of the animal from mid-back up to the neck/ears to expose a wide rectangular area of skin for surgery.
- Transfer the mouse to a stereotaxic instrument by placing its nose in the attached nose cone and stabilizing the skull with ear bars. Maintain isoflurane at 5% during placement of the ear bars and lower back to 2–3% once the mouse is secured in the stereotaxic device.
- Administer preoperative analgesic medications intraperitoneally — Meloxicam (2.0 mg/kg). Generously apply eye lubrication onto the open mouse eyes to prevent corneal desiccation when under anesthesia.
- Place the thoracic support arch underneath the mouse abdomen while straightening out the mouse body and spine by lightly pulling on the base of the tail. Use laboratory labeling tape to secure the tail and all extended limbs in a star-like position. Once secure, push the thoracic support arch rostrally, from the mouse abdomen towards the upper thorax — in order to prop up the thoracic spine (Figure 1B).
- Prepare a sterile surgical field by disinfecting the fur-clipped skin area prepared in step 1.3 with 70% ethanol, followed by povidone-iodine. Repeat twice. Apply a sterile surgical drape to keep a wide sterile field.
- Using a #10 scalpel blade, make a vertical incision parallel to the longitudinal axis of the animal from the mid-point of both shoulder blades to the curvature of the thoracic spine. Retract the skin to expose soft tissue and the spinal column contour (Figure 1C).
- Identify the lower border of the suprascapular fat pad (this demarcates the T4/5 vertebral level). With the same #10 blade, carefully but with force, cut along both sides of the vertebral bone T5–T8/9 to detach the back-muscle tendons from the column.
- Insert the teeth of retractors into the incision sites on either side of the spine. Adjust the exposure by expanding retractors to sufficiently elevate the spine without putting too much strain on the retracted muscle layers (Figure 1D).
- Under the surgical microscope, carefully clean the residual muscle and other soft tissue overlying the spine to expose the vertebral bone (Figure 1E). Identify the vertebrae that will be removed by clasping the spinous process of the vertebrae with toothed forceps and moving it slightly up and down.
NOTE: This should allow identification of intervertebral joints and expose the small openings (intervertebral foramina) underneath the vertebrae of interest. - Insert one head of the curved blunted scissors into either side of the exposed intervertebral foramen, caudal to the vertebral lamina to be excised out, and cut the connecting intervertebral joints bilaterally.
- Lift the lamina upwards and cut off the upper attachment of the lamina to isolate and remove the bone.
NOTE: This will expose the intact dural sac containing the spinal cord (Figure 1F). There might be excessive bleeding which can be controlled by placing precut 1 cm x 1 cm gauze onto the affected areas and/or wash with sterile phosphate-buffered saline (PBS). - With the dorsal midline vein serving as a landmark, insert a 45° bent shaft of a 30 G needle tip (with needle bevel facing upwards) into the dorsolateral surface of the spinal cord (approximately 1 mm deep) at approximately 0.5 mm lateral to either side of the midline.
- Move the needle ~2 mm from caudal to rostral (parallel to the midline) so that the entire length of the bevel of the needle is inserted into the cord. Remove the needle by retracing via the path of entry (Figure 1G).
NOTE: There should be no bleeding but swelling of the spinal tissue may be seen at this step. - To close the wound, remove the retractor and suture the back muscles on either side of the injury together in the midline using a 6-0 absorbable suture. Use a 4-0 sterile silk suture to subsequently close the overlying skin.
Access restricted. Please log in or start a trial to view this content.
Results
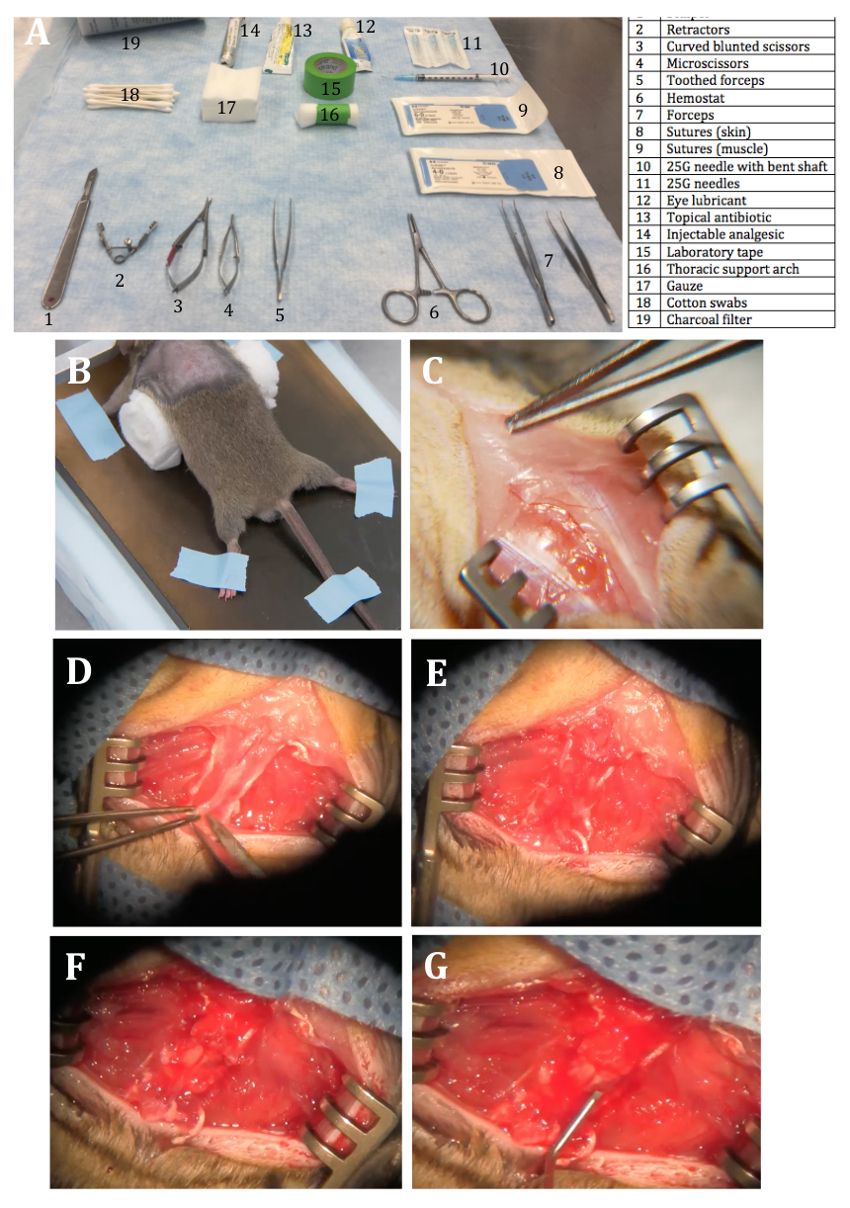
Figure 1: Surgical Procedure. (A) The layout of everything required, numbered for reference. (B) A picture of the mouse in a stereotaxic device with a straightened body, spine and limbs spread out and taped along with thorac...
Access restricted. Please log in or start a trial to view this content.
Materials
| Name | Company | Catalog Number | Comments |
|---|---|---|---|
| Agricola Retractor | Fine Science Tools | 17005-04 | |
| Moria Vannas-Wolff Spring Scissors (Curved) | Fine Science Tools | 15370-50 | Customize when ordering to get blunted tips |
| Graefe Forceps (Straight, 1x2 Teeth) | Fine Science Tools | 11053-10 | |
| Extra Fine Graefe Forceps (Curved, Serrated) | Fine Science Tools | 11152-10 | Or any other forceps for suturing |
| Hartman Hemostats (Straight) | Fine Science Tools | 13002-10 | Or any other appropriate for suturing |
| Scalpel Handle #3 | Fine Science Tools | 10003-12 | Or any other appropriate |
| Hair clippers | amazon.ca | https://www.amazon.ca/Wahl-Professional-8685-Classic-Clipper/dp/B00011K2BA | or any other appropriate |
| Stereotaxic instrument | Stoeling | 51500 | or any other appropriate |
| Meloxicam | or any appropriate sanctioned by animal care facility | ||
| Tears Naturale P.M. | Alcon | https://www.amazon.ca/Alcon-Tear-Gel-Liquid-Eye-Gel/dp/B00HHXGUXE | or any other appropriate |
| Isoflurane | Baxter International Inc | DIN 02225875 | or any other appropriate for anesthesia |
| Q-tips Cottom Swabs | amazon.ca | https://www.amazon.ca/Q-Tips-Cotton-Swabs-500-Count/dp/B003M5UO6U/ref=pd_lpo_vtph_194_bs_tr_img_1/140-7113119-8364127?_encoding=UTF8&psc=1&refRID=JC16N542KVRF2N62N3DS | |
| Cotton Gauze | Fisher Scientific | 13-761-52 | |
| 30G Needles | Becton Dickinson | 305106 | For Injury |
| 25G Needles | Becton Dickinson | 305122 | For Drug injections |
| 1mL Syringes | Becton Dickinson | 3090659 | for drug injections |
| 3mL Syringes | Becton Dickinson | 309657 | for fluid injections |
| 4-0 Suture | uoftmedstore.com | 2297-VS881 | for skin suturing |
| 6-0 Suture | uoftmedstore.com | VS889 | for muscle suturing |
| Standard Dissection Tools | Fine Science Tools | ||
| Dissection Microscope | Zeiss | Stemi 2000 |
