This video demonstrates phase contrast magnetic resonance imaging (PC-MRI) to measure blood flow in the common carotid artery of a rat. After securing an anesthetized rat on the MRI bed and ensuring stable physiological parameters, the common carotid artery is scanned to capture images at defined intervals. Blood flow is then computed from these images to evaluate changes throughout the cardiac cycle.
A subscription to JoVE is required to view this content. Sign in or start your free trial.
Method Article
Phase Contrast Magnetic Resonance Imaging to Assess Blood Flow in the Arteries of a Rat
1.3K views
⸱
April 28th, 2025
In This Article
Abstract
Protocol
All procedures involving animal models have been reviewed by the local institutional animal care committee and the JoVE veterinary review board.
1. Animal Preparation and Monitoring
- Leave all magnetically susceptible objects such as wallets, keys, credit cards, etc. outside the scanner room prior to commencing animal preparation for MRI scanning.
- Initially anesthetize the rat (2-month-old male Sprague-Dawley (SD) rat, 280–350 g) in an induction box using a mixture of 5% isoflurane (ISO) and oxygen (2 L/min) for 3–5 min, as necessary.
- When the animal is recumbent and exhibits no response to a tail or toe pinch, discontinue ISO administration and transfer the animal to the scanning room.
- Place the rat in the MRI bed in a head-first prone position and deliver 2-3% ISO through a nose cone device for maintaining anesthesia.
- Monitor respiration by placing a respiratory pillow sensor under the animal's torso.
- Connect the sensor to a respiratory system and check for respiration rate between 40-50 beats per minute (bpm).
- For cine-gated PC-MRI acquisition, place one electrode each on the right forepaw and the left hind paw, respectively (Figure 1a).
- Twist the electrocardiography (ECG) cables together.
- Use a head holder with ear bars and a bite bar to secure the animal to restrict head movement.
- Use a warm air heating system or gauze pads to maintain body temperature while in the magnet.
- Ensure that the R-wave is clear on the ECG monitor (Figure 1b) and place the animal in the scanner. There is no need to place the surface coil on the top of the animal's neck as images are acquired by the volume coil.
2. MRI Acquisition
- Use 2–3% ISO to maintain anesthesia during the entire imaging procedure. Continuously monitor physiological responses and keep as constant as possible.
- Start the MRI scans once the animal is placed inside the scanner and continues to be physiologically stable. In this study, use a 7 T small animal MRI system with a gradient strength of 630 mT/m, but other field strengths of small animal MRI systems can be used.
- Select the "Localizer" sequence from the console monitor of the MRI scanner and acquire scout images along all three orientations using any fast image acquisition sequence, e.g., the fast spin echo, to create coronal, axial, and sagittal images. The purpose of these scout images is to determine the imaging planes.
- Ensure that the center of the animal's head and neck are at the center of the magnet. If necessary, adjust the animal's position until the correct position is reached. If the animal is repositioned, repeat scanning to obtain scout images.
- Select the "Time-of-flight (TOF) angiogram" sequence from the console monitor of the MRI scanner and acquire a 2D TOF angiogram first to ascertain the precise anatomical location of the common carotid artery (CCA). Use the following scanning parameters: repetition time (TR)/ echo time (TE)=22/4.87 ms, flip angle = 90°, field of view (FOV) = 40 × 40 mm2, matrix size = 256 × 256, slice thickness 0.6 mm, with the number of excitation (NEX) = 1.
NOTE: The name of the TOF sequence could be vender specific. The user can insert these parameters in the console monitor. - Ensure that the saturation band is "on" and is placed on the top to avoid interference from venous signals.
NOTE: For the saturation band, it usually comes with the TOF sequence. If the saturation band does not show on the monitor, please notify the service person. - After locating the CCA using the TOF angiogram, target the image plane of the PC-MRI to the center of the CCA and orient such that the slice is perpendicular to the direction of blood flow (Figure 2a).
- Ensure that both respiration and ECG gating are connected to the MRI system, showing the clear signal on the monitor computer (Figure 1b), and set the trigger module to be "on" in the "Trigger Mode" from the console monitor of the MRI scanner.
- Confirm that the animal's physiological responses are stable before initiating the PC-MRI scan from the monitoring computer (Figure 1b). Verify that gating selections are "on" in both the monitor computer and the console monitor of MRI scanner.
NOTE: The physiology monitoring system used in this study is provided by the vender. For most animal scanners, similar physiology monitoring systems are provided and are vender specific. - Select the sequence of PC-MRI sequence from the console monitor of the MRI scanner and perform gated PC-MRI scans using the following parameters: TR/TE=15.55/4.51 ms (minimum TR and TE), flip angle=30°, FOV = 40 × 40 mm2, matrix size = 192 × 192, slice thickness = 2 mm, velocity encoding (VENC) = 120 cm/s, with NEX=8. Unidirectional VENC is acquired in the through-plane direction.
NOTE: The scan time is approximately 8.5 min, but the actual scan time may be slightly different among animals due to the variation in cardiac cycles. - Repeat steps 2.6–2.9 of image acquisition if the region of interest (ROI) is to be changed to another location in the CCA, such as at the bifurcation.
- Remove the animal from the scanner and return it to its recovery cage when the scan is complete.
- Warm the animal with a heating lamp to maintain body temperature. Keep the lamp at least 15 cm away from the animal to prevent overheating.
- When the animal starts to move and exhibits a response to a tail or toe pinch, turn off the heating lamp.
Access restricted. Please log in or start a trial to view this content.
Results
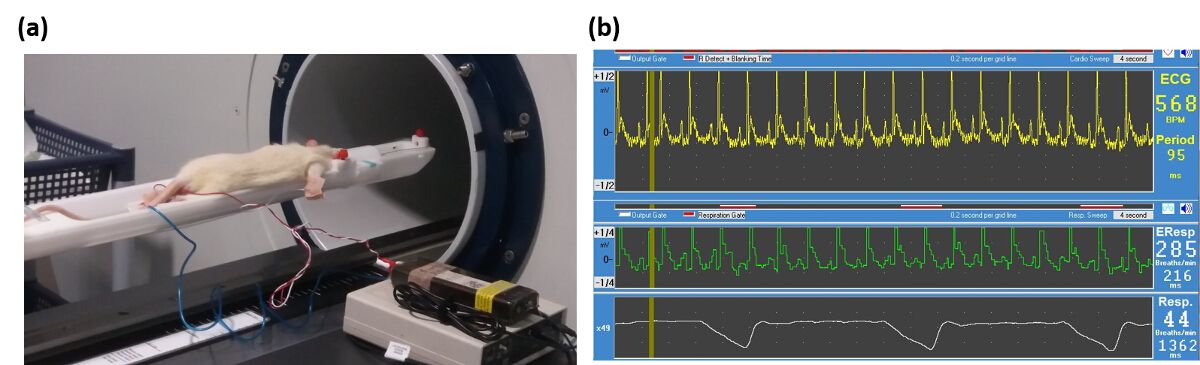
Figure 1: Animal monitoring. (a) ECG electrodes are placed on the right forepaw and the left hind paw, and the respiratory pillow sensor is placed under the animal's torso. (b) The ECG and respirat...
Access restricted. Please log in or start a trial to view this content.
Materials
| Name | Company | Catalog Number | Comments |
|---|---|---|---|
| 7T small animal MRI system | Bruker | ||
| Isoflurane | Baxter | 1001936040 | Anesthetic |
| ECG lead | 3M | 2269T | |
| Monitoring and gating system | SA instruments, Inc | Model 1030 |
