1. Preparation of Larval Brain Explants
- Make an imaging chamber.
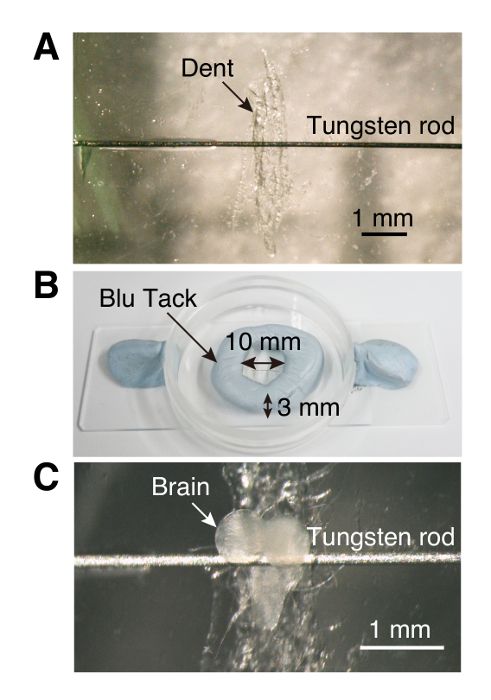
NOTE: Stable recording requires that the brain explants be tethered. Here, a low-cost, hand-made imaging chamber is used in the Ca2+ imaging system.- Using forceps, scratch the bottom center of a plastic culture dish (35 mm x 10 mm) to create a dent for the ventral ganglion of the larval brain, making mounting easier (step 1.3, Figure 1).
- With a toothpick, place a small drop of superglue on either side of the dent and attach a tungsten rod (0.125 mm diameter, 6 to 7 mm length) to the glue.
- Using a small piece of putty-like reusable adhesive, make a circular wall (10 mm in diameter and 3 mm high) surrounding the dent (Figure 1).
NOTE: The space inside the wall will later be filled with phosphate-buffered saline (PBS; 0.14 M sodium chloride ( NaCl), 0.0027 M potassium chloride (KCl), 0.01 M phosphate ion (PO43–), pH 7.4 ± 0.05 at 25 °C).
- Animal preparation
NOTE: For calcium imaging, a calcium indicator, GCaMP6s, is expressed in the cell type of interest, which is commonly achieved using combinations of tissue-specific GAL4 and UAS-GCaMP6s. To ensure that the signal is mediated through the candidate receptor, GCaMP6s is also expressed in a mutant defective in the receptor.- When experimental comparisons for different genotypes such as wild type and mutants are required, age match test larvae to avoid GCaMP6 expression level variations and physiological differences due to developmental stages.
- Keep parental flies (30 flies for each sex) in a culture vial containing standard fly food for 8 hours to allow egg-laying on the surface of the food. Culture larvae in mass under a 12-h light-dark cycle at 25 °C and 60-70 % relative humidity.
- Dissection of the larval brain
- At 90-120 h after egg laying (AEL), collect larvae and wash them at least 3 times with distilled water to remove adherent food debris.
- Place a larva on a square 1.5-inch watch glass filled with ice-cold PBS.
NOTE: The next two steps are carried out in this watch glass under the dissecting microscope. - Use forceps to gently grab the middle part of the larva. Use another forceps to grab the mouth hooks and pull the mouth hooks gently to separate the anterior part of the larva containing the brain from the rest of the body.
NOTE: Alternatively, surgical scissors can be used. - Hold the anterior tip by forceps and turn the larva inside out. Remove extraneous tissue attached to the brain, such as imaginal disks, fat bodies, and ring glands. Gently separate the brain from the mouthparts.
- Apply 200 µL of PBS to the inside of the ring made of the putty-like reusable adhesive in the imaging chamber. Gently suck the dissected brain with PBS into a Pasteur pipette, and then transfer it into the imaging chamber.
- Setting the brain into the imaging chamber
- Use forceps to grab muscle fibers extending from the ventral ganglia. Insert the brain gently into the dent underneath the tungsten wire.
- Using another forceps, pull the tungsten wire slightly up to place the brain in the correct position for imaging (Figure 1).
2. Acquisition of Ca2+ Fluorescence Images
NOTE: Brain explants immersed in PBS are imaged using a fluorescence microscope equipped with a 20X water-immersion objective lens (numerical aperture, N.A. = 0.5). PBS does not activate cells in the brain. If Z-axis images are needed, the objective lens is mounted with a piezoelectric-activated lens mover. A spinning disc confocal head is used to enhance the time resolution. For low-light imaging, an electron-multiplying charge-coupled device camera is mounted on the microscope. The imaging of GCaMP6s fluorescence (excitation/emission: 488/509 nm) requires a 488 nm laser for excitation with a dichroic beam splitter and an emission filter (e.g., 528 ± 38 nm band bandpass filter).
- Place the imaging chamber containing the brain explant under the microscope.
- Lower the objective lens until it touches the PBS. Under bright-field illumination, position the brain and bring it into focus. Switch to fluorescent light and adjust the focus on the GCaMP6s-labeled cells.
NOTE: The basal green fluorescence of the GCaMP6s should be visible. - Start acquisition at 250 ms/frame at a resolution of 512 × 512 pixels in water-cooled mode using the appropriate acquisition software (e.g., µManager). Adjust the exposure time to obtain fluorescence values within the dynamic range of the charge-coupled device (CCD) camera, but not lower than 1000 (arbitrary units), with 16-bit images (dynamic range 0-65,535).
NOTE: A low exposure time should be used to minimize photo-bleaching of the GCaMP6s. Exposure time should be optimized in each experiment as it depends on the expression levels of GCaMP6 and the sensitivity of the detection system. It was 100 ms in our experiment using dilp2>GCaMP6s. When z-sections are required for a given imaging depth, several z-section images can be acquired depending on the exposure time and frame intervals. If the camera has enough spatial resolution, the binning size (number of registers on the chip that will be binned into one digital pixel) should be increased to reduce the exposure time. - Once imaging parameters are determined, take images for 1 min before peptide administration to detect baseline signal intensities (F0).
- Apply the test peptide; for this, dissolve 100 µL of peptide solution in PBS and pipette it directly into the larval bath to yield an optimal concentration.
NOTE: The peptide solution should be injected slowly (e.g., flow rate 20 µL/s) into the bath solution using a pipette. An unrelated synthetic peptide dissolved in PBS is used as a negative control. - Record the GCaMP6s emission for a few minutes.