This video demonstrates time-lapse imaging of neural stem cells (NSCs) from a transgenic mouse brain using a confocal laser scanning microscope. NSCs fluoresce red during the G1 phase and are non-fluorescent in other cell-cycle phases. An adhered NSC culture is placed in the imaging chamber, imaging parameters are set, and images are captured at regular intervals for the desired duration.
A subscription to JoVE is required to view this content. Sign in or start your free trial.
Method Article
Time-Lapse Imaging of Mouse Neural Stem Cell Division Using Confocal Microscopy
751 views
⸱
June 18th, 2025
In This Article
Abstract
Protocol
1. Basic Setup Prior to Culture and Videomicroscopy
- Use glass-bottom culture plates or µ-Plates for confocal video microscopy. For 1 - 5 x 10³ cells/well, use 96-well plates, and for more than 5 x 10³ cells/well, use 24-well plates.
- At least one day prior to commencing the experiment, prepare sterile Poly-D-lysine (PDL) coated plates for adherent monolayer cultures. Add enough PDL (10 µg/ml in distilled water or dH2O) to coat the bottom of each well and incubate overnight (O/N) at 37 °C. Remove the PDL solution and rinse three times with dH2O before allowing the plate to dry in the hood during at least 2 hr under a laminar flow. If not used immediately, store the coated plate at -20 °C.
- Prepare culture medium by mixing neural stem cell (NSC) Basal Medium and NSC Proliferation Supplement at a 9:1 ratio (see Material table) along with 2 µg/ml heparin, 20 ng/ml purified human recombinant epidermal growth factor (EGF), and 10 ng/ml human recombinant fibroblast growth factor 2 (FGF-2). Warm up the culture medium to 37 °C in a water bath before use.
- For the subventricular zone (SVZ) dissociation, prepare papain solution: 1 mg/ml papain (15 UI/ml) in Earl’s Balance Salt Solution (EBSS) containing 0.2 mg/ml L-cysteine, 0.2 mg/ml ethylenediaminetetraacetic acid (EDTA), and 0.01 mg/ml DNase I in phosphate-buffered saline (PBS). Sterilize the solution by passing it through a 0.2 µm filter. Equilibrate the solution at 37 °C before use.
- To stop the enzymatic reaction, prepare a protease inhibitor solution (Ovomucoid): dulbecco's modified eagle medium (DMEM):F12 medium containing 0.7 mg/ml trypsin inhibitor type II. Filter the solution using a 0.2 µm filter.
- Prepare PBS 0.6% glucose solution to collect the brains and PBS 0.15% bovine serum albumin (BSA) solution for washing steps and for antibody staining.
- Prepare dissection tools: scissors, dissecting and tying forceps, and a scalpel. Soak them in 70% ethanol.
2. Harvesting of Adult Mouse Brains and SVZ Microdissections
- Sacrifice adult Fluorescence Ubiquitination Cell Cycle Indicator (FUCCI) mice (2 to 3-month-old and/or 12-month-old for aging studies), performing a cervical dislocation in accordance with the appropriate institutional guidelines.
- Spray the mouse with 70% ethanol and cut the head off using sharp scissors.
- Make an incision along the scalp to reveal the skull.
- Perform a longitudinal midline cut starting at the base of the skull towards the olfactory bulbs using a small pair of scissors. Make sure to avoid damaging the underlying brain with the scissors blades. Remove the upper open part of the skull with curved forceps to expose the brain.
- Collect the brain in a 15 mm petri dish containing 0.6% glucose in PBS.
- Dissect away the olfactory bulbs. Place the brain on its dorsal surface and make a coronal section through the optic chiasm using a scalpel.
- Under a dissecting microscope, position the rostral part of the brain section with the cut coronal surface facing upwards toward the experimenter.
- To dissect the SVZ, remove the septum with fine curved forceps, then insert one tip of a fine forceps into the striatum immediately adjacent to the ventricle and detach the SVZ from the surrounding tissue. Place the dissected SVZ into a petri dish containing 1 ml of PBS-0.6% glucose.
3. SVZ Tissue Dissociation
- Mince the dissected SVZ in the petri dish until no large pieces remain.
- Transfer the minced tissue along with the PBS-0.6% glucose to a 15 ml tube and centrifuge at 200 x g for 5 min.
- Discard the supernatant and add 1 ml of pre-warmed papain (1 mg/ml, prepared in step 1.4) supplemented with 0.01 mg/ml DNase I. Incubate for 10 min in a water bath at 37 °C. Use 1 ml of papain per mouse.
- Centrifuge at 200 x g for 5 min and discard the supernatant.
- Add 1 ml of pre-warmed ovomucoid (0.7 mg/ml, prepared in step 1.5) to stop papain activity. Mechanically dissociate the minced tissue further into a single-cell suspension by gently pipetting up and down 20 times through a p1000 micropipette tip. Avoid air bubbles.
- Pass the cell suspension through a sterile 20 µm filter in a new 15 ml tube. Make sure to wash the cell filter with PBS 0.15% BSA to avoid losing cells.
- Centrifuge at 200 x g for 10 min and discard the supernatant. Resuspend the cells in 100 µl of PBS containing 0.15% BSA.
4. Immunofluorescent Staining for Cell Sorting
For cell sorting using FUCCI-Red mice (Figure 1A), use the following antibodies: CD24 phycoerythrin-cyanine7 conjugate [PC7]; CD15/LeX fluorescein isothiocyanate [FITC] conjugated and Ax647 conjugated EGF ligand.
Note: LeX+EGFR+ cells and EGFR+ cells are not abundant in the adult SVZ: ≈ 600 and 1500 cells/mouse, respectively. We recommend pooling SVZ cells from 2 to 3 mice to have enough material. Do not work with more than 12 mice on the same day so that the cell sorting duration doesn’t exceed 3 hr. Keep in mind that working with too many mice on the same day will lead to an increased cell sorting duration, possibly resulting in increased cell death and/or cell differentiation.
- Perform the FACS staining in 100 µl of PBS 0.15% BSA per mouse (or in 200 µl for a group of 2 to 3 mice for optimal staining).
- Prepare the control tubes. Use compensation beads to prepare single color control tubes according to the manufacturer's protocol. Select a fraction of cells (1/10 of the cells extracted from one mouse is enough) and separate it in 4 tubes to prepare 1 negative control tube (unmarked cells) and 3 fluorescence minus one (FMO) control tubes. Resuspend the cells in 200 µl of PBS 0.15% BSA per tube.
Hint: For LeX-FITC FMO control, label the cells with CD24-PC7 (1:50) and Ax647‐conjugated EGF ligand (1:200); for CD24-PC7 FMO control, label the cells with CD15/LeX-FITC (1:50) and Ax647‐conjugated EGF ligand (1:200) and for Ax647‐conjugated EGF ligand FMO control, label the cells with CD15/LeX-FITC (1:50) and CD24-PC7 (1:50). - For the tubes used for cell sorting, use the following antibodies at the indicated dilution in PBS 0.15% BSA: CD24-PC7 (1:50), CD15/LeX-FITC (1:50), and Ax647‐conjugated EGF ligand (1:200).
- Incubate for 20 min at 4 °C in the dark. Wash with 1 ml PBS 0.15% BSA and centrifuge at 200 x g for 10 min. Resuspend the cells in 200 µl of PBS 0.15% BSA per brain. Keep the cell sorting tubes on ice and proceed immediately to the cell sorting.
- If using FUCCI-Green mice, separate LeX-positive and LeX-negative fractions using separation columns before cell sorting, as the LeX-FITC antibody shares the same emission wavelength as the FUCCI-green fluorescence (Figure 2A, B).
- First, label the cells with a mouse anti-human LeX-antibody (1:50) for 15 minutes at 4 °C in the dark in 100 µl of PBS 0.15% BSA.
- Wash the cells with 1 ml PBS 0.15% BSA and centrifuge at 200 x g for 10 min, then label the cells with anti-mouse IgM microbeads (1:10) for 15 minutes at 4 °C in the dark.
- Wash the cells with 1 ml PBS 0.15% BSA and centrifuge at 200 x g for 10 min. Resuspend the cells in 500 µl PBS 0.15% BSA and pour the cells through the separation column in the magnetic field as schematized in Figure 2C. Wash the column with 1 ml PBS 0.15% BSA to obtain LeX negative fraction.
- To obtain a LeX-positive fraction, remove the separation column from the magnetic field and elute the cells with 2 ml PBS 0.15% BSA.
- Proceed to CD24-PC7 and Ax647‐conjugated EGF ligand staining as indicated in 4.2.
5. Cell Sorting
Note: Cells were sorted on a FACS sorter at 40 Psi with an 86 µm nozzle. Fluorescence was collected using the following filter set: 520/35nm (FITC), 575/26nm (PE), 670/20nm (Ax647), and 740LP (PC7). Compensation is necessary to prevent false-positive signals as overlap is found between the emission spectra of the FUCCI-red fluorescence and the PC7 dye.
- Immediately prior to cell sorting, add a vital dye to discriminate live from dead cells. We used Hoechst (HO) (see material table) at a 2 µg/ml final concentration. Run the negative control tube (unmarked cells) through the FACS sorter and select the cells using side scatter (SSC) and forward scatter (FSC) parameters (Figure 3A).
NOTE: Dead cells were excluded by gating only the HO-negative fraction (Figure 3A), and then doublets were excluded by selecting the Pulse Width negative fraction (Figure 3A). - Run the single color controls prepared in step 4.2 and adjust the photomultiplier tube (PMT) voltages if necessary (i.e. negative population too high and/or positive cells off scale). Perform color compensation in the compensation window of the software.
- Run FMO controls prepared in step 4.2 (LeX-FITC FMO control, CD24-PC7 FMO control, and Ax647-conjugated EGF ligand FMO control) and draw the sorting gates (Figure 3). Sort the cells directly into 100 µl of culture medium in 1.5 ml microtubes.
6. Preparation of Cells for Microscopy
- Plate the freshly sorted cells at a density of 1 - 3 x 10³ cells/well on Poly-D-Lysine-coated 96-well µ-Plate with 300 µl of culture medium.
- Prior to video microscopy, incubate the culture plates at 37 °C and 5% CO2 for at least 1 hr to allow cell adhesion.
7. Microscope Setup and Image Acquisition
- Perform live imaging using a Plan Apo VC 20x DIC objective (NA: 0.75) on a confocal laser scanning microscope system attached to an inverted thermostated chamber at 37 °C under a 5% CO2 atmosphere.
- Position the 96-well µ-Plate inside the pre-warmed and equilibrated thermostated chamber and replace the lid with a thermostated cover.
- Open the NIS-Elements software and click in the menu bar on "Acquire/Acquisition controls/ND acquisition” to select the options of the time-lapse (length, stage positions, confocal z-sections,…), "Acquire/Acquisition controls/Ti Pad” to select the objectives and "Acquire/Acquisition controls/A1plus Settings” to select the PMT level for each fluorescence in the menu bar. Select a folder to save the data files.
- Using the ND acquisition window, set the center of each well as a stage position and select the large image option to 7 x 7 mm². This will create a mosaic image around the center of each well. Set the overlap for the large mosaic image to 5%. Take pictures every 20 minutes for 24 hr. Select the Plan Apo VC 20x DIC objective (NA: 0.75) in the Ti Pad window.
- In the A1plus Settings window, acquire images using a high-speed resonant scanner at a 512 x 512 pixels format with a resolution of 1.26 µm/pixel. Use brightfield to visualize cell shapes. In the case of FUCCI-Red mice, excite red fluorescence at 561 nm and collect using a 595/50 nm filter. In the case of FUCCI-Green mice, excite green fluorescence at 488 nm and collect using a 530/40 nm filter. Determine the optimal PMT level, offset, and laser power for each wavelength.
NOTE: We recommend using the autofocus function for the brightfield channel to allow the software to autofocus at each stage position before each acquisition. Hint: A Plan Apo VC 20x DIC objective (NA: 0.75) was used for its excellent resolution without the need for oil. Other objectives may be used depending on the optical resolution desired. - Select the 'Run now' button in the ND acquisition window to begin the acquisition.
Access restricted. Please log in or start a trial to view this content.
Results
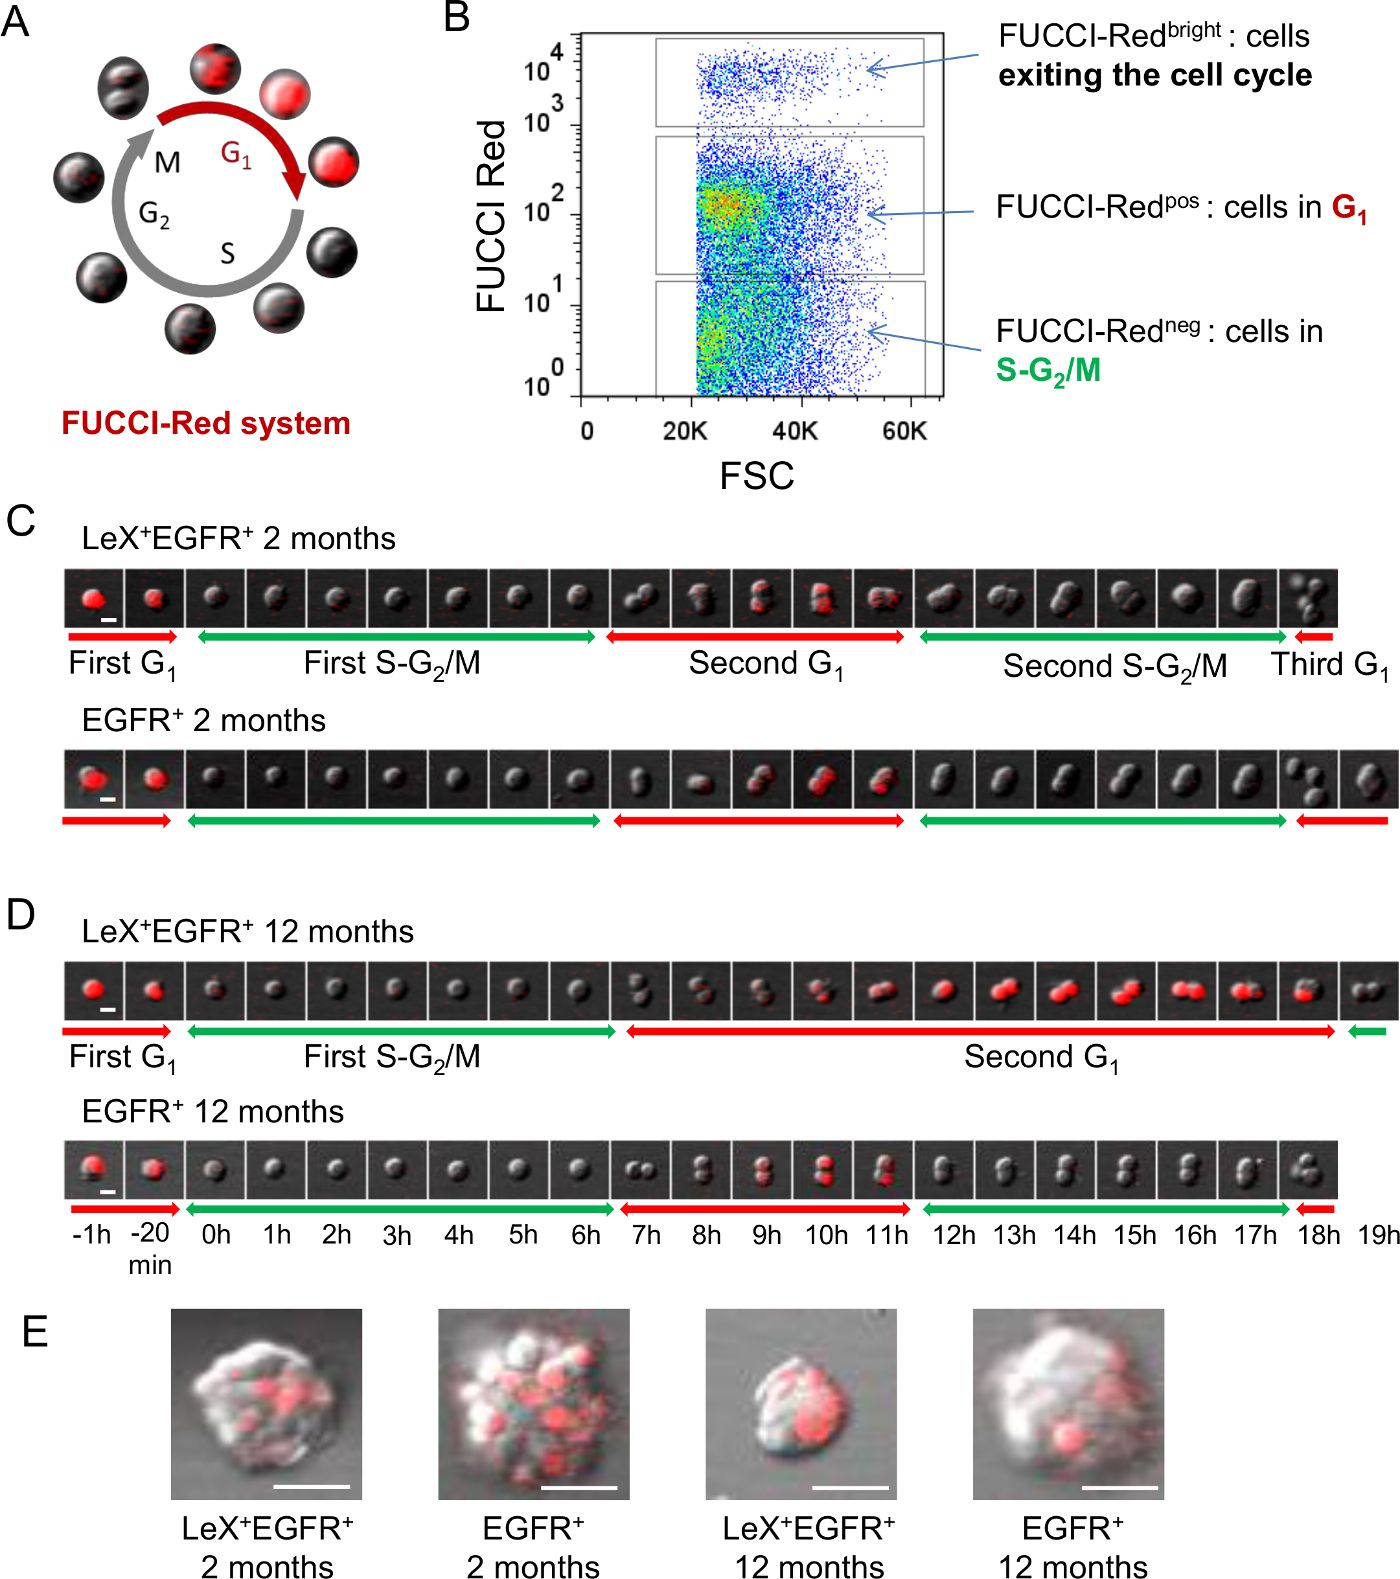
Figure 1: Live analyses of cell cycle using FUCCI-Red mice. (A) Schematic representation of FU...
Access restricted. Please log in or start a trial to view this content.
Materials
| Name | Company | Catalog Number | Comments |
|---|---|---|---|
| 96-well uncoated glass bottom culture plates | MatTek Corp. | P96G-1.5-5-F | |
| µ-Plates 96-well | Ibidi | 89626 | |
| Poly-D-Lysine | Millipore | A003E | |
| NeuroCult NSC Basal Medium | STEMCELL Technologies | 5700 | |
| NeuroCult NSC Proliferation Supplement | STEMCELL Technologies | 5701 | |
| Heparin | STEMCELL Technologies | 7980 | |
| EGF | Millipore | GF144 | |
| FGF-2 | Millipore | GF003 | |
| Papain | Worthington | LS003119 | |
| EBSS | Invitrogen | 24010-043 | |
| L-cysteine | Sigma | C-7352 | |
| 0.5M EDTA, pH 8.0 | Promega | V4231 | |
| DNase I | Sigma | D5025-15KU | |
| Trypsin inhibitor type II | Sigma | T9128 | Ovomucoid |
| DMEM:F12 medium | Life Technologies | 31330-038 | |
| 20 µm filter | BD Medimachine Filcon | 340622 | |
| Eppendorf microtubes 3810X | Sigma | Z606340-1000EA | |
| BSA | Sigma | A1595 | Bovine serum albumin solution |
| CD24 phycoerythrin-cyanine7 conjugate [PC7] | Life Technologies | A14776 | Mouse IgM; clone MMA. 1:50 |
| CD15/LeX fluorescein isothiocyanate [FITC] - conjugated | BD Biosciences | 332778 | Rat IgG2b; clone M1/69. 1:50 |
| Mouse anti-human LeX antibody | BD Pharmingen | 559045 | Mouse IgM; clone MAM. 1:50 |
| Alexa647 - conjugated EGF ligand | Life Technologies | E35351 | 1:200; Ax647-conjugated EGF ligand |
| CompBeads | BD Biosciences | 644204 | |
| MACS LS separation columns | Miltenyi Biotec | 130-042-401 | Separation columns |
| Anti-mouse IgM microbeads | Miltenyi Biotec | 130-047-301 | |
| Hoechst 33258 | Sigma | 861405 | |
| INFLUX cell sorter | BD Biosciences | FACS sorter | |
| Nikon A1R confocal laser scanning microscope system attached to an inverted ECLIPSE Ti | Nikon Corp. | Confocal laser scanning microscope | |
| NIS-Elements AR.4.13.01 64-bit software | Nikon Corp. | NIS-Elements software | |
| Plan Apo VC 20x DIC objective (NA: 0.75) | Nikon Corp. | ||
| ECLIPSE Ti thermostated chamber | Nikon Corp. | Thermostated chamber | |
| ImageJ | RBS | ||
| FlowJo | Tree Star, Ashland, OR | ||
| FUCCI mice | RIKEN BioResource Center, JAPAN |
