This video showcases a multi-photon time-lapse imaging protocol to visualize the migration of neural crest cells in a zebrafish embryo in real-time with high resolution.
A subscription to JoVE is required to view this content. Sign in or start your free trial.
Method Article
Visualizing Neural Crest Cell Migration in a Zebrafish Embryo Using Multi-Photon Time Lapse Imaging
1.1K views
⸱
June 17th, 2025
In This Article
Abstract
Protocol
All procedures involving animal models have been reviewed by the local institutional animal care committee and the JoVE veterinary review board.
1. Microscope Set-up for Time-lapse Imaging
1. Determining laser settings
1. Determining laser wavelength to use. Use a wavelength that is twice the excitation wavelength of the fluorophore of interest (e.g. wavelength between 880 and 940 nm for green fluorescent protein (GFP).
NOTE: In the present study, the wavelength setting for GFP was between 880 and 940 nm. The higher the wavelength, the lower the output power of the laser.
2. Determine laser transmission. A high percent of laser transmission will kill the embryo, use the lowest level of transmission (recommended). For 24 to 48 h time-lapse studies, as presented herein, keep transmission below 5%.
3. Determine microscope detection systems and ensure that the correct filters for the fluorophore are in place.
NOTE: For multi-photon microscopes, there are multiple detection systems with various sensitivities for the emitted fluorescence. In general, an internal detection system has less sensitivity than an external detection system. For transgenic lines with high levels of GFP expression, the internal detection system is adequate. For transgenic lines with low levels of GFP expression or with other fluorophores (e.g., red fluorescent protein), an external detection system may be required to maintain the percent of laser transmission at a reasonable level. Regardless the detection system used, the correct filters for the fluorophore must be in place.
2. Adjusting software settings on the multi-photon microscope
1. Using the 5X objective, locate the embryo. Manually raise the stage to the highest position and use the fine focus to position the embryo in the middle of the microscope range.
2. Manually lower the stage and change the 5X objective to the 25X water immersion objective (numerical aperture NA, 0.95). Carefully raise the stage to bring the embryo back into focus.
3. In the software, click on the "xyzt" mode for obtaining multiple images at time intervals (t) in the x-y plane over a depth of "z". Use the epifluorescence or brightfield view to find the depth of focus in the area of interest, which will demarcate the Z-stack.
1. In the software, click on "begin" button; for these experiments, the lateral edge of the eye was the beginning of the Z-stack. Click on "end" button; the midline of the embryo was the end of the Z-stack.
NOTE: The step size was 0.3-0.6 μm and there was a total of ~200 steps for a z-stack size of 60 to 120 μm).
4. Click on the menu for adjusting acquisition time and imaging frequency.
For the present system, ~200 steps require approximately 5 min for each z-stack acquisition. For adequate recovery of the fluorophore and survival of the embryo, allow for a ratio of at least 1:3 between z-stack acquisition (laser power on) and recovery time (laser power off).
NOTE: For example, z-stacks are acquired every 20 min with 5 min of z-stack acquisition and 15 min of recovery. For this protocol, larger z-stacks can be obtained, but would appropriately increase the time between z-stack acquisitions, resulting in fewer images over the time-lapse course.
1. With appropriate time for embryo recovery, set the time between z-stacks in the designated window. Set the total length of time for the experiment in the appropriate window.
5. Final software, laser, and embryo adjustments.
1. Turn on the live image setting to make final adjustments to the laser settings. Adjust laser transmission, gain and offset slider bars within the software to optimize the fluorescent image. Also, adjust the orientation of the embryo, as needed, depending on the length of the experiment, anticipated growth of the embryo, etc. Make sure that the area of interest remains within the frame through the duration of the experiment.
2. Turn off the epifluorescent light source as it is no longer needed during time-lapse acquisition. Cover the stage with the laser safety box (Figure 1I). When using the internal detection system, the laser safety box is adequate for protection against background light. Press "start".
NOTE: However, with more sensitive external detection systems, the laser safety box does not block enough background light, and additional covers are required to prevent the disruption of image acquisition.
2. During Time-lapse Acquisition
1. Refill the open bath chamber with time-lapse embryo media every 8-12 h (at least 2 times per day) during time-lapse acquisition through the sliding doors on the laser safety box (Figure 1I).
2. Before opening the doors of the laser safety box, ensure that the microscope is not actively acquiring an image.
NOTE: The use of heaters and circulating media systems is not necessary for time-lapse imaging experiments lasting 24 to 48 h. Indeed, the temperatures of both stage and in-line heaters are difficult to control, and during image acquisition the embryo exhibits an adequate development rate at a temperature range from 25-28 °C. Moreover, circulating media systems tend to overflow and potentially damage the equipment. Thus, all embryos are routinely staged post-acquisition.
3. Post-acquisition processing
1. In the software, click on the "file" menu and choose "save".
2. Open the file in image processing software (see the Table of Materials). Highlight the correct image series. In the software, choose the "Process" menu. Click on 3D Deconvolution and "Apply" to deconvolve each z-stack.
NOTE: The file is large; therefore, this step may take many hours.
3. In the software, under the "Process" menu, click on "maximum projection." Click on "Apply" to initiate maximum projection to generate 1 image per z-stack. Export each maximum projected file (1 image per z-stack) as a tiff.
4. Import individual tiff files into video processing software. Select all tiff files and drag them into the video editor. Adjust length of each image within the video to 0.1s. Export video as mov or mp4 file.
Access restricted. Please log in or start a trial to view this content.
Results
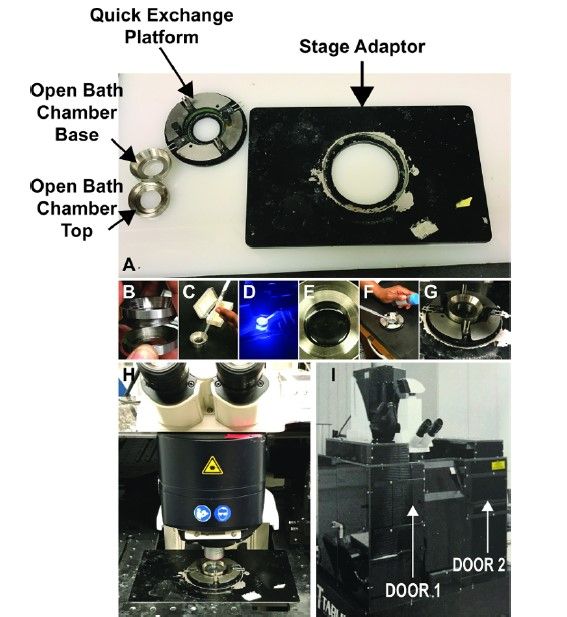
Figure 1. Setup. A. Each component of the embryo mounting apparatus, including the...
Access restricted. Please log in or start a trial to view this content.
Materials
| Name | Company | Catalog Number | Comments |
|---|---|---|---|
| TC SP5 MP Multi-photon microscope | Leica Microsystems CMS GmbH | ||
| Mai Tai DeepSee Ti-Sapphire Laser | SpectraPhysics | ||
| Laser Safety Box | Leica Microsystems CMS GmbH | ||
| Leica Application Suite X (LAS X) Software | Leica Microsystems CMS GmbH | ||
| Photoshop CS 6 Version 13.0 x64 Software | Adobe | ||
| iMovie Version 10.1.4 Software | Apple | ||
| Open Bath Chamber | Warner Instruments | RC-40HP | High Profile |
| Quick Exchange Platform | Warner Instruments | QE-1 | 35 mm |
| Stage Adapter | Warner Instruments | SA-20LZ-AL | 16.5 x 10 cm |
| Low-Melt Agarose | ISC Bioexpress | E-3112-25 | GeneMate Sieve GQA Low MeltAgarose, 25 g |
| Glass Coverslips | Fisher Scientific | 12-545-102 | Circle cover glass. 25 mm diameter |
| High Vacuum Grease | Fisher Scientific | 14-635-5C | 2.0-lb. tube. DOW CORNINGCORPORATION1658832 |
